1985 StarCraft Islander 221v fixer upper.

DCampbell

Seaman
Joined
Aug 16, 2018
Messages
73
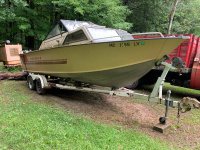
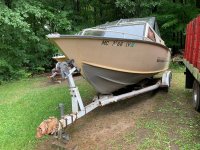
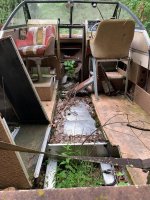
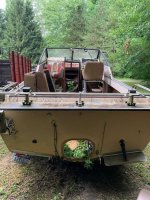
Finally, I found a Islander ! I rebuilt a 1989 Crestliner with a o/b bracket a few years ago , but really was wanting a Islander. I finally came across one last week. made a deal and she is mine. She is a dirty girl. seems like she is in good shape though. maybe a few organic lifeforms have been making use of her . Im stripping her down now. I have a bracket to use or I could cut the transom down. I am leaning towards the bracket for the extra space. I have a 25 inch ob regardless which direction I choose to go. She is missing the two side vent pieces of glass in the windshield and a piece of glass on the side of the cabin. it is cold here , but I have a fabric shelter that is about 12 foot wide by 20 foot long to cover her and work in. Im gonna add on to that with a little ingenuity, lol. There is no way Im waiting for spring, lol
 

Attachments

  • islander1.jpg
    islander1.jpg
    272.3 KB · Views: 46
  • islander 2.jpg
    islander 2.jpg
    267.1 KB · Views: 49
  • islander3.jpg
    islander3.jpg
    126.9 KB · Views: 168
  • islander4.jpg
    islander4.jpg
    127.7 KB · Views: 210

SHSU

Lieutenant Junior+Starmada Splash Of The Year 2019
Joined
Mar 8, 2017
Messages
1,665
Welcome and look forward to your progress!!!

I wish I had the room to take on a project with a boat that big.

SHSU
 

classiccat

"Captain" + Starmada Splash Of The Year 2020
Joined
Dec 20, 2010
Messages
3,405
Welcome!

Big v5 islander!

The WLOD transom opening gives a whole new meaning to hydroponics 😁 .

islander4-jpg.330880
 

racerone

Supreme Mariner
Joined
Dec 28, 2013
Messages
36,287
If You see the asking price of something new like that it will be well worth fixing it up.
 

DCampbell

Seaman
Joined
Aug 16, 2018
Messages
73
If You see the asking price of something new like that it will be well worth fixing it up.
The rack for down riggers and the rod holders had a sticker on it that said nor tech. never heard of them but it is strong and probably stainless.
 

DCampbell

Seaman
Joined
Aug 16, 2018
Messages
73
Welcome and look forward to your progress!!!

I wish I had the room to take on a project with a boat that big.

SHSU
Thanks for the welcome , I dont really have the room either but I just couldn't let it go !
 

Moserkr

Chief Officer + Starmada Splash Of The Year 2021
Joined
Nov 23, 2020
Messages
834
Welcome! 🤤 That boat has a ton of potential. Should be a fun project. Judging by all the greens shes pretty healthy.
 

DCampbell

Seaman
Joined
Aug 16, 2018
Messages
73
Thank you everybody for the welcome, First and foremost let me thank everyone for their response and taking a look at my thread. I tore out the seats and seat boxes today. removed some of the plywood from the floor. I cant believe it is 1/2 inch ! the foam may not be structural but it definitely added support to the floor. I guess that could be considered structural if you stretched a bit, lol. I am pleasantly surprised at the sturdiness of the construction of this boat, the Crestliner I have is a welded hull and this hull seems just as nice for being riveted. The stringers are thick and sturdy. nice. Looks like some ants made a nest in the foam under the floor. Tomorrow I hope to get most the floor and the cuddy strip of wood and hopefully the cuddy partitions out. I have a lot of wires and things to strip out. I will not be using all the gauges . I have the digital Yamaha gauges to put back in , so that makes it a little easier. thanks for looking guys.
 

racerone

Supreme Mariner
Joined
Dec 28, 2013
Messages
36,287
I would take a close look at that foam under the floor.-----I stripped foam out of a boat and threw it away.----Loaded with water it was.-----Going to install ribs for strength and no foam or wood in my boat.
 

DCampbell

Seaman
Joined
Aug 16, 2018
Messages
73
I would take a close look at that foam under the floor.-----I stripped foam out of a boat and threw it away.----Loaded with water it was.-----Going to install ribs for strength and no foam or wood in my boat.
oh yeah , it looks really bad, lol. I will put the pink 2 inch slab stuff back in. i will use 3/4 ply though. one little piece of that foam weighs 5 pounds, lol
 

SHSU

Lieutenant Junior+Starmada Splash Of The Year 2019
Joined
Mar 8, 2017
Messages
1,665
I cant believe it is 1/2 inch ! the foam may not be structural but it definitely added support to the floor. I guess that could be considered structural if you stretched a bit, lol.

Yep, I think 1/2 inch was standard from factory. You will see a lot of guys upped the thickness. Some of us Huskier guys needed the extra support. ;)
Thing to note, when you add the extra thickness it may cause some issues with anything that comes off the floor. So in my case, my helm and windshield had to be adjusted to account for the extra 1/4 inch.

As for the foam, yep sounds like you already found out the issue it has caused. Shovel it out and trash it.

SHSU
 

Watermann

Starmada Splash of the Year 2014
Joined
Jan 12, 2013
Messages
13,753
Welcome to the Starmada tin looney bin, I love me some cabin cruiser tin, not too many het from start to finish, especially the bigger ones.

I'll be interested in seeing your Islanders fuel tank when removed, my 22' V5 Islander tank was missing when I got the boat for my retirement project.

islander3-jpg.330879
 

DCampbell

Seaman
Joined
Aug 16, 2018
Messages
73
Welcome to the Starmada tin looney bin, I love me some cabin cruiser tin, not too many het from start to finish, especially the bigger ones.

I'll be interested in seeing your Islanders fuel tank when removed, my 22' V5 Islander tank was missing when I got the boat for my retirement project.

islander3-jpg.330879
Ill make sure to get some good pics of the tank.
Thanks for the welcome! My Crestliner took about three months longer to get done, so I am gonna just see how this one rolls . I'm hoping to get most of the deconstruction done while it is cold. I have wanted a boat like this forever, lol. Saginaw bay with the 18 footer is okay but getting out in 5 footers is scary. I restored it as a open bow the way it came until I got caught in some big waves and decided I want a closed bow with some protection. I am going to try to build a hard top when I am finished .
 

DCampbell

Seaman
Joined
Aug 16, 2018
Messages
73
Question: On the last boat it was a welded hull. I had the keyhole in the transom welded shut. I have been trying to decide whether to put an oversize plate of aluminum, riveted to the hull and sealed or to have the plated welded over. I have heard that certain types of aluminum were riveted because they were not the right type to be welded. I dont know if this has merit or not. welding did cause my transom skin to warp on the last one, but the bracket bolts and 5200 sealed it good with no leaks. I played with the idea of no bracket just cutting the transom down, either way knee braces will need to be built. smaller splashwells seem to work on the newer style boats. my outboard is a 25 inch leg so that helps. im not against brackets but there is a difference in handling. when a wave comes up from behind the wave first pushes past the outboard, rising right to the bottom of the head, and then it pushes up on the bottom a second later. No way would I use a 20 inch outboard. When you accelerate the lever action from the 30 inch setback of the bracket will sink your engine slightly, where a transom mounted engine stays with the transom so to speak. I believe the extra length of this boat will negate some of that, except the wave from behind. Having to remove the back stern cover to remove the transom means it really isn't that much more work building a splashwell. I would appreciate your ideas and suggestions if you care to throw some out, lol
 
Last edited:

classiccat

"Captain" + Starmada Splash Of The Year 2020
Joined
Dec 20, 2010
Messages
3,405
the tricky part of riveting over the patch is that you'll have rivet bucktails contending with the transom wood...at least the upper-half of the keyhole.

the tricky part of welding is the proximity of the bottom edge of the keyhole to the rivet seam (welding often melts the sealant in that seam) in addition to the distortion of the transom skin if the welder doesn't know what he's doing. It's 5052 aluminum.

I use a trick where I have no bucktail...you chamfer the hole so that the bucktail fills it, then grind the bucktail back to make approximately flush with the aluminum... You're obviously sacrificing alot of holding strength but I think if you overlap the exterior patch and butter it with 5200 (or silkoflex...sp?) you should be OK there.
 

DCampbell

Seaman
Joined
Aug 16, 2018
Messages
73
the tricky part of riveting over the patch is that you'll have rivet bucktails contending with the transom wood...at least the upper-half of the keyhole.

the tricky part of welding is the proximity of the bottom edge of the keyhole to the rivet seam (welding often melts the sealant in that seam) in addition to the distortion of the transom skin if the welder doesn't know what he's doing. It's 5052 aluminum.

I use a trick where I have no bucktail...you chamfer the hole so that the bucktail fills it, then grind the bucktail back to make approximately flush with the aluminum... You're obviously sacrificing alot of holding strength but I think if you overlap the exterior patch and butter it with 5200 (or silkoflex...sp?) you should be OK there.
perfect ! I was going over in my mind how I could remedy this. what did you chamfer the hole with ? melting the sealant in the seam convinced me, lol riveted it is.
 
Top