1985 Mercury 85hp (4 cyl) runs great for 20 minutes then boggs down

Markslund

Seaman Apprentice
Joined
Sep 8, 2020
Messages
41
Thank you guys for your all inputs. I just wish I knew someone who either has my same motor or has actually had it in their hands and could definitively say yes, you have a thermostat, yes you have a thermal sensor, and yes there is or is not a “limp mode” on this model. I can’t physically see it and don’t have the experience to rely on. Thanks again…even

I appreciate that, and as much as I should have a warning horn if available…I’m still trying to track down possible reasons why my motor is bogging down after running great for 20 minutes. If there actually is a Limp Mode and associated parts it would be very helpful.
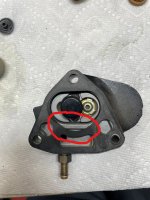
UPDATE: I went back to my fuel pump. I had replaced the diaphragm awhile back before this weird issue started. At that time my motor was surging at idle. I read that it was a classic fuel pump issue, so I obtained a replacement diaphragm from a local repair shop. So until now I had ruled out the fuel pump regarding my recent issues since I had replaced the diaphragm, right? Until recently when someone mentioned that there is a better kit that also includes the check valves for these triangular pumps. With new kit in-hand I pulled off the pump assembly and discovered that the gasket on my new kit was slightly different than the one I had replaced initially. See Image (it didn't seem to match perfectly)
InkedFuel pump gasket before_LI.jpg
Below is with the new gasket (perfect match)
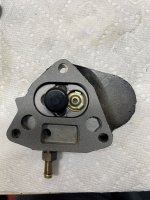
Fuel pump gasket after.jpg
After putting it back together, I went to the lake. Although I had a little issue with starting, I idled out and the motor ran flawlessly for over an hour non-stop. So it looks like my haunted problems are over. Could it have been the fuel pump gasket (or check valves) all along? Sure seems that way.

My only issue now is my idle. Before heading back to the boat launch, I decided to adjust my idle up a bit since I was having a hard time keeping it running when I launched. After I adjusted it however, I had a really hard time starting, and it hesitated pretty bad when I tried to pop out of the hole. I attempted to adjust the idle mixture screws (duel "C" carbs on this 1985 merc). It seemed to come out of it. But I'm still having to push in the choke every time to get it started. My manual states that the rpms should be between 700-800 before adjusting the idle mixture screws. Then after adjusting mixture screws and a successful response, adjust the idle stop for 500-600 rpms. I don't really understand the precedence of that. Please comment. Seems as though my attempt to adjust the idle up after it had been running so great, threw off my idle mixture.

Also, with my issue of hard starting and keeping it running when I initially pop it into gear, would you agree that I am probably running too lean?

Thanks in advance!
 

chris.olson

Petty Officer 2nd Class
Joined
Mar 15, 2009
Messages
173
Then after adjusting mixture screws and a successful response, adjust the idle stop for 500-600 rpms. I don't really understand the precedence of that. Please comment.

Now is a good time to do a full sync and ignition timing. The idle on those is with the throttle plates fully closed. All the idle stop does is adjust the base ignition timing. If all the linkages are properly set it will increase speed off idle, initially, by advancing the timing before the linkage picks up the throttle cam and starts to open the carbs.

I set the carbs initially rich (about 2 1/2 turns out) to get the timing linkage and throttle cam gap set. Then put it in gear and alternately adjust the mixtures and idle stop, and I don't set 'em to 600 - I set 'em to 700-750 because advancing that base timing a bit at idle keeps the engine cleaned out a little better for extending trolling at dead idle..

The leaner you set the idle mixtures, the faster it will idle. But they don't like to idle lean - it will hesitate and sometimes quit if you idle it too lean on sudden throttle opening. There's no real number of turns on the idle screws you can use. Lean one out a bit at a time until it starts to speed up (too lean), then richen it a bit so it slows back down. Do the same with the other one. And you can't do it with muffs on it - the exhaust has to be in the water because having the exhaust out of the water will result in a too-lean idle mixture setting.
 

Mark Grant

Recruit
Joined
Mar 23, 2022
Messages
3
Hi;
When you set your carb I was always told do high speed first,then low , but for sure use a tach ! lol Also as to your merc "bogging down" it is actually starving for gas when you throttle up.If there was too much fuel would simply stall out. Had a merc way back that did the same thing-got rid of it because didn't know then.Check your plug tips also, black=too rich and brown=too lean
 

racerone

Supreme Mariner
Joined
Dec 28, 2013
Messages
37,858
The high speed mixture is NOT adjustable on these carburetors !-----Open the low speed mixture screws 1/8th turn at a time.-----Often the bogging will go away.
 

Markslund

Seaman Apprentice
Joined
Sep 8, 2020
Messages
41
Now is a good time to do a full sync and ignition timing. The idle on those is with the throttle plates fully closed. All the idle stop does is adjust the base ignition timing. If all the linkages are properly set it will increase speed off idle, initially, by advancing the timing before the linkage picks up the throttle cam and starts to open the carbs.

I set the carbs initially rich (about 2 1/2 turns out) to get the timing linkage and throttle cam gap set. Then put it in gear and alternately adjust the mixtures and idle stop, and I don't set 'em to 600 - I set 'em to 700-750 because advancing that base timing a bit at idle keeps the engine cleaned out a little better for extending trolling at dead idle..

The leaner you set the idle mixtures, the faster it will idle. But they don't like to idle lean - it will hesitate and sometimes quit if you idle it too lean on sudden throttle opening. There's no real number of turns on the idle screws you can use. Lean one out a bit at a time until it starts to speed up (too lean), then richen it a bit so it slows back down. Do the same with the other one. And you can't do it with muffs on it - the exhaust has to be in the water because having the exhaust out of the water will result in a too-lean idle mixture setting.
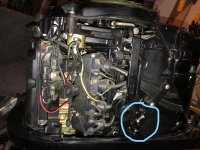
OK Thanks for your reply. I have a few questions. Sorry, I'm learning. Below is a picture of what I was adjusting that I thought would simply bring the idle up and down. It wasn't really responsive in that way. In fact after I messed with it I had a really hard time starting and keeping it running. Was I actually adjusting what you called base ignition timing?
InkedIdle adjust_LI.jpg
Do I need to get a timing light to do this? If so, I may be getting in deeper than I thought. If I don't need one, can you please provide some steps to follow? The manual steps for adjusting idle mixture by ear seemed to work for me, as it ran decent for an hour and was coming out of the hole etc., but then when I tried to adjust the idle up, it seems like it threw off my idle mixture adjustment.

If you have the time to put it in step format start to finish for somewhat of a newbie , it would be very helpful.

One last question-You said not to use muffs, but that this could be done in a barrel? I thought I had to do it in the water. Do I need to remove the prop then in order to check the acceleration?

Thanks again!
 

chris.olson

Petty Officer 2nd Class
Joined
Mar 15, 2009
Messages
173
OK Thanks for your reply. I have a few questions. Sorry, I'm learning.

If you don't have a service manual for the engine, now would be a good time to get one. The linkage you point out moves the trigger plate for the ignition timing and this all has to be synchronized to advance the timing and open the throttles in the right sequence.

Yes, you absolutely need a timing light to set it. The ignition timing has to be advanced to 8 deg BTDC with the throttles closed. There's a primary pickup arm that contacts the throttle cam. The screws on that have to be loosened and turn that pickup arm until it just contacts the throttle cam at 8 deg.

The maximum ignition advance is 32 deg BTDC mechanical, but that will retard to 30 deg BTDC at 5,000 rpm.

It's very difficult to explain without pictures and diagrams, and that's why you need a service manual before you mess with that. If it's not sync'd and timed properly the engine will never run right and you can damage the powerhead.

Yes, you can run the engine in a barrel or test tank, which is actually better than on the lake, to set the idle. As long as your barrel has enough room in it to allow the prop to turn with it in forward gear. If you don't have a big enough barrel or test tank, then back the trailer and boat into the water at the landing, and do it there with the boat tied on the trailer close to shore where you have access to tools that you need without (hopefully) dropping anything in the lake.
 

Markslund

Seaman Apprentice
Joined
Sep 8, 2020
Messages
41
If you don't have a service manual for the engine, now would be a good time to get one. The linkage you point out moves the trigger plate for the ignition timing and this all has to be synchronized to advance the timing and open the throttles in the right sequence.

Yes, you absolutely need a timing light to set it. The ignition timing has to be advanced to 8 deg BTDC with the throttles closed. There's a primary pickup arm that contacts the throttle cam. The screws on that have to be loosened and turn that pickup arm until it just contacts the throttle cam at 8 deg.

The maximum ignition advance is 32 deg BTDC mechanical, but that will retard to 30 deg BTDC at 5,000 rpm.

It's very difficult to explain without pictures and diagrams, and that's why you need a service manual before you mess with that. If it's not sync'd and timed properly the engine will never run right and you can damage the powerhead.

Yes, you can run the engine in a barrel or test tank, which is actually better than on the lake, to set the idle. As long as your barrel has enough room in it to allow the prop to turn with it in forward gear. If you don't have a big enough barrel or test tank, then back the trailer and boat into the water at the landing, and do it there with the boat tied on the trailer close to shore where you have access to tools that you need without (hopefully) dropping anything in the lake.
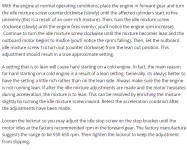
I do have a service manual and I just read through the steps again for the Idle Mixture Adjustment. Once again, the way I read it, after I have adjusted the idle mixture screws on each of the carbs, it then states to adjust the Idle Stop Screw to the 550-650 range. Please see below snip:

Capture.PNG

This is the screw that I adjusted (circled in previous picture). So, I'm still having a hard time understanding how my adjusting the Idle Stop Screw, as dictated by the service manual, messed up my timing.

I'm just trying to understand your comments what I may have done wrong and what the correct process should be for adjusting the idle. Is it just a good idea to check timing?
 

racerone

Supreme Mariner
Joined
Dec 28, 2013
Messages
37,858
Only the maximum timing advance is set on your motor.-----There is a MUCH MISUNDERSTOOD idle timing.----It is called " throttle pick up " and it is the point where throttle plates open.-----Where the timing is when engine idles smoothly does not matter and looks after itself.
 

Dave1027

Lieutenant Junior Grade
Joined
May 25, 2010
Messages
1,080
Only the maximum timing advance is set on your motor.-----There is a MUCH MISUNDERSTOOD idle timing.----It is called " throttle pick up " and it is the point where throttle plates open.-----Where the timing is when engine idles smoothly does not matter and looks after itself.
I don't want to hijack the thread but am curious about the "throttle pickup point timing". The manual for my Merc (4 cylinder) does not state the pickup point in timing degrees. It only references it to the throttle cam location. Is it not as critical on the 4 cylinder motors?
 

chris.olson

Petty Officer 2nd Class
Joined
Mar 15, 2009
Messages
173
This is the screw that I adjusted (circled in previous picture). So, I'm still having a hard time understanding how my adjusting the Idle Stop Screw, as dictated by the service manual, messed up my timing.

Because that screw adjusts the timing, not the throttle opening. You need to verify that the sync between the timing and throttles is right. The timing needs to be at 8 deg BTDC before it opens the throttles or the engine will bog out and hesitate as soon as it goes off the idle circuit in the carbs.

1) put a white paint mark on 8 degrees BTDC.

2) Start the engine and push the throttle handle on your Quicksilver control until your timing shows the white paint mark lines up with the pointer.

3) Shut the engine down, but don't move the throttle handle - leave it at where it was to get 8 deg BTDC timing.

4) Look at the linkage and cam that opens the throttles on the carbs. The throttle plates should be fully closed yet. There is a pickup arm that contacts the cam on the throttle shaft and that should be just touching the throttle cam. That pickup arm is adjustable.

If you do not have that synchronization set properly between timing and throttle opening the engine is not going to respond properly. After you get that set, then you can adjust your idle mix and speed. All the speed adjusting screw does is advance or retard the base timing - it doesn't move the throttle plates in the carbs (or it had better not be).

The last thing to check, as long as you got the timing light on it, is the maximum advance.

1A) Put another paint mark at 32 deg BTDC.

2A) Take all the plug wires off and ground them with jumper wires so the engine can't start.

3A Push the throttle handle on the Quicksilver control wide open.

4A Crank the engine with the starter and observe with the timing light if your white paint mark lines up with the pointer. If it doesn't adjust the maximum advance stop screw.

If you do the maximum advance adjustment static without the engine running it will be set to 32 deg BTDC. If you do it on the lake at wide open throttle it will be 30 deg BTDC @ 5,000 rpm.
 

Chris1956

Supreme Mariner
Joined
Mar 25, 2004
Messages
27,861
Gee, I would expect the idle pickup timing to be 0-9*ATDC and max spark advance to be 21* BTDC, as is standard for all ADI motors.

The 32* spark advance was for 1960s magneto ignitions, if I remember correctly.
 

chris.olson

Petty Officer 2nd Class
Joined
Mar 15, 2009
Messages
173
If the OP's engine is '85 production it's a 75, not an 85, and it has the old switchbox. Does not have a timing advance/retard module. Whether it's a 800, 850, 80 or 75 they all use the same 67 cube powerhead. Depending on the serial number break, if it's got the 464 mark on the flywheel, then you have to use a dial indicator on the piston to align the timing pointer because the timing pointer is adjustable.
 

chris.olson

Petty Officer 2nd Class
Joined
Mar 15, 2009
Messages
173
Oh, and the specs in the factory service manual are for good gas because these engines have 9.5:1 pistons. MTBE is banned so ethanol-free "recreational gas" has no oxygenate in it. Your carb engine will run lean on E10 unless you re-jet the carbs and you will have to retard the timing to keep it from pinging.

Of the two options for fuel, re-jetting for E10 will produce more power than burning the "recreational gas". The modern higher-compression fuel injected engines can take advantage of this. Your old carb engine can't without some mods.
 

Chris1956

Supreme Mariner
Joined
Mar 25, 2004
Messages
27,861
Chris, That is an ADI engine. That makes it 1976 or newer on the 4 cylinder motors. I would like to know where you got those idle pickup and max spark advance specifications. As far as I know, all ADI motors use a 0-9*ATDC for idle pickup and 21* BTDC for max spark advance.
 

Markslund

Seaman Apprentice
Joined
Sep 8, 2020
Messages
41
Because that screw adjusts the timing, not the throttle opening. You need to verify that the sync between the timing and throttles is right. The timing needs to be at 8 deg BTDC before it opens the throttles or the engine will bog out and hesitate as soon as it goes off the idle circuit in the carbs.

1) put a white paint mark on 8 degrees BTDC.

2) Start the engine and push the throttle handle on your Quicksilver control until your timing shows the white paint mark lines up with the pointer.

3) Shut the engine down, but don't move the throttle handle - leave it at where it was to get 8 deg BTDC timing.

4) Look at the linkage and cam that opens the throttles on the carbs. The throttle plates should be fully closed yet. There is a pickup arm that contacts the cam on the throttle shaft and that should be just touching the throttle cam. That pickup arm is adjustable.

If you do not have that synchronization set properly between timing and throttle opening the engine is not going to respond properly. After you get that set, then you can adjust your idle mix and speed. All the speed adjusting screw does is advance or retard the base timing - it doesn't move the throttle plates in the carbs (or it had better not be).

The last thing to check, as long as you got the timing light on it, is the maximum advance.

1A) Put another paint mark at 32 deg BTDC.

2A) Take all the plug wires off and ground them with jumper wires so the engine can't start.

3A Push the throttle handle on the Quicksilver control wide open.

4A Crank the engine with the starter and observe with the timing light if your white paint mark lines up with the pointer. If it doesn't adjust the maximum advance stop screw.

If you do the maximum advance adjustment static without the engine running it will be set to 32 deg BTDC. If you do it on the lake at wide open throttle it will be 30 deg BTDC @ 5,000 rpm.
Thanks Chris Olson. This is very helpful. I'm getting very frustrated with the downloaded manual I have from PDF Manual Publisher 2005. It is very sketchy. Any recommendations for a better manual going forward?

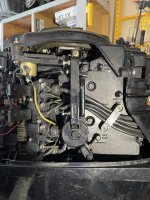
In your step 4, can you identify from the picture below can you identify the adjustment for the pickup arm?

Timing Stops.jpg

Also, can you please identify the Maximum Advance Stop Screw as mentioned in your 4A step?

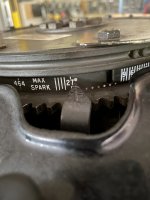
Then on my flywheel, I'm not sure what the marking deviations are in order to determine 32° BTDC as you mention in your Step 1A. 27° is clearly marked...do I assume these are one degree marks and there would be a mark where the 2 is, and therefor 32° is actually the 4th actual mark before the 27?

Flywheel timing marks what is 32.jpg

Lastly just to understand the sequence, after I verify/adjust the sync & maximum advance steps you laid out.... Then I should adjust my idle mixtures screws on both carbs followed by adjusting the Idle Stop Screw for the correct idle RPM's ?? And my manual states 550-650 for a final idle setting. Do I have this in order?

Oh, and...is there any merit to what Chris1956 stated about your specs ?
He said, "Gee, I would expect the idle pickup timing to be 0-9*ATDC and max spark advance to be 21* BTDC, as is standard for all ADI motors. The 32* spark advance was for 1960s magneto ignitions, if I remember correctly."

Thanks again Chris!
 

racerone

Supreme Mariner
Joined
Dec 28, 2013
Messages
37,858
Maximum spark advance is clearly identified.----It is the top screw on that lever.---Leave motor stopped.-----Turn propeller.-----Have an assistant SLOWLY move control lever to full throttle.------Observe movement of linkages.-----The maximum spark advance rarely needs to be adjusted for the life of the motor.
 

chris.olson

Petty Officer 2nd Class
Joined
Mar 15, 2009
Messages
173
Mark, Chris1956 is unfortunately not correct, and neither was I. Thanks for the detailed photo - it helps to identify which engine you have.

You have an engine with the 464 mark I mentioned on the flywheel. The screw on the bottom left in the photo of the spark arm is the throttle pickup. If you look up on top you'll see the pickup arm and throttle cam with two pins on it.

So the adjustments for this engine are different than what I gave you due to the serial number break. That timing pointer is adjustable on this engine and that needs to be verified first. This is the reason for that 464 mark. You take the plug out of the #1 cylinder and rotate the engine by hand until the piston is at TDC. Install a dial indicator with the pointer on the piston crown thru the plug hole and zero it. Turn the engine clockwise until the piston is coming back up in the bore. When the piston reaches .464" BTDC that 464 mark should line up with the pointer. If it doesn't, loosen the bolt on the pointer and adjust it. Everything is based off that.

If you don't have a dial indicator you can use a vernier caliper. Rest it on the top of the plug hole and slide it until the stinger touches the piston. Look at the reading on the caliper. Add .464" to the reading and adjust the stinger that much further out and lock the caliper with the thumbscrew. Turn the engine until the piston contacts the stinger.

The rest is all the same except the throttle pickup setting for your serial number range is TDC (0 degrees) instead of 8 degrees. You can adjust that bottom left screw on the spark arm to get that. Adjust the spark stop to get 27 deg with your timing light. The marks to the left of the 27 are 29, 30, 31 and 32 degrees.

At full load and throttle in the test tank or on the lake it will actually be at 30 deg BTDC if you check it with your timing light - identical to the early serial number. Where you set the static spark stop determines how to get that, and that change was at serial number 4423111. I'm not exactly sure what Mercury changed to get the different specs at the serial number break, but if you dial indicate the piston it's the same 4.2mm (0.165") BTDC on either one. I assume it had something to do with that timing pointer and a change to the curve of the pickup arm, and that's why the 464 mark on the flywheel. They use that calibrate the pointer based on piston travel.

I only use the factory service manual. I have all the manuals for the inline fours and sixes back to the 1950's. I'm not sure if those are available from Mercury anymore.

Also, as I mentioned, the fuels we have today are not the same as when the manuals were written. So those old timing specs are not cast in stone. Ethanol is frowned on in marine because of water. But I run E10 in both of my old Mercury outboards. It is a better and cleaner burning fuel than the old MTBE formulated gasoline used to be.
 

chris.olson

Petty Officer 2nd Class
Joined
Mar 15, 2009
Messages
173
Mark,
I can see where some of the confusion lies with these aftermarket manuals. Just for the heck of it I downloaded one from tin boats that I think is a PDF of an aftermarket manual from marineengine.com. They have the specs messed up in the Appendix, compared to the factory service manual.

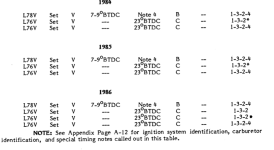
You will see here that for 1985 production tuneup specs for your 75, they show 8 deg throttle pickup with Note 4 for the spark stop. This is the 32 degree static timing vs 30 degrees actual @ 5,000 rpm (they show 5,500 rpm, which is incorrect - it actually retards to 28 deg @ 5,500).

This is a snapshot of that aftermarket manual.

Screen Shot 2022-06-26 at 1.01.49 PM.png

And then in the Notes part you see this, 32 degrees at crank (static) yields 30 deg @ 5,500. It should be 30 deg @ 5,000 and 28 deg @ 5,500.

Screen Shot 2022-06-26 at 1.03.32 PM.png

Interestingly, you can see in Note 2 above where they note the serial number break for throttle pickup timing, but they don't have the correct values for the early serial numbers - it is 8 deg as shown in the first snapshot. And somehow they are associating this with what heat range spark plug is used, when in the real world this does not apply. The heat range of the spark plug only determines how hot the plug runs (length of the insulator). It does determine when the fire is lit in the combustion chamber unless the engine is pre-igniting from a plug that is too hot.

And then even further mistaken, they show the timing for the later serial number in the first snapshot to be 23 and this is not correct. 23 is not even marked on your flywheel - 27 degrees is. And then you have the 29, 30, 31 and 32 degree marks for full load timing testing.

So I think the people that wrote some of these aftermarket manuals are confused like politicians over what issues apply to what. I would not recommend using aftermarket manuals and get a factory service manual if at all possible.
 

Markslund

Seaman Apprentice
Joined
Sep 8, 2020
Messages
41
Mark,
I can see where some of the confusion lies with these aftermarket manuals. Just for the heck of it I downloaded one from tin boats that I think is a PDF of an aftermarket manual from marineengine.com. They have the specs messed up in the Appendix, compared to the factory service manual.

You will see here that for 1985 production tuneup specs for your 75, they show 8 deg throttle pickup with Note 4 for the spark stop. This is the 32 degree static timing vs 30 degrees actual @ 5,000 rpm (they show 5,500 rpm, which is incorrect - it actually retards to 28 deg @ 5,500).

This is a snapshot of that aftermarket manual.

View attachment 364051

And then in the Notes part you see this, 32 degrees at crank (static) yields 30 deg @ 5,500. It should be 30 deg @ 5,000 and 28 deg @ 5,500.

View attachment 364052

Interestingly, you can see in Note 2 above where they note the serial number break for throttle pickup timing, but they don't have the correct values for the early serial numbers - it is 8 deg as shown in the first snapshot. And somehow they are associating this with what heat range spark plug is used, when in the real world this does not apply. The heat range of the spark plug only determines how hot the plug runs (length of the insulator). It does determine when the fire is lit in the combustion chamber unless the engine is pre-igniting from a plug that is too hot.

And then even further mistaken, they show the timing for the later serial number in the first snapshot to be 23 and this is not correct. 23 is not even marked on your flywheel - 27 degrees is. And then you have the 29, 30, 31 and 32 degree marks for full load timing testing.

So I think the people that wrote some of these aftermarket manuals are confused like politicians over what issues apply to what. I would not recommend using aftermarket manuals and get a factory service manual if at all possible.
THANKS CHRIS OLSON!
You put a lot of time into helping me and I appreciate you very much for that! My motor is now running great and I look forward to many hours spent on the water. I hope that others too may benefit from this post, especially after you uncovered the errors that have been circulated through these on-line repair manuals. So frustrating! Knowledge from experts like yourself who have the experience are priceless. Thanks again!
-Mark
 

chris.olson

Petty Officer 2nd Class
Joined
Mar 15, 2009
Messages
173
I hope that others too may benefit from this post, especially after you uncovered the errors that have been circulated through these on-line repair manuals.

That manual that I took the snapshots from was a downloaded one that I think is a scan of aftermarket manuals sold by another online outlet. Intertec used to publish the factory manuals for Mercury Marine and occasionally those show up on eBay for sale for $30 or $40 dollars. A lot of times they are beat up, have oil or grease stains on them, but they are still a good buy if you come across one for sale. I've always believed the factory manuals are the best. Aftermarket is kind of like trying to service your car or truck with a Chilson manual - it tends to have a generic abbreviated summary of what a real overhaul or service manual has in it, and some of the information is not correct. I'm not saying all the aftermarket manuals are like that, but if you have two of them from different publishers and they don't agree, time to investigate and compare to a real factory service manual, then make notes in your aftermarket one with the corrections.
 
Top