1984 Evinrude E115TLCRD starboard cylinder heat

CPAT22

Cadet
Thread starter
Joined
Jun 13, 2017
Messages
10
Hey all,
New member and first post. Be gentle. lol
I am resurrecting my 1984 Evinrude 115/Mako 17 , from 10+ years of inactivity.
I wont go into what all I had done to the motor upon "storage" or what I have done to bring it back and live.I DID replace the water pump and housing already BEFORE starting the motor.
I have gotten the motor to run and idle fine with the hose and earmuffs.When doing so I checked the cylinder temps with my hands after a few minutes. The port side,I was able to keep my hand on with no problem. The Starboard, was hot to the touch. I shut it down right away.
I am trying to figure out whats up and in doing so, I removed the hoses from the heads down to the thermostats/bypass manifold. I had let it cool down and restarted just for 10 seconds to see if any water was coming out of the head of the starboard side and THERE WAS NONE. Well, maybe a tiny trickle but thats it.
My question is, does this mean that the head is occluded,poppet valves or whatever are stuck ,etc??? I would assume that this is so, since the port side is flowing fine.
I believe the thermostats are original( believe it or not) as I am the second owner and have owned it since 1990.
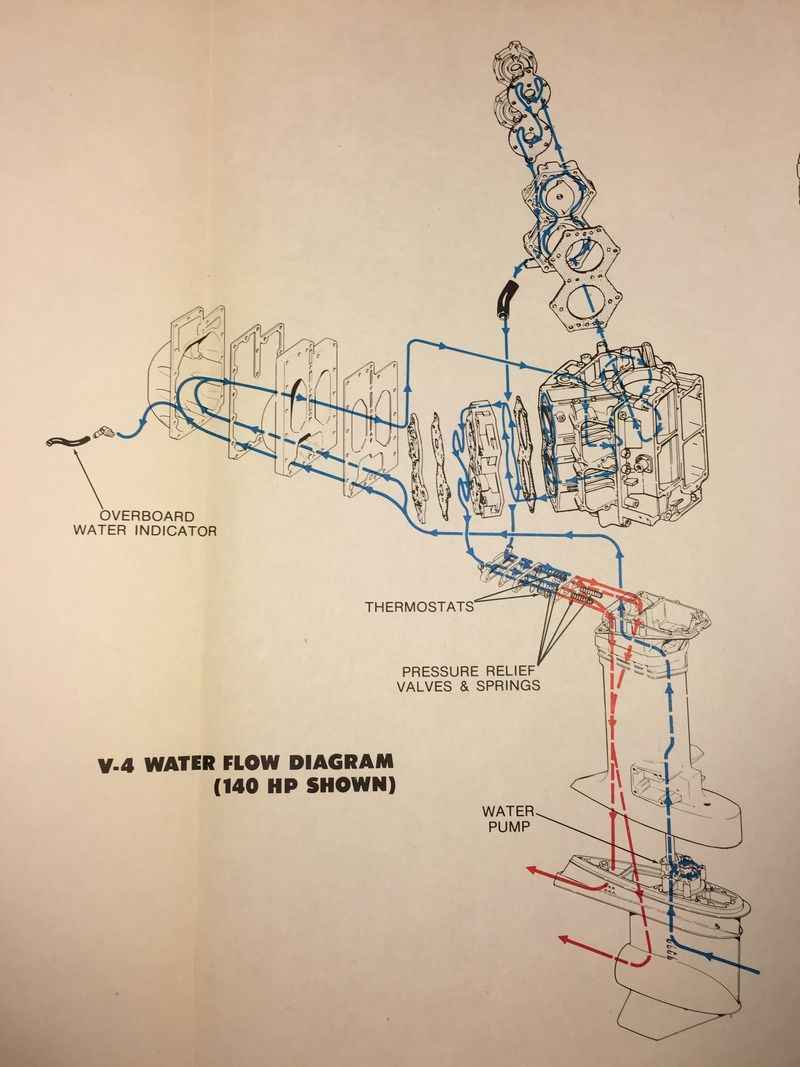
The water flow is basically from the water pump, up through the heads, and then down to the thermostats/bypass valves and out of the bottom of the motor ?
I'm thinking from what I have read that I may need to remove the head and replace/ clean parts and re-assemble with new gaskets, etc??
Thanks for any help and advice .
Craig


​
​
​
 

Joe Reeves

Supreme Mariner
Joined
Feb 24, 2002
Messages
13,262
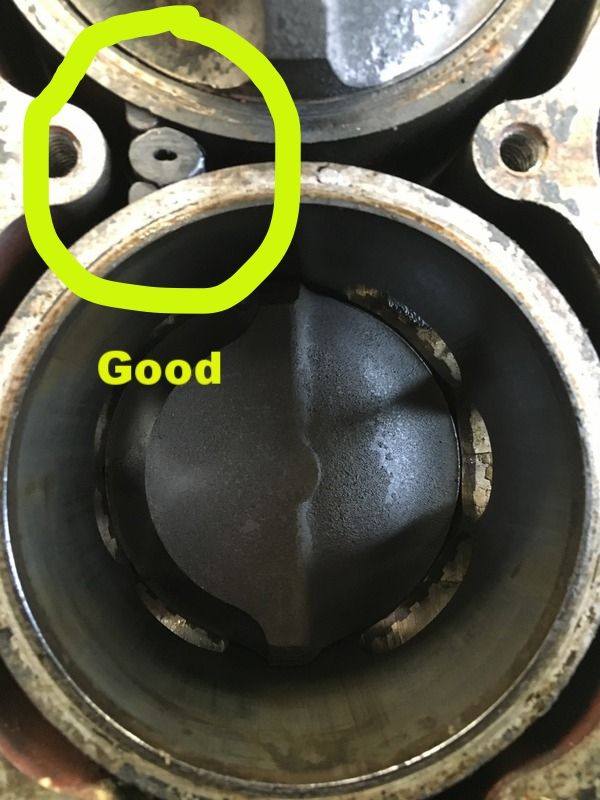
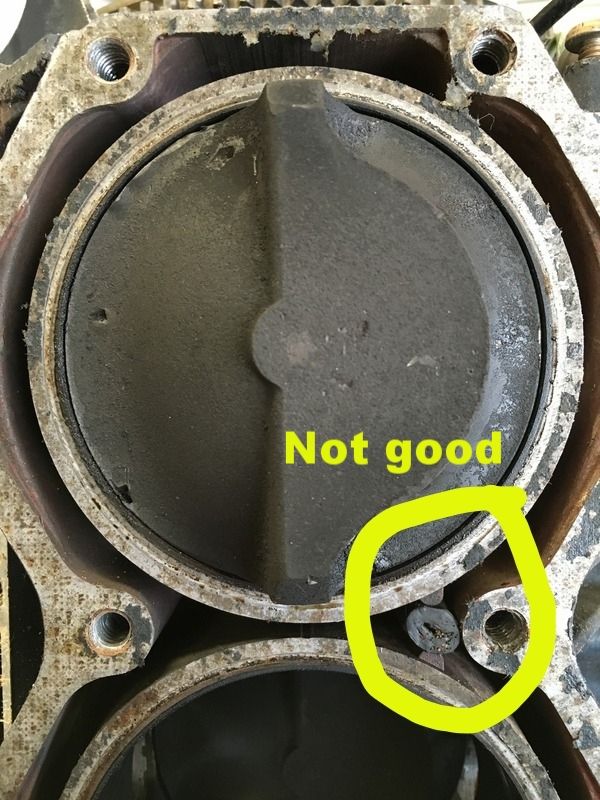
There are rubber water deflectors to control the flow of water in the water passages, accessible only when the cylinder head is removed. They have a habit of swelling after a number of years and that blocks the flow.... check them.

********************
(Water Deflectors)
(J. Reeves)

Water deflectors are actually lengths of 3/8" outside diameter rubber hose, installed between the top cylinder and any cylinder beneath it, and also between the bottom cylinder and the block. The purpose of the deflectors is to have the water follow a definite path around the cylinder walls. Unfortunately the deflectors between the cylinders will at times swell sideways due to either a previous bad overheating problem, or simply due to age and salt corrosion. This causes a water flow restriction which usually allows the water to cool sufficiently at low rpms but not at the higher rpms.

This hose material can be purchased reasonably at any automotive parts type store if you care to make your own, or you can purchase individual deflectors at any Evinrude/Johnson dealership at a somewhat higher cost.

Removing and installing them can be a hassle at times, but not always. I use a sharply pointed scribe with about 1/4" of the tip bent at a right angle whereas I can reach in, jab the tip sideways into the rubber, then yank it out. It's necessary to clean the seating surfaces where the rubber contacts the block with a small rat tail file to eliminate salt deposits etc. When installing the new rubber deflector, coat the deflector and the metal surfaces with WD40 which will act as lubrication to allow it to go in as easily as possible.

Make sure that you insert something into that deflector area before cutting and installing the deflectors if you make your own so that you will be certain that they are the right length and also that they will be seated properly. Usually a very small amount will be left extending above the block sealing area..... simply cut the excess off with a single edge razor blade.
 

interalian

Commander
Joined
Jul 23, 2009
Messages
2,105
Here's the head waterflow. Enters at the bottom through the block.

7b0657d8-2b0d-4345-bf22-149fd3897c30_zpswljjopiz.jpg
 

CPAT22

Cadet
Thread starter
Joined
Jun 13, 2017
Messages
10
Joe,
Thank you for the reply. I will order the head cover and head gasket and pull it apart and check all of the above. If the hose is just 3/8 hose then I believe I will make my own.I can measure carefully with a Stainless ruler that I have and cut to length. I already ordered a new thermostat kit and will install that,also.
Should I remove the head cover from the head and clean under there as well ? It appears from reading and searching on this forum that I probably should. If I order the gasket I might as well go ahead and do it.Gasket sealant to the head cover gasket but NOT the head gasket ?
Was I correct on the basic flow of water through the motor on my original post ? I am pretty sure there is also a recirculation and then when the water heats up it goes through the thermostats.
Thanks again for your reply.
Craig
 

interalian

Commander
Joined
Jul 23, 2009
Messages
2,105
Here's the waterflow for the whole engine. There are small bleeds in the thermostat block that let a little water past to bleed the air out and let water past to open the thermostats. If they're blocked the thermostats won't open. There's no recirculation. Thermosats cover low speed use, and at high speed/water pressure, the poppet valves are pressed open for more flow.

If you take the cylinder head water covers off, be prepared for broken bolts.

IMG_0707_zpsthvxytt1.jpg
 

rothfm

Ensign
Joined
Sep 26, 2006
Messages
920
On these older motors, I started to remove the head covers and have been finding alot of build-up. If you can get these bolts out, its worth a look.
 

interalian

Commander
Joined
Jul 23, 2009
Messages
2,105
I had removed the water covers and noticed a lot of build up of salt, but it was on the opposite side of the gasket, not on the head itself. If you have an otherwise good cooling system, you can see if you have good flow by removing the bottom hoses and running the engine. If you see good equal flow from both sides you can assume there aren't any issues with blockages since the water has to wend its way around all the areas just to get out the hose.
 

CPAT22

Cadet
Thread starter
Joined
Jun 13, 2017
Messages
10
Thank you Interalian for the pics ! Those will help me .
rothfm also thanks for your input.
Maybe I will start with just the head first and then possibly the cover .( I have ALWAYS flushed the motor after being in the salt water.So hoping that has helped over the years).
 

CPAT22

Cadet
Thread starter
Joined
Jun 13, 2017
Messages
10
CPAT22
CPAT22 replied Today, 03:16 PM
Well I pulled the head on the starboard side. Nasty and plugged up.I cleaned the head and the block side and got everything opened up. I blew through the water output tube at the bottom of the head that goes to the thermostat. It's almost completely occluded. So,I started removing the 16 bolts that hold on the front cover to the head, 14 came off easy. Two I had to heat, and they still snapped. Will have to deal with that. Still have to get the cover off and I will send some pics along as soon as I can figure out how to get them down to the size limit,so it doesn't keep failing to upload. Craig
 

Joe Reeves

Supreme Mariner
Joined
Feb 24, 2002
Messages
13,262
Unless you're content with drilling out those small 1/4 diameter bolts, have a machine shop remove them. Don't chance damaging the head.
 

Fed

Commander
Joined
Apr 1, 2010
Messages
2,457
When it's cold the thermostats are shut so you would have been blowing through a tiny by-pass hole designed to let a small amount of cold water out so the hot water can get into the thermostat housing and activate the thermostats.

FWIW I'd only fit genuine OMC deflectors, aside from any size variations with fuel line there's also the material to consider.
They do swell and they also build up corrosion between the deflectors & the cylinder walls which crushes the deflectors & forces them out to block the water passages.
 

CPAT22

Cadet
Thread starter
Joined
Jun 13, 2017
Messages
10
One has some stud left now that I have the cover off. The other one I drilled a little bit,down so Incouodnget the cover off. I have them soaking w PB Blaster for a bit until the gaskets get here. If I can't break them loose, the machine shop maybe a good idea. Or an Easy Out ..?
 

interalian

Commander
Joined
Jul 23, 2009
Messages
2,105
One has some stud left now that I have the cover off. The other one I drilled a little bit,down so Incouodnget the cover off. I have them soaking w PB Blaster for a bit until the gaskets get here. If I can't break them loose, the machine shop maybe a good idea. Or an Easy Out ..?

Do yourself a favour. Don't try to remove them yourself. And forget about 'easy out' solution - you'll just break the thing in the bolt and then you have a hardened bit of steel to work through. Take the head to a shop and have them weld a nut to the stub, then the stub should just turn out after the weld sets (pretty much instantly after it stops glowing).
 

CPAT22

Cadet
Thread starter
Joined
Jun 13, 2017
Messages
10
I must source the head cover bolts that I broke off. They have the grade 8 dashes on top and are magnetic so they are grade 8 steel bolts.
Definitely wont pay $7 each for them. So will look at hardware store. Guess the head was painted for corrosion protection.And surprised they snapped,being grade 8!
I guess also that steel is a better option for dissimilar metals ? ( steel and aluminum,vs stainless and aluminum)
 

CPAT22

Cadet
Thread starter
Joined
Jun 13, 2017
Messages
10
Can anyone post me the torque specs and order of torque for the head and the head cover??

I need to get a manual and have read that the Clymer and the other manual aren't worth a crap. Does anyone have advice on which site to download or buy a hard copy ?? It would also be appreciated.
Craig
 
Top