1984 Bayliner Capri Rebuild

JoeyInKC

Seaman Apprentice
Joined
May 1, 2009
Messages
31
Hey there, just thought I would share my $500 investment.

I bought an 84 Capri on the 26th of April. Knowing that the floor was beyond repair, I bought it anyways. I figured this is my chance to have a decent boat with a new floor.

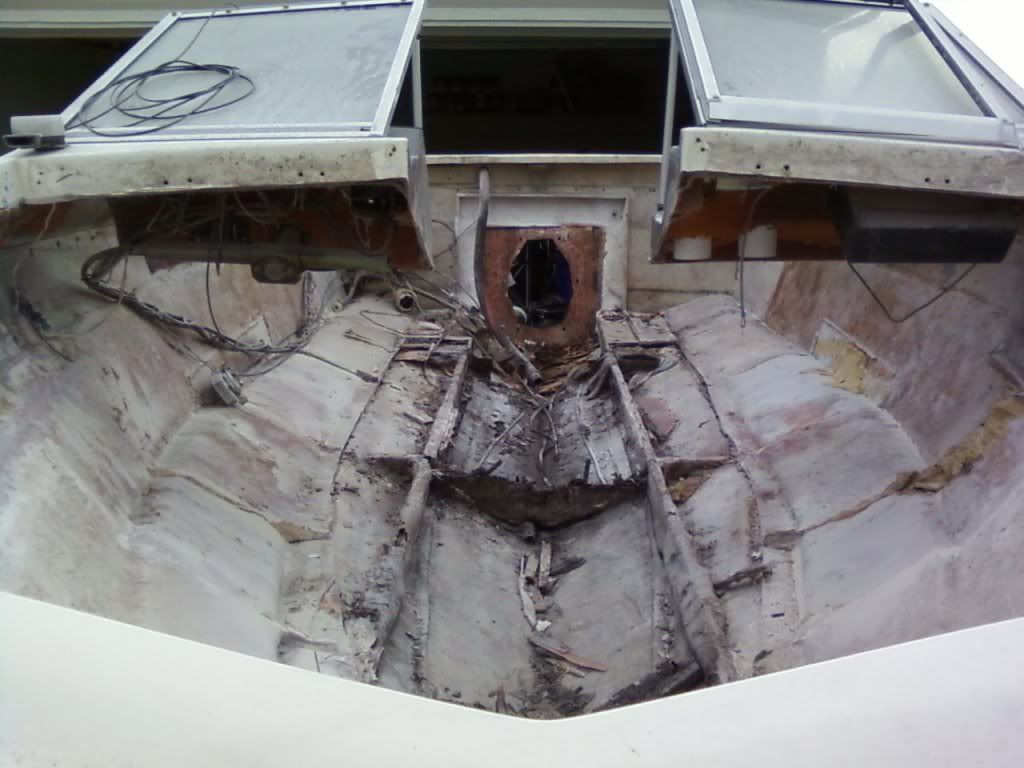
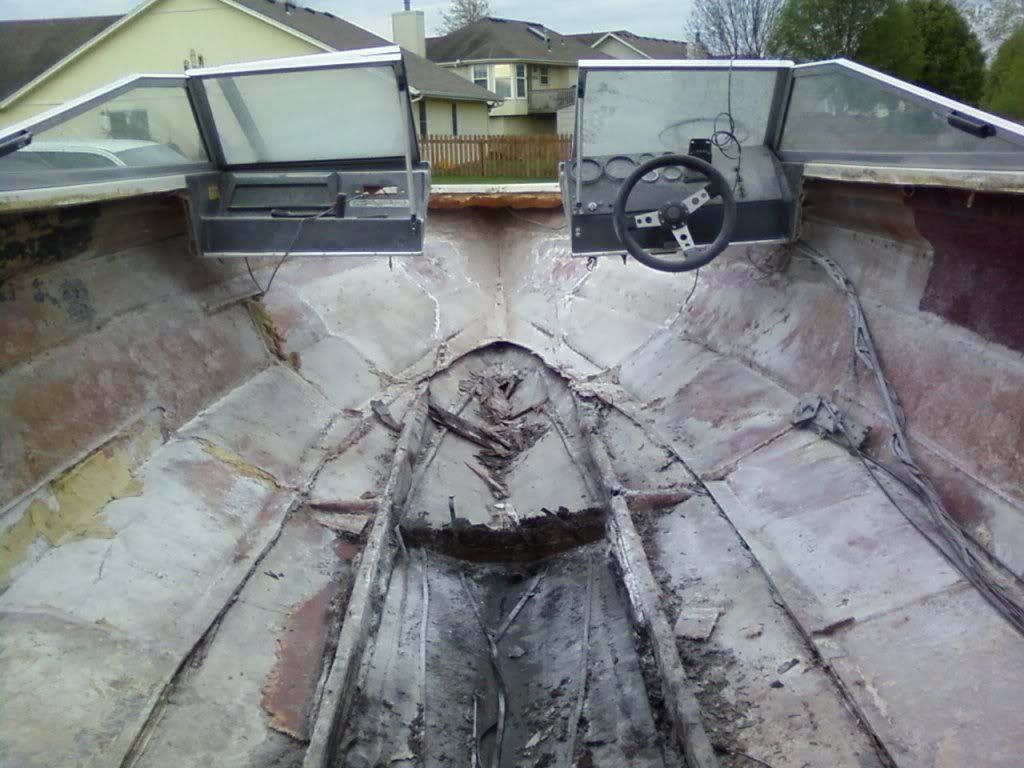
Well, I tore out the floor a few days ago, and between working full-time and the lovely rain we have been having, I finally got to get back at it today after work. I spent about 2 hours solid of some more fun with the grinder.

I still have some more grinding to do to get it ready for the new floor. I also have to cut out the old stringers and of course the transom is rotten too.

But hey, it was only $500, right? I don't mind, and I enjoy doing it.

I have a Volvo I/O 4cyl. I don't know why I havent removed the engine yet, but I need to so I can replace the transom. Does anyone have the knowledge or literature on that motor and outdrive? It has a Volvo Penta 270 on it. Any parts manuals will be greatly appreciated.

I will post some pictures tomorrow and welcome all critism, feedback, or suggestions.

Thanks,

Joe
 

proshadetree

Lieutenant Commander
Joined
Jul 19, 2008
Messages
1,887
Re: 1984 Bayliner Capri Rebuild

Why would you want to fix a bayliner? I dont know but I have been working on mine.Check the I/O section for engine info.I love the way these old boats look and ride.I have for years just got one once the floor fell out and the engine froze and busted.Keep at it and youll be boating soon.Lots of good info here.Good thing you know your transom is shot I put mine together and had a leak.It was exhaust, but I was that close.Yep it was rotten.Do it right the first time.I speak from experience no scence doing it twice.Check out f-14's thread it great work and pics.Get some pics up and Welcome.
 

capri1600

Petty Officer 2nd Class
Joined
Apr 20, 2009
Messages
150
Re: 1984 Bayliner Capri Rebuild

Welcome! I'm doing a 1983 Bayliner Capri 1600. It came free on a very nice $200 Escort trailer with the $800 85hp Force I bought. The previous owner had started cutting out the floor and went through the hull with the grinder and gave up. I too am taking it down to a bare fiberglass hull including grinding down the seams before I begin fixing and rebuilding. I LOVE the sequential lift hull and the way they ride/run on the water! I just came in from a grinding session.

DSCN2902.jpg
 

Mark42

Fleet Admiral
Joined
Oct 8, 2003
Messages
9,334
Re: 1984 Bayliner Capri Rebuild

Welcome to iboats! This is the perfect place to learn and get help with fixing up your Bayliner. Quite a few Bayliner owners on the boards. Get us some pics of your boat!
 

bear_69cuda

Commander
Joined
Oct 10, 2008
Messages
2,109
Re: 1984 Bayliner Capri Rebuild

Welcome!

I did some modifications on my Bayliner... Plenty info here for sure!

Check repair and maintenance forum for I/O questions.... Smart folks here at iboats!
 

JoeyInKC

Seaman Apprentice
Joined
May 1, 2009
Messages
31
Re: 1984 Bayliner Capri Rebuild

Well here is an end to day 5 of the rebuild...

I got the motor and outdrive out, about 90-95% of the floor, just got the stringers to go for the most part. While I was grinding and all that, my wife was tearing the seats apart to check to see if the seat foam was reusable....

Had to pull the tires off of the trailer so the engine hoist with the engine could clear the side of the boat.

Some words of advice: 1. Don't do like I did and start the rebuild in your driveway just to find out that your boat is too long to fit in the garage. 2. Your driveway may look a little white trash like with all the boat parts sitting in it :).

Well here are some pics of the progress thus far...

day5progress-2.jpg


day5progress-3.jpg
 

Mark42

Fleet Admiral
Joined
Oct 8, 2003
Messages
9,334
Re: 1984 Bayliner Capri Rebuild

Joey, Nice job of demo!! One common problem with bow riders is that the windshield does not line up correctly after the stringers and deck are installed. Now is a good time to close the windshield, use some spacers to keep the proper gaps, and screw some supports across the hull to keep it lined up while installing the new stringers, deck etc.

Are you rebuilding like original, or are you going to make some custom changes?

Mark.
 

lowkee

Lieutenant Commander
Joined
Dec 13, 2008
Messages
1,890
Re: 1984 Bayliner Capri Rebuild

That is some major progress for just 5 days! You are a machine! It took me a good 3 weeks to hit that mark!

Like Mark said, don't forget you are rebuilding an entire interior. You can make it whatever you want, not just how Bayliner intended. Make it truly yours and even the brand new ones will pale in comparison. And more pics! ;)
 

JoeyInKC

Seaman Apprentice
Joined
May 1, 2009
Messages
31
Re: 1984 Bayliner Capri Rebuild

Thanks for the words of encouragement... I honestly thought I was moving on the slow side... That I am I working with the weather, otherwise I think i would be about ready to put new stringers in. I should be ready by Monday for stringers...

I do however have a few more obstacles to overcome. I am in the Reserves and am getting ready to leave on Tuesday for my 2 week deal, so that is going to push me back. I just hope that the city doesn't say anything about the boat whilst I am away.

I am probably going to make the interior pretty close to the original design. I will make a few minor changes, but nothing too drastic.

I will post some new pics Monday evening if I get anything else accomplished.

Thanks on the tip about the windshield, will do.
 

proshadetree

Lieutenant Commander
Joined
Jul 19, 2008
Messages
1,887
Re: 1984 Bayliner Capri Rebuild

Great job so far.The cutting and grinding drove me nuts.The rebuild took me a while because I didnt have anything to go by.Most of mine was gone when I found it.Great to have help,If shes working on it she will be more tolerant with it.
 

JoeyInKC

Seaman Apprentice
Joined
May 1, 2009
Messages
31
Re: 1984 Bayliner Capri Rebuild

Day 7 of the rebuild...

Well, got everything tore out. Removed the stringers, and the rest of the floor. Got everything cleaned up, then went on to install new stringers. I used 3/4" ply. I was lucky to have most of one of the old stringers to go off of for measurements. Took some measurements of the transom and used 3 layers of 1/2" ply for that (that is what looked like came out of it).

For those of you that don't know, fiberglass mat is an animal all by itself. I coated everything with the resin, put the mat on and proceeded to cover with more resin. Now let me say that I am a novice to fiberglass mat, but I did not realize that it would be like trying to put resin on cobwebs. It was a pain in the butt. So I gave up on the mat, and went with cloth from then on.

I am about 80% complete in fiberglassing the stringers with the first layer. I have one layer on the transom also. I had to give up because it is starting to get a little dark. I forgot to take pictures before I tarped it up, so sorry. I will get some on here the next chance I get.

Question: how many layers of glass should I cover the transom with?

Also, is there a good place to get motor/outdrive parts from? I have a Volvo AQ125A with a 270 Penta outdrive.

Also, If anyone can point me in the right driection to get new glass for my walkthrough.

There won't be any progress for the next 2 weeks, as I will be playing Army in California.

Well that is all for now. Thanks.

Joe
 

proshadetree

Lieutenant Commander
Joined
Jul 19, 2008
Messages
1,887
Re: 1984 Bayliner Capri Rebuild

I thank you for playing army.And great job so far. Itll get there
 

capri1600

Petty Officer 2nd Class
Joined
Apr 20, 2009
Messages
150
Re: 1984 Bayliner Capri Rebuild

Spend some time with the mat when you get time. Mat is more waterproof than cloth, especially in the first couple of layers. If you use just one or two layers of cloth you are relying on the resin too much to provide the water protection to the wood. In terms of using mat, wet the surface, lay the mat in place then brush or roll additional resin from the topside until properly wetted out just like you were trying to do. I bet you were just trying to brush out the resin too thin. As the brush runs out of resin you end up with a brush full of cobwebs like you were talking about. Also, to anyone new, do not wet the mat and then try to pick it up and place it. The resin disolves the binding agent holding the mat together and all you'll have a handful of goo and a lot of frustration. If you get to glass a large open area, the grooved rollers are awesome to work with, even the smaller ones. By the way, you are using polyester resin right? You dont use mat with epoxy.
 

Mark42

Fleet Admiral
Joined
Oct 8, 2003
Messages
9,334
Re: 1984 Bayliner Capri Rebuild

Yep, like capri1600 said, lay the mat on the resin. If you can, put the resin on as thick as possible so the mat draws it in and helps reduce the amount of time spent applying more resin. Also, try using bondo style spreaders to press down the mat rather than rollers, it might pull and collect less fibers.

When are we going to get some pics?

And what size/model capri is that?
 

JoeyInKC

Seaman Apprentice
Joined
May 1, 2009
Messages
31
Re: 1984 Bayliner Capri Rebuild

capri... yes i am using poly resin with the mat... i think you may be right on me not using enough resin. When I get back home i will try again with more resin on the mat.

mark, i think it is a capri 1950.... its almost 18 foot something....

when I get done with my 2 weeks in the mojave desert i will post some new updated pictures.

well, duty calls. Talk to everyone later.
 

JoeyInKC

Seaman Apprentice
Joined
May 1, 2009
Messages
31
Re: 1984 Bayliner Capri Rebuild

Ok, I am back at it....

The day before yesterday I finished fiberglassing the stringers, and finished the new transom....

Today, I received the 2 part foam from us composites and filled the voids between the stringers. Tomorrow I plan to put the new floor in. I should have the new floor in and the rear seat bases as well as the engine cover base. By Monday, depending on the weather, I hope to be ready for carpet so long as I dont run out of the foam.

I only purchased 2 kits (1 gallon of part a, and 1 gallon of part b in a kit) to see how far that would go.

I will try to post some pics by monday, but right now we cannot locate the camera. But progress doesn't wait around for fuji (camera brand name). :)

Until then.
 

proshadetree

Lieutenant Commander
Joined
Jul 19, 2008
Messages
1,887
Re: 1984 Bayliner Capri Rebuild

I got my carpet from home depot dot com.Glad to see your back and back on the linner.Cant wait to see it done
 

JoeyInKC

Seaman Apprentice
Joined
May 1, 2009
Messages
31
Re: 1984 Bayliner Capri Rebuild

Well, got the outdrive re-installed. That was a chore...

I got new bellows and seals today (which totaled over $300). So I was all excited to get it back in. Let me tell you that was a pain in the rear end to get the drive shaft and bellow back onto the intermediate housing. It must have taken me almost 3 hours to get the drive shaft lined up correctly, and boy let me tell you those sweds know how make tight spots.

Well, hopefully more to follow tomorrow... and hopefully pics too...

Joe
 

proshadetree

Lieutenant Commander
Joined
Jul 19, 2008
Messages
1,887
Re: 1984 Bayliner Capri Rebuild

I was forever lining mine up.Adjust up get out check ,get in adjust down check.Repeat repeat repeat.Glad thats over.
 

JoeyInKC

Seaman Apprentice
Joined
May 1, 2009
Messages
31
Re: 1984 Bayliner Capri Rebuild

Well, had some issues thinking that I had the drive shaft lined up... I was wrong... but got er done today...

I got the engine in completely today, and half of the rear seat frames fiberglassed in also... Only had 2 and a half hours to work, seeing how I dont get home during the week until 530, then spend time with the 6 mo old... and dinner... no big deal though... I should be able to hit my mark to be done in a couple weeks. (I plan to be on the Lake of the Ozarks for the 4th, with a few trial runs before then...)

Tomorrow I hope to get the rear seats base fiberglassed in and then I should be ready for carpet :) yay!

Pics to follow... I promise to get some posted by the end of this weekend...
 
Top