1983 Galaxy Double Cabin 260

Corjen1

Lieutenant Junior Grade
Joined
Aug 24, 2013
Messages
1,237
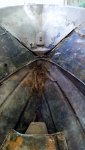
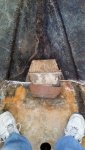
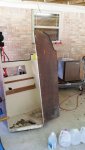
Nice project!! like Kcassels said , take a million pix of everything, you will need/want them later.... Truss up the hull, Ive seen it done with the hull still on the trailer oras I did, built a dolly for the hull. I simply screwed 2/4's from gunnel to gunnel, kept them in place until it was time to reinstall the cap.

Goof luck on you project, if you have any questions, feel free to ask... lots of great guys and info on this forum.
 

Shanestan

Seaman Apprentice
Joined
Aug 30, 2015
Messages
45
Sorry its taking so long between updates. You know how work gets in the way, and a day I had set aside to work on the boat, lightning struck a tree and blew up my water main, burnt out the water heater elements and themostat, and cable modem. Plumber cost me dough that I could have spent on the boat but I gotta have hot water! It could have been worse
 

Shanestan

Seaman Apprentice
Joined
Aug 30, 2015
Messages
45
Moving right along


20160719_113529 (1024x576).jpg

The top resting on a trailer so I can move it out of the way.

20160719_113558 (1024x576).jpg

From the aft end so you can see how i did it.

20160719_153708 (1024x576).jpg

Over to the side

20160719_153651 (1024x576).jpg

Now I can work on the hull much easier.

20160719_153736 (1024x576).jpg

The head enclosure and the fridge are out. Fridge still runs for being a 1983 model.
 

Attachments

  • 20160719_153736 (1024x576).jpg
    20160719_153736 (1024x576).jpg
    290.8 KB · Views: 0

Shanestan

Seaman Apprentice
Joined
Aug 30, 2015
Messages
45
Nice work there.

Thanks, LCMDR Cassels!

Work continues:
20160808_105214 (1024x576).jpg

Bow Rails removed, working on removing pulpit.

20160808_113324 (1024x545).jpg

First got to remove mechanical spot light. This actually still works with spot/flood lamp. Its not going to go back on, want something new.

20160808_114659 (1024x528).jpg

This teak or mahagony is old and I tore up the wood caps to get to to hardware. You can see where the rope has chewed the wood up as it came out of the chain locker.

20160808_121734 (1024x576).jpg

So it is now off after after using about 13 bad words. Look at the built up crap underneath. Not sure if i want this piece to go back on. Its been sanded alot over time and has deep grooves. I know neither is cheap to buy and have custom made.

Removing It also made it easier to look at this area:

20160808_105238 (1024x569).jpg 20160808_105229 (1024x576).jpg

This the hatch that has no cover over the chain locker. In these two shots, the material in between the layers is rotted away. Not sure how to tackle this.
Anybody have any thoughts?
 

Shanestan

Seaman Apprentice
Joined
Aug 30, 2015
Messages
45
Questions about windows: It looks simple to remove but dont know about reusing the gaskets or do I need to buy new stuff.


20160808_105255 (1024x563).jpg

Is that section of inner material to allow for expansion?

20160808_105314 (1024x546).jpg

Also there is a wrinkle (is present on the other side as well.

20160808_105322 (1024x576).jpg

And a shot of the sliding windows. They all need to come out and be resealed.
 
Last edited:

Shanestan

Seaman Apprentice
Joined
Aug 30, 2015
Messages
45
Oh by the way, it is stupid hot in Mobile Al. I think Im the only member within a 70 mile radious.
 
Last edited:

zdeyonker

Seaman Apprentice
Joined
Jun 7, 2016
Messages
33
If it's a typical window mount, then the trim piece in between the two rubber sections is what keeps the whole thing together. The channel allows for the seal and window to be pressed into the frame cutout. Then the channel is filled with a plastic, aluminum, or chrome trim of some sort to keep the rubber from falling back through if someone were to push on it extra hard. I would suggest replacement if it is hard or cracking, not sure how hard it would be to find a suitable replacement though.
 

kcassells

Fleet Admiral
Joined
Oct 16, 2012
Messages
8,607
Shane just wanted to back to you... LCMDR title is only a reflection of the times I posted/responded. There are more people here with so much more talent in their toenail that I surely do not have.
Once those gaskets got popped out then you need to order new ones. Look at the proifile to try and match. There are a lot of co. that do that as well as newer configs.
My comp is on the freeze but I'm sure you got the idea.
 

Shanestan

Seaman Apprentice
Joined
Aug 30, 2015
Messages
45
Shane just wanted to back to you... LCMDR title is only a reflection of the times I posted/responded. There are more people here with so much more talent in their toenail that I surely do not have.
Once those gaskets got popped out then you need to order new ones. Look at the proifile to try and match. There are a lot of co. that do that as well as newer configs.
My comp is on the freeze but I'm sure you got the idea.

So the more comments I make in this forum, my 'rank' goes up?
 

Shanestan

Seaman Apprentice
Joined
Aug 30, 2015
Messages
45
Suns out, Engine out!

DSCN3186 (1024x768).jpg

Laying the rail for the gantry crane service.

DSCN3193 (1024x768).jpg

Putting on the wheels for the crane.

DSCN3200 (1024x768).jpg

Bolting on the 10' I-beam. This crane come with 7' 8" beam is not wide enough for the boat (@8'), so I had two 10' beams that a coworker welded the pads onto. The new beams are 6x12 compared to 5x10 from Harbor Freight. The crane will telescope up to 14'.

DSCN3230 (1024x753).jpg

Hooking up to the power plant.

DSCN3239 (1024x663).jpg

Close up of the motor mounts. I decided to remove the the smaller bolts which turned out to be lag bolts (I think)

DSCN3252 (1024x768).jpg

Close up up of the bent lag bolt. Nice.

DSCN3261 (1024x768).jpg

Just barely cleared the aft end. I know that if i choked up on the load leveler chain, I would have more clearance room.

DSCN3274 (1024x765).jpg

A good of the oil pan. Power plant looks relatively clean.

DSCN3280 (1024x756).jpg

On a rolling pallet, and on a trailer.
 

Shanestan

Seaman Apprentice
Joined
Aug 30, 2015
Messages
45
So I got some time off, and worked on getting the stern drive mount off. Had a terrible time with that Y pipe, needed a 1/4 drive,12 point 10mm socket as 3/8 felt like it would fit but would slip off. I ended up making two trips to the parts store to by the correct socket set. So once I got the Y pipe out, started working on removing the nuts from the mount. No problems as they all came off but it revealed that the inside mount was broken at the bottom just below the hole where the drive shaft goes through.
I'll have some pictures up soon of the damage that was done. So was the damage caused:
1.) by vibration in the drive line.
2.) by running into something hard.
3.) a bad transom.
Any one of those problems makes me distrust the entire stern drive. The foot on the stern drive has a crack in the final drive near the prop. I bought a new foot but I think I going to have to further. Would buying a used system be the way to go? If I did what would I look out for?

Not to worried about the motor. I plan to repower it with a 350. Can I stay with the Gen 1 Mod 1 or would I have to change to Mod II?


broken transom plate.jpg

Dang this stinks!
 
Last edited:

Shanestan

Seaman Apprentice
Joined
Aug 30, 2015
Messages
45
And the beat goes on.

20160907_124052 (1024x576).jpg

Picked up this beauty from craigslist. This should eliminate a need for a generator. Will just need better batteries. It can handle two load banks. A 3000w unit could do quite a bit more but I dont have a 50 footer.

20160907_132750 (576x1024).jpg

Removing the stern drive mount. Hot water heater is gone. That Y-pipe is a pain if you dont have the correct 12 point socket. Mine used a 10mm 3/8 drive while others i have seen used 3/8 12 point socket.

20160908_105545 (1024x576).jpg


Everything is out including trim tabs and pump. Hard to see but upper left is the broken inside transom mount.

received_10154467447728834 (1024x910).jpg

Cleaning up okay.

received_10154467448528834 (1024x491).jpg
 

Attachments

  • 20160907_124052 (1024x576).jpg
    20160907_124052 (1024x576).jpg
    268.3 KB · Views: 0
  • 20160907_132750 (576x1024).jpg
    20160907_132750 (576x1024).jpg
    324.5 KB · Views: 0

mickyryan

Rear Admiral
Joined
Apr 18, 2016
Messages
4,210
did you buy that boat off cragslist in florida? was just curious cause name looked familiar :)
 

Shanestan

Seaman Apprentice
Joined
Aug 30, 2015
Messages
45
Micky, Seller lived in Mobile west of the Airport. The paperwork shows that it was bought new in Flint Michigan, titled in Illinois and stayed there till about 2003 when it moved to Georgia from parent to son. Then his brother picked it up last year or so and was going to rebuild it but hurt his back in a motorcycle accident so he put it up on craigslist. It was registered in Alabama when I bought it, but the trailer had Georgia plates on it. I have lots of reciepts for work and service done to it from IL and GA. Nothing from Florida.
I absolutely hate that name though.
 

Shanestan

Seaman Apprentice
Joined
Aug 30, 2015
Messages
45
No Title

The work continues......
 

Attachments

  • photo253732.jpg
    photo253732.jpg
    356.7 KB · Views: 0
  • photo253733.jpg
    photo253733.jpg
    101.3 KB · Views: 0
  • photo253734.jpg
    photo253734.jpg
    104.5 KB · Views: 0
  • photo253735.jpg
    photo253735.jpg
    268.7 KB · Views: 0
  • photo253736.jpg
    photo253736.jpg
    345.7 KB · Views: 0
  • photo253737.jpg
    photo253737.jpg
    104.2 KB · Views: 0
Top