1981 Starcraft Super Sport 180 - Gonna try a Restore

Candutch

Chief Petty Officer
Joined
May 8, 2015
Messages
637
Thanks BWR! I never even thought of putting the foam in like that. Seems to me it would be stronger than laying flat as well.
 

dpotter

Petty Officer 2nd Class
Joined
Oct 4, 2015
Messages
191
Do you have a metal break, or did you have someone make the bends for you? I'm looking at the 48" break from Harbor Freight.

​Doug
 

BWR1953

Admiral
Joined
Jan 23, 2009
Messages
6,178
Thanks BWR! I never even thought of putting the foam in like that. Seems to me it would be stronger than laying flat as well.
Here's how we did the rest. I was lucky to have my wife doing the bulk of the cutting. :D

foam blocks1.jpg
 

Candutch

Chief Petty Officer
Joined
May 8, 2015
Messages
637
I do but it is only a 30" so I had to get the splashwell bent at a shop. Crappy thing was they had a minimum $60 charge so it worked out to $20 a bend. For future reference it was a 90 degree bend for the lip that sews to the transom then 75 degree for the back and a 90 at the top of the foe the lip going over the frame.
 
Last edited:

Candutch

Chief Petty Officer
Joined
May 8, 2015
Messages
637
That's a good admiral you have there BWR. I wouldn't be able to get mine to come out and do that.
 

Watermann

Starmada Splash of the Year 2014
Joined
Jan 12, 2013
Messages
13,787
What do you think about this being support for decking and a livewell? My upfront livewell and GP27 battery is sitting on 1/2" ply that is supported by the rigid foam laid in like you see below in the rest of boat. My SeaNymph SS160.

IMAG0382.jpg
 

Candutch

Chief Petty Officer
Joined
May 8, 2015
Messages
637
Thanks for the pic Watermann. After seeing your and BWR's I will use rigid foam and install it like you guys did.
 

Grandad

Lieutenant Commander
Joined
Jun 7, 2011
Messages
1,504
I found that using a hot wire, I was able to cut foam easily to dimensions and odd angles without the mess of saw blades and the restricted curves of knives. A hot wire will turn in any complex direction as you gently force it through the foam. I used fine stainless steel wire powered by a model train transformer for varying the temperature. Too hot burns out the wire. Find the sweet spot and it goes really well. Details in my rebuild thread. - Grandad
 

Candutch

Chief Petty Officer
Joined
May 8, 2015
Messages
637
Thanks Grandad, I remember seeing that on your thread now that you mentioned it. I wish I would have looked here before I started, almost done now. I did it the old fashion way with a utility knife.
I re-used the long pieces of white foam because it was in good shape but I did put 1" closed cell under neath and under the stringers which closes off any gaps for foam to get into the belly. I also riveted some checker plate to the ribs so water can run over them if need be.
Also got the aluminum plate laminated to the outside of the transom where the design change was made to the shape. I'm still undecided if I should jb weld the joint or cover the whole top portion with a new piece of aluminum covering the seams. Any idea if jb weld is strong enough to not Crack at the seam?

View attachment y4m86zDDbY84Y-nc9oXI_vmdUPdyl0H-i9arq6PTXrWCfUMu-0GEH98jMXD_0AXs-OJ6KfHDHNegIqSmpFfxHw4vnNjEg9I-KLLs


View attachment y4m4ElwuB03azXDqnwXSIL7YXFboN9GGejFVzamVhgHRR2G7hZkG4-3LEN_siXfSMqpplH0SkwrEcrYnTIxpk6jShGfzYpZ4mI_M
View attachment y4m5IYWR8MgdNP3P4m5j09LsA9jc_PWJrh7Qv_eNANdm-SgxzkAcTSC4KGGVKsJuuouSqdvTeBvaxxF2W-euGBXxlMqCU92CkIUL

I also ran some 1.5 inch angle from the stringer to the ribs in the bow for some more support for the floor. It's hard to see in the pics.
 
Last edited:

Grandad

Lieutenant Commander
Joined
Jun 7, 2011
Messages
1,504
I've used some JB Weld to "glue" angle iron to the lower corner of my I/O's cracked intake manifold and to fill some holes somewhere at one time, but I have doubts that it will withstand much stress and I think it will fail on you after you've invested a lot of finish work. A new skin on the transom would be a temptation for me. Maybe someone else has a suggestion. - Grandad
 

Candutch

Chief Petty Officer
Joined
May 8, 2015
Messages
637
Good point Grandad, that was my worry that flex on the transom would cause it crack along the seam.
 

Candutch

Chief Petty Officer
Joined
May 8, 2015
Messages
637
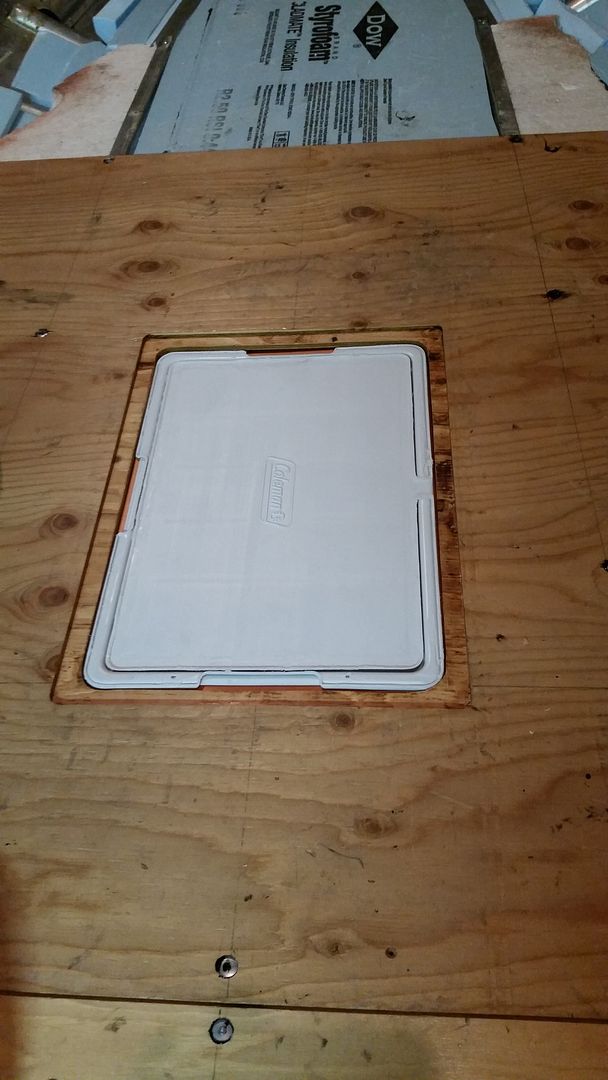
Got some work done this week during the evenings. Finished sealing the new piece of deck and attached 3/4" piece of ply for pedestal support, cut the cooler hatch out, finished installing foam and got the deck in place. I have 4 days off coming up so the plan is to router out a lip around the cooler hatch and seal that, install drain on cooler and secure cooler, rivet down the deck and then try to figure out how to cut the cooler lid down as it is 1/2" too high.

View attachment y4mUlzi-1l_jIo5JYzLhtakHCyPrDMyEMBA-xrmJIVZ0Qx0Yy_lLi9gyatXhfMryG1FTefs4r8LrppOmfqW7fOADeny9mjszts2BView attachment y4mwjxFOl-eUIsVszcQFzbCJev1NcxWrOZVEDBg0-wW-oju_K0uykd_TkypL6UEZIbi9Yuz18ozOd502lEqRLfBD2WYef9Te_zKl
 

Attachments

  • y4mtWFgkWspjCZPxOUioGUG13x1BC5LM1473dcSB0RvQA4UVhiLwshOkSd9naatL-3NwRI-TAvINfxK2s2Fru2FBtA9d3oZ4qCoX
    23.4 KB · Views: 2
Last edited:

dpotter

Petty Officer 2nd Class
Joined
Oct 4, 2015
Messages
191
Looking great Dutch. Can't wait for mine to get to that point.

Doug
 

Candutch

Chief Petty Officer
Joined
May 8, 2015
Messages
637
Thanks Doug! I can finally see I glimmer of light at the end of the tunnel. I'm just really glad I have a floor to walk on now instead of treading carefully along the foam and stringers.
 

Watermann

Starmada Splash of the Year 2014
Joined
Jan 12, 2013
Messages
13,787
Everything seems to start going back together a whole lot quicker once the deck is in. Looks great from here!
 

Grandad

Lieutenant Commander
Joined
Jun 7, 2011
Messages
1,504
Hi Candutch. Just a tip. Your use of Tee nuts reminded me of a bad experience I had that you can avoid. I used them inside an upholstered seat that was then secured in place. My experience was that if you don't apply a little bit of lubricant (maybe white grease) to the threads, when you insert stainless steel bolts into stainless steel tee nuts, they gall easily and can become hopelessly locked together. I had to tear apart upholstery that was well stapled and you don't want to be pulling up your decking. Also, I've had tee nuts lose their grip because I pushed a little too hard with the bolts before they were spun up tight. Royal pain. Verify the threads are good on all of them before final assembly.
- Grandad
 

Candutch

Chief Petty Officer
Joined
May 8, 2015
Messages
637
Thanks Watermann and a huge thanks for those tips Grandad. I will check all the threads first thing. I'm glad I checked in before heading out and securing the deck.
 

Candutch

Chief Petty Officer
Joined
May 8, 2015
Messages
637
Well it was slow going today, mostly because I had to clean up the hangar as I couldn't stand the mess anymore. I did put a drain in the cooler and install it in the floor. I used a plastic splashwell drain and attached some bilge hose to it so it drains into the bottom of the hull. I used the small coleman party stacker and mounted it on a 3/16 inch piece of checker plate. After trimming the lip off the lid with my Dremel it fits perfect. I plan on attaching it to a pace of checker plate for the hatch lid. I also got 2 sections of floor secured but had to do some trimming on the bow piece so I am currently sealing the edges again.
I counter sunk all the rivets and since I used ones with a steel mandrel I filled the holes with 5200 and sealed the top with it as well.
View attachment y4mtWFgkWspjCZPxOUioGUG13x1BC5LM1473dcSB0RvQA4UVhiLwshOkSd9naatL-3NwRI-TAvINfxK2s2Fru2FBtA9d3oZ4qCoXView attachment y4mEwrP3IUaXJCJ36M0GUk5bJc_cRpM3VTN2FbCzROsear4q18EqWONEnNhFA8d2hR_PrYYMPZXq0rnOSljOVfptpmaFwcyYls_f

20160311_203132.jpg
 
Last edited:
Top