1981 Springbok 18' Restoration/Renovation

mvanek21

Seaman Apprentice
Joined
Apr 12, 2024
Messages
37
Hi all,

First off, I'd like to thank everybody on here for all the help I've received on other threads regarding other motor/electrical issues I've now successfully repaired.

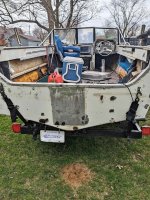
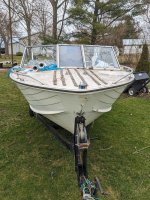
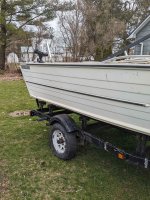
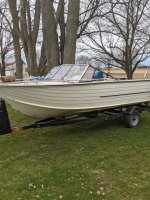
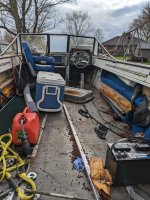
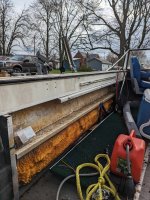
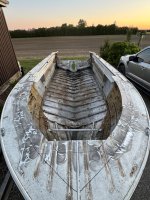
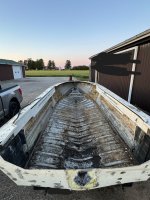
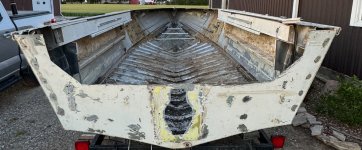
This post will be about an aluminum boat I've purchased in hopes to cut open the closed bow, and transform it into an open bow designed for an extra pedestal seat for walleye jigging. I plan on including pictures as I progress through this project in hopes of receiving tips/tricks to help make it as successful and seamless as possible. I would like to construct a livewell into this boat as well if its doable once I go through the hull and ensure all the rivets/structural pieces are intact. The boat is a 1981 Springbok 18', previous owner said it would handle up to a 115 with no problem, just looking for some feedback as to what the max HP rating would be, nothing urgent as the hull itself is the priority and powering it will be one of the last steps. I've included some pictures below of the hull.

Any feedback/tips/tricks/advice is all greatly appreciated...
 

Attachments

  • Springbok 1.jpg
    Springbok 1.jpg
    320.4 KB · Views: 20
  • Springbok 2.jpg
    Springbok 2.jpg
    222.6 KB · Views: 19
  • Springbok 3.jpg
    Springbok 3.jpg
    208.7 KB · Views: 18
  • Springbok 4.jpg
    Springbok 4.jpg
    329.6 KB · Views: 22
  • Springbok 5.jpg
    Springbok 5.jpg
    484.5 KB · Views: 22
  • Springbok 6.jpg
    Springbok 6.jpg
    489.4 KB · Views: 23

mvanek21

Seaman Apprentice
Joined
Apr 12, 2024
Messages
37
Started off removing all of the interior stuff, lots of carpet and old foam flying everywhere. Went ahead and traced the shape of the new open bow and left about 4” extra everywhere so I can bend it downwards and wrap it down later on. Does anyone have any tips for removing the old pourable foam?
View attachment IMG_6918.jpegIMG_6936.jpeg
 

Attachments

  • IMG_6937.jpeg
    IMG_6937.jpeg
    2.5 MB · Views: 7

mvanek21

Seaman Apprentice
Joined
Apr 12, 2024
Messages
37
I am currently in the process of removing the last bits of foam and flooring before i fill the boat up with some water and find any leaky spots.

What would people suggest using for folding that aluminum on the bow downwards on a 90 degree angle? its about 0.100" so it seems like it would be tough to bend by hand without physically removing the whole gunwale sections. Does anyone have any advice on what tools to use of how to go about bending this down so i can weld/rivet it all together?
 

mvanek21

Seaman Apprentice
Joined
Apr 12, 2024
Messages
37
Transom finally removed, it was quite tough getting it out only to find out there were a few screws drilled into it with the screw heads grinded flush to the aluminum and painted over.......

Once all the fasteners were out it was rather easy to lift it out, got it out in one piece which will be nice for tracing it out as a template for the new wooden transom.

Next up, removing all this stubborn flotation foam from the hull, some pieces seem to come out in full chunks, whereas others break apart and i've got to scrape away everything. The drain hole had gotten plugged with a loose piece of foam after being left outside during a storm and the hull filled up with water, only one spot on the bottom of the transom seam seemed to have a drip... hoping this is the only leak.
 

Attachments

  • Transom Removed - front.jpg
    5.6 MB · Views: 10
  • Transom Removed - rear.jpg
    6.3 MB · Views: 9

mvanek21

Seaman Apprentice
Joined
Apr 12, 2024
Messages
37
Finally got this terrible flotation foam removed from the hull, removing the stringers allowed for ease of getting under the foam and removing in big sections when it seemed to stay together. Filled about 5 garbage bags full of the old foam, it had to have weighed a couple hundred pounds with all of the water saturation.

I lifted the boat off of the trailer and blocked it in our pasture to let any rain water drain out. I was shocked to see the condition of the trailed with some of these keel rollers down to the bushing, thankfully the keel doesn't appear to have contacted any bare bushings.

I then removed all the roller components and bow stop/winch and jack stand. I am planning on putting new keel rollers on the trailer, and then installing some fabricated bunks on each side instead of the roller route. I am also intending to fabricate a new bow stop/winch with two rollers (one above and one below the eye on the boat) as the previous one was very compact and did not allow easy access to unclipping the boat.

The trailer was fully went over, with all old paint removed and any issue spots pre-heated and welded, only found 2 locations that I decided to weld on and neither were structural spots. I also welded a bolt onto the tongue to avoid the self tapping route with the ground wire connection. I threw some primer on with a spray gun and allowed it to cure, then applied 2 coats of semi-gloss black paint.

While the second coat of paint dries, I'm replacing the races, bearings, and seals on the hubs. Hoping to get the hubs put back on the axle tomorrow and bolt the wheels themselves back on. Going to add all the lights, wiring harness, keel and bunk support brackets while it's on jacks for ease of working at a nicer level.

Hoping to start working on the aluminum hull when the schedule allows for it!
 

Attachments

  • Foam removed - front.jpg
    Foam removed - front.jpg
    2.4 MB · Views: 11
  • Foam removed - rear.jpg
    Foam removed - rear.jpg
    2.3 MB · Views: 11
  • Boat on blocks.jpg
    5.8 MB · Views: 7
  • Trailer without boat - 1.jpg
    8.7 MB · Views: 6
  • Trailer without boat - 2.jpg
    9.3 MB · Views: 6
  • Trailer painted - unassembled.jpg
    Trailer painted - unassembled.jpg
    2 MB · Views: 11

mvanek21

Seaman Apprentice
Joined
Apr 12, 2024
Messages
37
Trailer fully assembled, waiting until I get the boat sitting on it to make the final adjustments to my keel rollers and bunks. Going to fab up a bow stop/winch post once I get the boat positioned properly as the old one got stuck with the bow eye.
 

Attachments

  • IMG_7429.jpeg
    5.8 MB · Views: 6
  • IMG_7430.jpeg
    5.8 MB · Views: 5

mvanek21

Seaman Apprentice
Joined
Apr 12, 2024
Messages
37
I’ve got the boat secured on my trailer with the bow winch post as well. I’m unsure if I should move the bunks aft to sit past the transom edge for further support, it would be an easy adjustment to make so I’ll hold off for later days to reaccess. Lately I’ve been using these nice days to be out chasing walleye on Lake Erie so my progress with this project has definitely slowed down.
 

Attachments

  • IMG_7747.jpeg
    IMG_7747.jpeg
    3.5 MB · Views: 3

mvanek21

Seaman Apprentice
Joined
Apr 12, 2024
Messages
37
My next step is going to be locating any loose or missing rivets and installing solid aluminum rivets. I’m thinking anything structural I’ll be using the normal solid rivets, and if there’s anything that’s purely to fill a hole with some sort of backing plate I’ll use some semi-tubular solid rivets to save the solids for places needing the additional strength. Using 5200 for extra sealing on the rivet shank as well.

I’ve got about 40-50 holes in the transom from where the PO had used blind rivets to attach a cover where the outdrive was. I’m thinking if I tig and fill any small holes that I won’t need in the future it will result in a cleaner look and avoid the river backing interfering with the wooden transom.

I’ve yet to decide on how I will properly seal and cover the outdrive hole but I’m leaning towards an aluminum plate that would cover as many small rivet holes as possible, and tig welding it to the original transom skin. This way I’ll be able to use the holes from the inside to tack the pieces together, and properly lay a bead all the way around to avoid to use of sealant and create a solid seal of aluminum to aluminum.
 

Attachments

  • IMG_7754.jpeg
    IMG_7754.jpeg
    720.4 KB · Views: 2

flashback

Captain
Joined
Jun 28, 2002
Messages
3,871
You seem to have a good grasp on what is needed. You mentioned a piece of aluminum plate welded to the skin. I'm not a welder but I suspect that the various thickness between the two may be problematic.
 

mvanek21

Seaman Apprentice
Joined
Apr 12, 2024
Messages
37
You seem to have a good grasp on what is needed. You mentioned a piece of aluminum plate welded to the skin. I'm not a welder but I suspect that the various thickness between the two may be problematic.
I understand that, I’ve got the key shape that the PO used to fill the outdrive hole and had riveted a flat sheet against the outer skin as well. I’m going to keep reading up and researching but I was thinking if I used that key to fill the outdrive hole and had it sandwiched between my outer skin sheet, I could weld the outer sheet fully and tack the key in various places. I figured if I had no void between the aluminum and the wooden transom it should provide adequate strength. I’m planning on using a slightly thinner piece of aluminum for the outer sheet cover to not create too much added stress. I’ve got to fabricate a knee brace as the PO used two pieces of angled aluminum lagged to the flooring and into the stringers…… my plan is to beef up the knee brace to ensure it spreads the loading forces out better.
 

mvanek21

Seaman Apprentice
Joined
Apr 12, 2024
Messages
37
You seem to have a good grasp on what is needed. You mentioned a piece of aluminum plate welded to the skin. I'm not a welder but I suspect that the various thickness between the two may be problematic.
Do you happen to have any suggestions for attaching this outer plate to the transom besides welding? I know riveting would be more than suitable but I worry it could create high spots where the wood would be interfered with and not able to sit flush against all locations on the outer sheet.
 

mvanek21

Seaman Apprentice
Joined
Apr 12, 2024
Messages
37
After some more thinking and reading multiple forums/threads, i've come to the idea of filling any holes that would interfere with the wooden transom using tig welding. These would include old transom tie down holes that aren't needed (PO made 2 holes directly beside the ones originally in the aluminum by the looks of it). There is no splashwell drain holes yet so im going to hold off until i've got some sort of splashwell design planned to map out the location. This would be the easiest and sure-fire way to replace the lost material from previous holes being drilled.

Along the sides, i'm going to keep the holes and use stainless bolts with 5200 to secure the transom to the hull on the outer edges. 5 bolts on each side may seem excessive but the 5 holes per side are already there and it should just hold the wood to the outer and future inner skin better.

On the bottom seam below the Z brace, i plan to install solid rivets with 5200 and later use gluv-it on all the interior seams and rivets. On the starboard side of the transom there is 1 hole in particular that looks extremely close to the seam, im not sure if i'll be able to get a solid rivet in here, if i can't get one here without further removing material i plan to cover all the holes with a patch on the exterior side of the transom skin and apply a hefty amount of 5200.

I'm planning on relocating the bilge drain hole as its awfully close to the center of the transom and adding a knee brace may interfere with this placement. I'm thinking of using the same patching method or possibly extending the sheet to cover the I/O hole down as far to the seam as possible.
 

Attachments

  • Screenshot 2024-07-04 135918.png
    Screenshot 2024-07-04 135918.png
    93.9 KB · Views: 5

flashback

Captain
Joined
Jun 28, 2002
Messages
3,871
Makes sense to me, what are you going to power it with. Nice diagram btw.
 

mvanek21

Seaman Apprentice
Joined
Apr 12, 2024
Messages
37
Makes sense to me, what are you going to power it with. Nice diagram btw.
thank you, im not sure what size OB ill throw on the back yet, PO had a 90 on it and said it ran well. I plan on getting the hull fully sealed and reinforced before i start to worry about powering it. Only spots that seem to leak water are where a wood screw was used to hold down the keel, and 5-6 rivets along the transom seam. I'd rather beef the hull up past its normal design and be underpowered than the opposite.

I've began to take most of his stuff with a grain of salt after seeing the previous shortcuts creating more work for myself now. Its called a project boat for a reason lol.
 

mvanek21

Seaman Apprentice
Joined
Apr 12, 2024
Messages
37
Just a question here for anyone with some structural knowledge.

My Z braces are very close to the transom seam and there is maybe 2-3” between the bottom of the hull and the bottom of the transom. As my current boat is glass, I remember the transom board reaching to the bottom of the hull. From reading other threads on here, I’ve seen a lot of aluminum boats with more of a square edge on the bottom of the wooden transom far above the bottom of the hull.

My question is, will the current placement of the Z hull cause issues when I add a knee brace? My concern is I won’t have much area to rivet the bottom portion of the knee brace onto the aluminum skin. Would it be worth it to raise the Z edge up so there is more room to attach the knee brace? I see it is usually about half and half with slightly more attached to the wooden portion of the transom but as it sits right now I’m around a 6:1 ratio for where my knee brace would connect to the transom.
 

Attachments

  • IMG_7762.jpeg
    5.7 MB · Views: 10

mvanek21

Seaman Apprentice
Joined
Apr 12, 2024
Messages
37
Got the rear skin completely rid of all the old paint… was that ever a tough job. It’s a good sign for the rest of the hull as now I’m only planning on cleaning up any chipped areas and then self etch primer, and hoping to leave the previous paint on to paint over the whole thing. I’m going to get my wooden transom made next to fit properly inside before I begin to measure and plan out the aluminum skin.
 

mvanek21

Seaman Apprentice
Joined
Apr 12, 2024
Messages
37
Also going to try and find a good chemical paint remover for the interior as the gunwales are going to be slightly redesigned and I don’t want to wire wheel them completely for time and effort sake.
 

mvanek21

Seaman Apprentice
Joined
Apr 12, 2024
Messages
37
Transom skin completely cleaned up and free of any old paint. Going to give the inside of the skin a good cleaning and make sure it doesn’t have any contaminants in the holes that could interfere with the epoxy. I’m going to use the Gflex 655 epoxy to bond the skin onto the transom, by sanding and etching both pieces prior to adhering them together. The plan is to use the holes for the Zbraces and the outer edge bolt holes to secure the skin on while the epoxy cures. Then I’ll go around and start riveting where it doesn’t interfere with the wood itself, and making holes for stainless screws that will bite into the wood.

Haven't gotten much done lately with this project as I’ve been busy working and fishing Lake Erie when Mother Nature allows for it but hoping to pick up the work pace and get this transom done.
 

Attachments

  • IMG_8123.jpeg
    IMG_8123.jpeg
    1.3 MB · Views: 2
Top