1980 Holiday 181

Troubled1

Petty Officer 2nd Class
Joined
Oct 2, 2019
Messages
116
So far everything mechanically wrong with the boat has been caused by the previous owner’s lack of mechanical aptitude or just plain carelessness. My brother sent me the link to this boat when it was first advertised and the seller was asking $1600. I would have bought it for that price but the $$ wasn’t in the bank. The next morning it was $600. I’m sure he must of had someone look at it and they figured it (motor/outdrive) was no good or his wife wanted it gone ASAP. Whatever the reason, my wife figured I payed the $1600 and was still happy with it. When I told her it was $500, she knew it was a good deal. When she heard it run, she was quite excited. Hearing the tilt and trim motors go sealed it for her. She is now really looking forward to being in it and has no problem with me spending a bit of $$ on it.
 

Moserkr

Chief Officer + Starmada Splash Of The Year 2021
Joined
Nov 23, 2020
Messages
869
Great deal and glad it all works! A happy wife is the cherry on top.
 

Troubled1

Petty Officer 2nd Class
Joined
Oct 2, 2019
Messages
116
Took the tilt clutch apart this evening. I found the spacer that goes between the snap ring and spring washers was on top of the snap ring. I removed the clutch assembly, moved the spacer to the proper spot and the tilt now works up and down. I can however still pull the drive unit up by hand so I’m sure reverse will do the same. I’m going to get some shim stock and try a 0.010” shim under the spacer to see if it fixes the issue.
It was quite slow raising so I’ll remove the trunnion caps, clean and grease it and see if it helps. I was having an intermittent issue with the solenoids on up and down so I’ll probably switch them out for continuous duty solenoids. I did see some solenoids listed at Napa that had override buttons on the top in case of an issue with switch wiring. I may install those just to have that option.
 

Watermann

Starmada Splash of the Year 2014
Joined
Jan 12, 2013
Messages
13,794
Impressive problem solving, be sure to stick around after the holly to help guys out down the road ;)
 

Troubled1

Petty Officer 2nd Class
Joined
Oct 2, 2019
Messages
116
Haven’t had much time to work on the boat this week as I have a small 12’ aluminum I’m needed to get ready for this weekend. I did get to start on the scraping, sanding and priming the trailer last night. It’s not exactly fun but it needs to be done none the less.
A72F73C9-C05F-466D-9969-080C7119CDC1.jpeg
 

Troubled1

Petty Officer 2nd Class
Joined
Oct 2, 2019
Messages
116
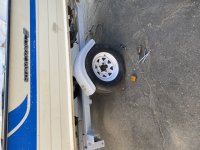
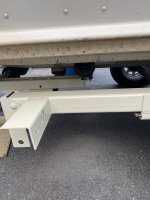
Trailer now has color. I had some “recreation white” laying around the garage and that’s the new finish. I did find 2 rivet heads missing in the stern about 4” forward of the transom. I took a hammer and pin punch and they easily popped out. I’ll replace them this evening when I get a helper.
image.jpg
 

Troubled1

Petty Officer 2nd Class
Joined
Oct 2, 2019
Messages
116
My plan now is to install the new trailer lighting, replace the 2 rivets and then bring it down to the launch, back it into to lake but leave it on the trailer and run it up to full temperature. I’ll also use that opportunity to see if the bellows has any leaks. If everything works out, replacing the floor will be the next step.
 

Troubled1

Petty Officer 2nd Class
Joined
Oct 2, 2019
Messages
116
I had to put off the first float. I have the trailer ready and the new lights installed but I wanted to run it on the muffs before bringing it to the big lake. Unfortunately I had a fire/no start issue. Took the meter and started testing. No power to the coil with the key on. Checked and had voltage at battery pos on the ignition switch. I turned the key on and no power to the run terminal. Ran a jumper between batt and run and it fired up. I have since ordered a new ignition switch.
Last evening I went under the dash and removed countless feet of redundant wiring. This evening I’m removing and stripping the carb down and will put it in the ultrasonic cleaner. While it’s being cleaned I’m going to remove the tilt solenoids and replace them with continuous duty units.
 

Troubled1

Petty Officer 2nd Class
Joined
Oct 2, 2019
Messages
116
The solenoids for the tilt have been replaced, trailer wiring is sorted out and the carb has been fully cleaned and rebuilt. I took it down to an obscure little boat launch on Lake Superior this morning and put the boat in the water. I left it on the trailer and ran it up to temperature. I can’t believe how quickly this thing fired up!!
I let the engine idle for about 30 minutes to make sure it was fully up to temperature. I set the timing and made a few adjustments to the idle mixture screws. Unfortunately my meter i brought with me doesn’t have the tach/dwell so that will be taken care of at another time. I used my laser thermometer to check temperatures of hoses, manifolds etc. the intake got the hottest at just over 200°F. The temperature gauge fluctuated only a few degrees between 175-185°F. The tach only worked intermittently so I’ll be checking the wiring to the gauges before anything is replaced. Trim and tilt both functioned as intended.
In the 30-40 minutes it was in the water I only had about 1/2cup of water in the bilge so I’m thinking I’ll have to check more rivets. The motor itself ran smoothly and quiet, no knocks or clattering. I shifted between forward neutral and reverse and the only issue was me being a little ham fisted on the throttle in reverse and it pulled the lower drive up. Not sure if this should happen but I’ll take any advice/comments on that. There is an hour meter in the engine compartment but it been disconnected. Not sure how long it’s been like that but it reads 338hrs.
The next step in the project now that I know the driveline is functioning is to start removing the interior and take up the carpet. The wood in the engine compartment and transom is solid with no signs of rot. The floor around the storage hatch is rotted but from midway of the seats forward feels very solid. I guess the only way to know for is to start tearing things apart.
The best part is my wife is totally pumped about this boat! According to her, it would be a bargain at twice the price.
 

Troubled1

Petty Officer 2nd Class
Joined
Oct 2, 2019
Messages
116
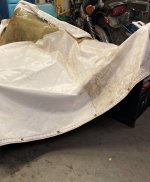
Raining this evening so I took the rear curtain into the garage. The rear plastic windows have yellowed beyond cleaning/polishing so we decided to have all the plastic windows replaced. Just using a magic eraser I can’t believe how clean this 41 year old top is coming. The vinyl isn’t brittle and is still quite pliable. It may take some time to clean up but will definitely be worth the effort.
D3EA1A84-735D-4C79-9626-0BC204CB5E33.jpeg
 

jdvasher

Petty Officer 1st Class
Joined
Jul 10, 2019
Messages
371
Raining this evening so I took the rear curtain into the garage. The rear plastic windows have yellowed beyond cleaning/polishing so we decided to have all the plastic windows replaced. Just using a magic eraser I can’t believe how clean this 41 year old top is coming. The vinyl isn’t brittle and is still quite pliable. It may take some time to clean up but will definitely be worth the effort.
View attachment 346071Thats really nice that it cam with the top and its in good shape. Mine was drier than an old fart. it had shrunk up to about 2/3 the original size. I will have to get a new one made and I am not looking forward to that.
 

Troubled1

Petty Officer 2nd Class
Joined
Oct 2, 2019
Messages
116
Has anyone done a vinyl wrap on their boat? After I replace the rotted wood in the floor I plan on updating things. The carpet will be replaced with marine vinyl flooring, I’ll add a step up to the bow, sound system with subwoofer will be going in and eventually the upholstery will be updated.
I’ve seen a few YouTube videos on aluminum boats being wrapped but would like to hear from people the have experience with either having it done or diy.
 

jdvasher

Petty Officer 1st Class
Joined
Jul 10, 2019
Messages
371
Has anyone done a vinyl wrap on their boat? After I replace the rotted wood in the floor I plan on updating things. The carpet will be replaced with marine vinyl flooring, I’ll add a step up to the bow, sound system with subwoofer will be going in and eventually the upholstery will be updated.
I’ve seen a few YouTube videos on aluminum boats being wrapped but would like to hear from people the have experience with either having it done or diy
I'm curious about this too. It seems like the rivets could add some difficulty to this but maybe it can be done. I know I've seen issues when dealing with small details like this on vehicles.
 

Troubled1

Petty Officer 2nd Class
Joined
Oct 2, 2019
Messages
116
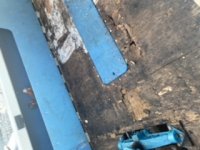
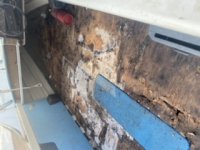
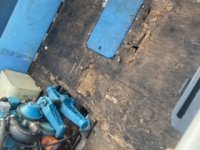
I have the floor boards pulled out to replace the 2 sections in the rear of the boat. The wood up front is out as well. It is like new so it will be cleaned, sealed and reused. I checked the original floatation foam and it is dry. Starcraft had put in white styrofoam down the center underneath the waterski hatch. That foam was drenched so it won’t be getting replaced. The thin wood they used as the hatch floor only had one layer of ply left.
Once the hatch area was opened up I saw the rivets holding the stringers to the ribs were almost all broken off.
664D8E32-299E-4CA2-B248-068DD371FD1E.jpgT
This evening I punch the rivets out and installed new ones. For the replacement hatch floor I have a piece of fiberglass core laminate used in urban rail transit. I’m going to use that instead of 1/8” plywood. Tomorrow I’ll fit it and get it riveted into place.
The wood blocks underneath the engine mounts are rotting so I’m going to replace them with UHMW plastic blocks 1 1/4” think topped with 1/4” aluminum plate to get the 1 1-2” I need. I noticed while checking the mounts I need to replace the water pump/alternator belt. So when I replace the mount blocks that will get changed.
Now a question. The motor mount bolts go through the wood blocks and there’s 4 layers of 1/2” plywood under the stringers the bolts pass through. I haven’t had a chance to look or get my hand in to see if it’s washers and nuts or if they used lag bolts to hold it down. Can someone chime in and let me know?
I have decided that the floor boards will be riveted back down so I’ll be borrowing a pneumatic rivet gun from work. It gets hard on the old hands after a while using a hand riveter.
 

Troubled1

Petty Officer 2nd Class
Joined
Oct 2, 2019
Messages
116
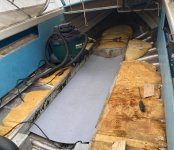
I spent a couple evenings working on getting the floor boards in. First job was to get the stringers riveted back down to the ribs of the hull. Next I installed fiberglass core laminate as a floor for the water ski hatch.
836D4A08-DF74-4FB9-93E6-EFB4BA34185A.jpeg
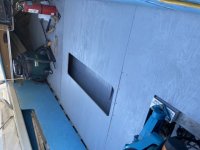
With the laminate in place, the resealed front section and the 2 new rear sections were fitted.
B1E77781-302F-40C0-9340-FB7030ECDBAE.jpeg

I removed the rotted motor mount blocks and replaced them with 1” UHMW Plastic and 2 1/4” aluminum plates. Work needed the pneumatic rivet gun back so I decided just to order my own. Once that shows up, the boards will be fully fastened in place and the fuel tank and battery hold down will be re-installed.
I’m tossing around the idea of a step up to the bow as we like to take our dogs to the beach to swim. I’m just not sure if they would be able to get up on the bow to jump off. I may just end up getting some kind of plank we can use as the dogs, (Cane Corso and Great Dane/English Mastiff) are a little too big to lift in/out of the boat. How do others with big dogs do it?
 

SHSU

Lieutenant Junior+Starmada Splash Of The Year 2019
Joined
Mar 8, 2017
Messages
1,742
Getting out is easy, getting in....

We only take our youngest dog and he can jump in at the beach no problem. When we took our lady she would stand up with paws on the gunwale and we would have to pick up her backend to get her in. Just have to see what your dogs are comfortable with and if you feel they need the extra step.

SHSU
 

BOYS & TOYS

Petty Officer 2nd Class
Joined
Mar 1, 2008
Messages
149
My black lab is perfect at the dock. I need to lift him on the bow when beaching. I have a plastic milk carton with added wood top for short two legged passengers.
 

Attachments

  • Resized_20190609_170553.jpeg
    Resized_20190609_170553.jpeg
    485.3 KB · Views: 7
  • Screenshot_20210813-001035_Facebook.jpg
    Screenshot_20210813-001035_Facebook.jpg
    515.7 KB · Views: 7

Troubled1

Petty Officer 2nd Class
Joined
Oct 2, 2019
Messages
116
My black lab is perfect at the dock. I need to lift him on the bow when beaching. I have a plastic milk carton with added wood top for short two legged passengers.
Good idea. I have a small single step Rubbermaid stepper I can toss up under the bow. I’ll probably end up using an aluminum ramp for the dogs and stow it in the water ski hatch.
 
Top