1979 Starcraft 16’ SS Refresh

Moserkr

Chief Officer + Starmada Splash Of The Year 2021
Joined
Nov 23, 2020
Messages
869
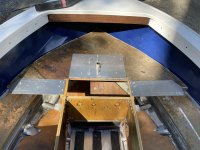
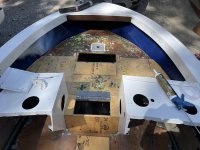
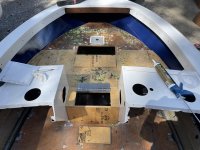
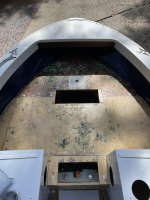
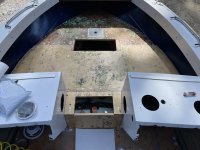
Lunch live update! Got the front deck fitted but ran short of rivets! Luckily i foresaw this coming, and ordered some to be here on monday. Hoping 100 is enough lol, cause that would be +\- 300 LF blinds for the complete deck/gunnels. Will install the casting deck as soon as those rivets get here, but its ready.

Under the casting deck, on the main deck, i put a coat of spar over the epoxy, which will all be covered by black neoprene (spars drying now). Protects the floor of the storage area and is going to prevent stuff from going down into the bilge - except water of course. I will put a coat of spar across the whole main deck before the actual floors go in.

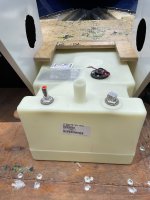
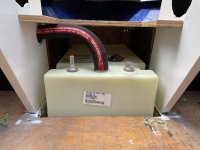
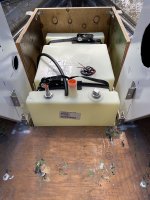
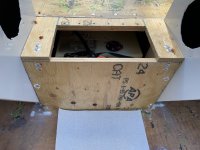
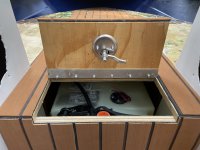
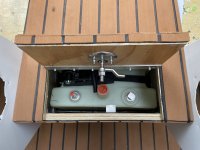
Moved on to the gas tank which was surprisingly easy, and not surprisingly very tight fitting. Barely made it with the 1.5” fill line - there is no room for error between it and the floor. I cut through the console and it will route along the inside up to the gunnel. But it fits!! Can finish that up as soon as the casting decks in and my vent line comes in. So...

This afternoon, its consoles and electronics time! Hoping to get a good bit done but we shall see. I need the basics - auto bilge and motor hardwired to one battery with a kill switch. Safety lights to a fuse panel on the auxiliary battery, which will also power the fish finder, radio, manual bilge, and other electronics eventually.

Back to work!!
 

Attachments

  • B1AF479A-35C5-4803-804D-533376BD70D0.jpeg
    B1AF479A-35C5-4803-804D-533376BD70D0.jpeg
    3.1 MB · Views: 14
  • 0E9F7217-6D4A-44F6-A0B7-BA64A6D1DF3A.jpeg
    0E9F7217-6D4A-44F6-A0B7-BA64A6D1DF3A.jpeg
    3.1 MB · Views: 13
  • BD91881C-67E2-4D2C-87D2-35F642993695.jpeg
    BD91881C-67E2-4D2C-87D2-35F642993695.jpeg
    3.2 MB · Views: 13
  • 470DF021-1B04-456F-878C-8D42E447DCE7.jpeg
    470DF021-1B04-456F-878C-8D42E447DCE7.jpeg
    1.4 MB · Views: 13
  • B260E9FD-56DA-437E-A07E-EEC22F5BE38D.jpeg
    B260E9FD-56DA-437E-A07E-EEC22F5BE38D.jpeg
    2.9 MB · Views: 15

Moserkr

Chief Officer + Starmada Splash Of The Year 2021
Joined
Nov 23, 2020
Messages
869
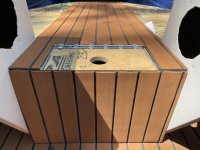
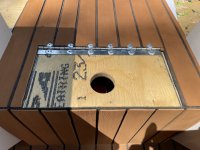
In my last post I failed to mention that the gas tank is fully removable as well!! I didnt know if it would be but as long as I take off the vertical wood cover between the consoles, which Ill make removable, then can be maneuvered out. Also has the regular hatch above the fittings to keep an eye on thing.

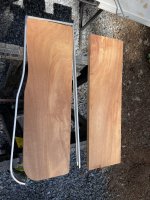
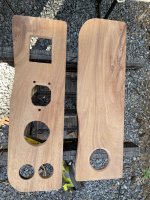
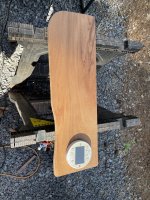
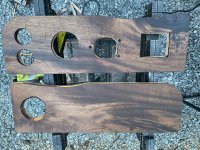
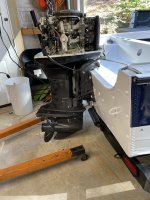
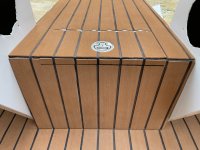
Spent way too much time on the consoles last night but i think they turned out nice. They are a little lighter than the rest of the wood I stained, but I like it. Wish the other wood turned out like them, but they will at least stand out. Today is now electronics day, and Ill be picking up the engine hoist from my in-laws. White paint is pretty well cured so I think the motor can be put on it. Also need to do the trim pieces that require 2 sets of hands so will employ the Admirals help while shes around.

Tomorrow, hopefully my LF rivets come in so I can mostly finish the casting deck. Missing the 5/8” vent line for my fuel tank as well so I better call the company, see why I only got the fill line. Getting close but theres so many little details!!!
 

Attachments

  • 2149BB00-6F89-49D7-82E5-F62C25798FA9.jpeg
    2149BB00-6F89-49D7-82E5-F62C25798FA9.jpeg
    2.5 MB · Views: 9
  • 6F7DE0BE-0083-4F52-AA7D-A638469A3B2D.jpeg
    6F7DE0BE-0083-4F52-AA7D-A638469A3B2D.jpeg
    2.4 MB · Views: 8
  • 8292CDB6-D379-47E1-8503-96F82DA94D1E.jpeg
    8292CDB6-D379-47E1-8503-96F82DA94D1E.jpeg
    2.6 MB · Views: 9
  • 8A2A9070-70BE-446B-85CE-EBEBDB412115.jpeg
    8A2A9070-70BE-446B-85CE-EBEBDB412115.jpeg
    3.5 MB · Views: 9

SHSU

Lieutenant Junior+Starmada Splash Of The Year 2019
Joined
Mar 8, 2017
Messages
1,741
A lot of progress made!!! You will have her in the water super quick.

SHSU
 

Moserkr

Chief Officer + Starmada Splash Of The Year 2021
Joined
Nov 23, 2020
Messages
869
Yes sir!! Still working on it... sneak peak 😏
9EAE5D92-6555-41C8-9DD5-FF59CE36BDDE.jpeg

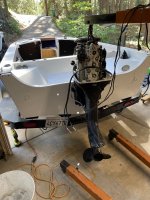
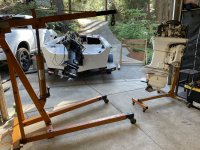
Borrowed the engine hoist for a few hours today. Moved the running motor onto the boat, and the non-running motor onto the motor stand. Much nicer than the big wood one and so much garage space cleaned up!! Barely got the motor on the boat since it was tilted all the way down, so once it was on I had to wire the TnT in order to raise the motor just to move it out of the garage! Good news is it worked!! Swap took 2.5 hours but its done n done! Going to start wiring the rest tonight and get the consoles in!
 

Attachments

  • E62B8599-9DC3-4592-8022-CEC5684A97B9.jpeg
    E62B8599-9DC3-4592-8022-CEC5684A97B9.jpeg
    1.8 MB · Views: 14
  • E57A1D4B-4C97-4654-B960-A70B7B51B6AF.jpeg
    E57A1D4B-4C97-4654-B960-A70B7B51B6AF.jpeg
    2 MB · Views: 14

SHSU

Lieutenant Junior+Starmada Splash Of The Year 2019
Joined
Mar 8, 2017
Messages
1,741
Man you are going to have to make sure you lift the motor before you pull out, but should make for a shallower launch/load.

SHSU
 

Moserkr

Chief Officer + Starmada Splash Of The Year 2021
Joined
Nov 23, 2020
Messages
869
Haha @SHSU you have no idea!! The trailer hitch was way lower in my driveway than the back in those 2 pics and it still could touch!! I will keep it fully up until shes in the water and then still will be careful.

Worked on the consoles a bit today and installed pieces for the fuel system. Im behind my hopeful schedule and unfortunately have a short trip coming up. So Ill give it a final push tonight and see what gets done. Im missing my vent line too so dead out of the water until then anyway.

Ill do an update tomorrow before I pack her up for a week.
 

Moserkr

Chief Officer + Starmada Splash Of The Year 2021
Joined
Nov 23, 2020
Messages
869
List is getting so short I can remember it off the top of my head!! Haha. Of course each thing on this list has at least 5 sub steps…

Casting deck and gas tank are in!!! Woohoo!!!! Still have to hook all the fuel lines up, and put in the deck hatches, but everything is ready. Minus that vent line - found out it got backordered so got a different one. Gas tank is removable by drilling out 4 rivets if I need to.

Put the mounts for electronics, steering, and gauges into the dash too. Then pulled the gauges out - they were old and one broke. Plus the 2 small ones were an hour meter and a trim gauge. I dont need either, so ordered a volt meter and gas gauge as replacements. Dash will only have those plus the old tach (will replace eventually), and an electronic panel. Sorry no pics, its not done.

Will try to get back to it once Im back again. Doesnt look like Ill get to take my niece out in it, so kayaks it is. See y’all soon!
 

Attachments

  • 6700C0CD-849E-473F-82F2-D7E6EC5FDC04.jpeg
    6700C0CD-849E-473F-82F2-D7E6EC5FDC04.jpeg
    1.9 MB · Views: 12
  • EAEF2B1C-0607-443B-9334-1989CA115097.jpeg
    EAEF2B1C-0607-443B-9334-1989CA115097.jpeg
    2.1 MB · Views: 11
  • 5B6830E0-6653-4A0A-AAC3-FD324317AD5C.jpeg
    5B6830E0-6653-4A0A-AAC3-FD324317AD5C.jpeg
    2.9 MB · Views: 10
  • 075B14E6-3EFB-4101-9B4A-FC031E423E5D.jpeg
    075B14E6-3EFB-4101-9B4A-FC031E423E5D.jpeg
    2.8 MB · Views: 12

Moserkr

Chief Officer + Starmada Splash Of The Year 2021
Joined
Nov 23, 2020
Messages
869
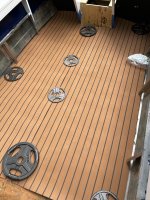
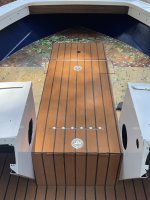
Not back at it 100% yet, but had a little time today with my niece in town to put the main hydroturf sections in! Theres a reason it was so cheap - factory seconds…. Each piece had minor issues I worked around. But a good portion is now in!! Used gorilla spray adhesive to hold it down. After applying it, Im very confident it is not ever coming off without a hard fight. Pic is prior to it being glued in place. Will try to get to more later this week…
 

Attachments

  • E26D3060-A056-42F1-A30B-8624D97820D6.jpeg
    E26D3060-A056-42F1-A30B-8624D97820D6.jpeg
    2.3 MB · Views: 21
SHSU

Lieutenant Junior+Starmada Splash Of The Year 2019
Joined
Mar 8, 2017
Messages
1,741
That is some nice looking flooring.

I really like the Nautolex we went with, but if we did more boating/tubing then fishing I might be tempted to try it. Having a softer surface for the admiral/mini admiral to walk on when boating would be nice, but having a hard surface for fishing just makes more sense for our use case.

SHSU
 

Moserkr

Chief Officer + Starmada Splash Of The Year 2021
Joined
Nov 23, 2020
Messages
869
Thanks. I agree, and Im hoping dirt blends into it without severe staining. But im stuck with it now for a while lol. On bare feet its extremely comfortable and being closed cell foam should still be great for fishing. Its big on duck boats from what ive noticed now and those get pretty thrashed so I have high hopes. Im happy to be the experiment and will update accordingly.

The nautolex definitely has its benefits, and i even read that people put foam under it for padding which I didnt know was possible. Im not sure of the lifespan of either options so when the time comes to replace it can decide which one is more worthwhile. Seems like the nautolex is tried n true though.

Wont get to the boat til this weekend and we have a heat wave coming of course…. Did test fit the gunnel boards and need to cut them down a few inches. Should look nice in the end.
 

Moserkr

Chief Officer + Starmada Splash Of The Year 2021
Joined
Nov 23, 2020
Messages
869
Back in the saddle!! Ready to ride this horse across the finish line.

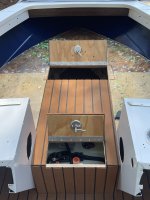
Slow going today amidst the heat and i still didnt get all my lines cut right. Good learning curve though. Part of the issue of the front casting deck was I reused the PO’s plywood since I didnt want to buy new expensive stuff. Its plenty stout and will look fine, but took more work to make it happen.

Front casting deck is officially… done!! (Minus trim but i dont have that yet). Hatches are in, functional, and tight. The hydroturf is down - which also had issues. The “sloppy seconds” not only had a few scuffs or uneven cuts I worked around, but also had different widths of brown stripes…. Took extra cuts to make it work and im fairly confident the glue will hold it. Hard to tell where those cuts even are imo. Trim will go over all the edges and around all the hatches. Just needs the bow seats to not look so ugly lol.

Tomorrow, I will tackle the gunnel wood and foam. Thanks for stopping by and good to be back at it!!
 

Attachments

  • 737340C1-B300-455A-BF66-0BCEAF4B223B.jpeg
    737340C1-B300-455A-BF66-0BCEAF4B223B.jpeg
    3.9 MB · Views: 12
  • 40B3B97F-6AB9-4916-9C95-9D378C5E0C06.jpeg
    40B3B97F-6AB9-4916-9C95-9D378C5E0C06.jpeg
    4.3 MB · Views: 13
  • CCA566ED-0CF5-4123-8581-2D419C1D609F.jpeg
    CCA566ED-0CF5-4123-8581-2D419C1D609F.jpeg
    4.5 MB · Views: 12
  • B9A8FF47-10B4-4C3D-95B1-4E5627DCD66B.jpeg
    B9A8FF47-10B4-4C3D-95B1-4E5627DCD66B.jpeg
    3.7 MB · Views: 12
  • 16458B4C-F261-4C55-BDAE-DF7D74D00C91.jpeg
    16458B4C-F261-4C55-BDAE-DF7D74D00C91.jpeg
    3.4 MB · Views: 13
  • B9797406-9415-404C-8836-BB2E2667076F.jpeg
    B9797406-9415-404C-8836-BB2E2667076F.jpeg
    1.4 MB · Views: 12
  • 7C1D783B-6688-4353-9C27-39DA6DAA4204.jpeg
    7C1D783B-6688-4353-9C27-39DA6DAA4204.jpeg
    1.3 MB · Views: 12

Moserkr

Chief Officer + Starmada Splash Of The Year 2021
Joined
Nov 23, 2020
Messages
869
Oh yea…. You can see where i tried putting the hydroturf under the rivets so that it was held down. Bad idea. Didnt like it and decided to glue the rest over the riveted hinges. Hinges are all backed by AL on the opposite side. Very stout. One day ill redo the front deck how I originally wanted it with a bigger hatch and the casting seat centered better (PO had it too far forward). Oh well, im happy enough and moving forward!
 

SHSU

Lieutenant Junior+Starmada Splash Of The Year 2019
Joined
Mar 8, 2017
Messages
1,741
We are our own worst critics. I can't see any issue with the hydroturf.

You going to finish the rest of the front deck in hydroturf?

SHSU
 

Moserkr

Chief Officer + Starmada Splash Of The Year 2021
Joined
Nov 23, 2020
Messages
869
@SHSU we absolutely are. If I ever change it in the future, at least i have a much better of how/what to do.

I wanted to do the whole front deck in the hydroturf but i dont have enough. I do, however, have all the material for bow cushions…. Which would cover the additional hydroturf anyway. Not sure what the standard is for building bow cushions, but heres the future plan…

I have some thin 1/4” plywood lying around. Cut the wood, vinyl, and foam to fit the bow in 3 sections, staple it together, and bolt it down. If theres a different/better way to do a no sew cushion, Im all ears. Cushions would wrap around the hydroturf section in the middle.

Will finish the rest of the boat before i do that part. So when i said “done”, its not exactly true, but done for now lol.
 

Moserkr

Chief Officer + Starmada Splash Of The Year 2021
Joined
Nov 23, 2020
Messages
869
More coming…. Heat is slowing me down. Once the gunnel panels are in I can do the consoles, wires, and fuel system. Need em in to mount stuff like the fuse panel and water separator.
 

Attachments

  • 51A6BA67-0625-4A9A-BF23-123635F2A6E5.jpeg
    51A6BA67-0625-4A9A-BF23-123635F2A6E5.jpeg
    6.5 MB · Views: 12
  • 286BBE0D-2B54-47C1-9EC9-C0C471458F6D.jpeg
    286BBE0D-2B54-47C1-9EC9-C0C471458F6D.jpeg
    4.6 MB · Views: 12
  • 5615DAFF-4D8A-477A-B252-2B5F2031DCC6.jpeg
    5615DAFF-4D8A-477A-B252-2B5F2031DCC6.jpeg
    4 MB · Views: 12

SHSU

Lieutenant Junior+Starmada Splash Of The Year 2019
Joined
Mar 8, 2017
Messages
1,741
I have some thin 1/4” plywood lying around. Cut the wood, vinyl, and foam to fit the bow in 3 sections, staple it together, and bolt it down. If theres a different/better way to do a no sew cushion, Im all ears. Cushions would wrap around the hydroturf section in the middle.

Use 1/2 inch BCX so the SS staples actually don't punch through. Plus it will help keep it shape over time. Would be good to seal as well, but up to you.

SHSU
 

Moserkr

Chief Officer + Starmada Splash Of The Year 2021
Joined
Nov 23, 2020
Messages
869
I was definitely planning on sealing it like everything else in the boat. I have a half gallon of spar left for the bow and bench seats. Really dont want to buy more plywood lol. Budgets blown, but i have enough 1/4” ply wood lying around to where i could double up with some glue…. Ill weigh the options when I get to that point. Im guessing you dont want staples sticking through so that you dont get poked or have it poke through the vinyl? The board with the vinyl attached will be bolted to 3/4” bcx so i dont see an issue with bending.
 

Moserkr

Chief Officer + Starmada Splash Of The Year 2021
Joined
Nov 23, 2020
Messages
869
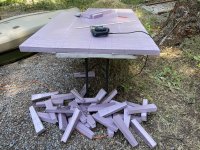
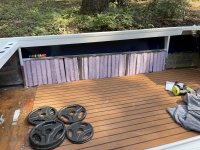
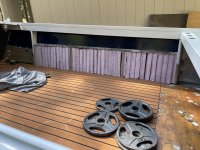
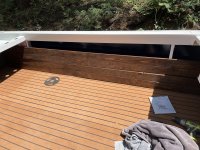
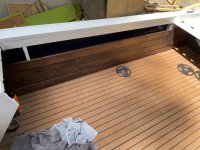
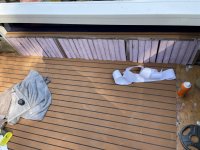
All the flotation foam is officially in!! Ended up using a little over 2.5x sheets of 2” foam. Added hydroturf to the inside of the gunnel shelf too and added scraps of it under the SW to finish the floor. Now Im test fitting the gunnel wood board panels. Still need to create brackets so they can attach to the console wood and the stern brackets. Will rivet all across the gunnel shelf and its supports too to tie it all in together. Boards are almost 10’ long. My floor bows up in one spot so need to figure that out before I rivet the boards in. Also the curve of the bow hits the bottom boards so either need to trim it or force it to curve with the boat. There will be other details I will get to later as well but want these boards in so I can get to wiring and fuel!!
 

Attachments

  • B396B286-82D2-427C-B645-26E80D0A5229.jpeg
    B396B286-82D2-427C-B645-26E80D0A5229.jpeg
    4.4 MB · Views: 18
  • 5442C7E3-95DA-4EB6-92D3-3A87BFE9BA5C.jpeg
    5442C7E3-95DA-4EB6-92D3-3A87BFE9BA5C.jpeg
    3.2 MB · Views: 18
  • 870A4728-E610-4BCC-8DBA-C2E0A269278C.jpeg
    870A4728-E610-4BCC-8DBA-C2E0A269278C.jpeg
    3.4 MB · Views: 18

SHSU

Lieutenant Junior+Starmada Splash Of The Year 2019
Joined
Mar 8, 2017
Messages
1,741
Looking good!

I like how you are using the boards for the siding. Looks really good and fits with the hydroturf.

SHSU
 

Moserkr

Chief Officer + Starmada Splash Of The Year 2021
Joined
Nov 23, 2020
Messages
869
Thanks! They are still not in but the brackets are cut now. Just need to drill and rivet everything into place. Got the warped wood floor to sit almost level with 300 lbs of plates, so im hoping that the gunnel wood holds it down with rivets…. If not theres nothing i can do now. I did notice one spot on the hydroturf starting to bubble though…. Really hope that its…

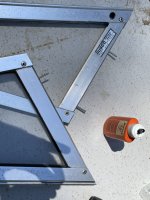
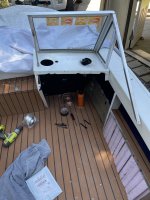
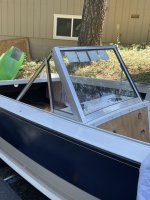
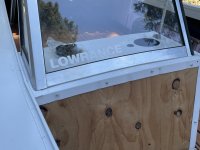
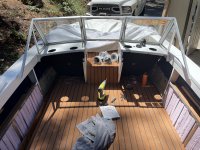
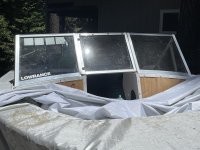
Today I did get the windshields installed!!!! Felt great and freed up valuable garage floor space. As you may know, Im going to commit the sin of cutting off the ugly long windowless support beams. Since my frames are already abused with an extra large random hole and a rusty screw thats not coming out yet…. I dont feel so bad.

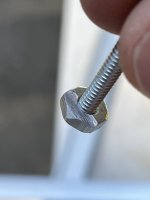
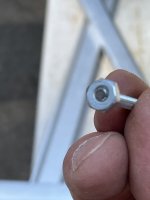
To secure the small side support windows though, i did have to do some rough engineering. I got some #6 nuts (5/32) and #6 1.25” machine screws. Cut the heads off the screws, and ground down one side of the nuts. This allowed me to thread the nuts on one side of the screw, grounded side down, with the screws cut end facing up. So the screw cant come off the nut, and with the nut being ground down on one side, it fits into the smaller track of the smaller side windows. These act as the new support and are solid. Added 2 screws so each side window and drilled some additional holes in the consoles to accommodate them. I have not cut the old, long windowless supports off… yet. Pretty happy how it turned out. My original in er support braces need help though. They are all rusted and fugly - if theres a place that sells replacements, please let me know. Im interested. Other than that, on to the next step!! Finishing the gunnel wood… (includes a speaker install).
 

Attachments

  • C51697D9-0B0D-45A1-8B9E-75068B823648.jpeg
    C51697D9-0B0D-45A1-8B9E-75068B823648.jpeg
    662.1 KB · Views: 12
  • F733F6E6-DDD3-4A60-82C9-94E0FDAC0DD7.jpeg
    F733F6E6-DDD3-4A60-82C9-94E0FDAC0DD7.jpeg
    691.5 KB · Views: 11
  • 8C5D6A33-C113-4794-B205-E4ABB0BC1C48.jpeg
    8C5D6A33-C113-4794-B205-E4ABB0BC1C48.jpeg
    1.4 MB · Views: 12
  • C9DDEE8E-001A-417D-B5CD-D78E4DFC61CC.jpeg
    C9DDEE8E-001A-417D-B5CD-D78E4DFC61CC.jpeg
    1.5 MB · Views: 14
  • A797162C-AEEC-4692-A457-17C239789A64.jpeg
    A797162C-AEEC-4692-A457-17C239789A64.jpeg
    1.3 MB · Views: 14
  • C46E9E11-F6E1-4593-8FD6-230BFB2607A0.jpeg
    C46E9E11-F6E1-4593-8FD6-230BFB2607A0.jpeg
    1.8 MB · Views: 13
  • 5A762870-BC24-4B0D-BB26-8CBE1BD44105.jpeg
    5A762870-BC24-4B0D-BB26-8CBE1BD44105.jpeg
    4 MB · Views: 12
  • C64FD645-DFE6-4853-8364-355B87642230.jpeg
    C64FD645-DFE6-4853-8364-355B87642230.jpeg
    2.5 MB · Views: 12
Top