1979 115 hp 6 cyl inline 2 cycle timing/carb adjust

Curtis W.U.

Cadet
Joined
Apr 29, 2018
Messages
17
I have a 1979 115 hp 2 cycle 6 cylinder inline mercury out board.
I am refurbishing the 16 ft. Hydra sports bass boat. I have everything completed except the engine repair.
What I have done and tried is as follows:
1. Clean carbs (would run at higher rpm but not idle no matter how the carbs was set)
2. Checked compression had 115 to 120 on all cylinders.
3. Cheked plug firing and all cylinders are firing.
4. Had a lot of play in from throttle lever to carb/timing linkage (could not get new linkages due they are no longer produced) So I decided to use a light spring to keep linkage loaded so there would be no advance of spark at idle.
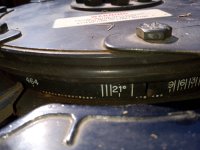
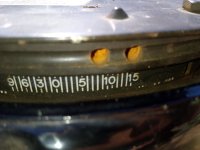
Had it running and idling but it was rough so tried adjusting the carbs and got some of it out then made a mistake and tried adjusting the timing advance lol now it will not run unless it is higher idle speed. can't seam to find the right point for the advance/carb setting.

How do you adjust the timing advance and carburetors for this outboard.
Btw I am a senior electronics tech and have retired from industry where I have 45 years experience in Electronics/electrical/mechanical so I should be able to follow any technical instructions.

Thank you
 
Last edited:

merc850

Commander
Joined
Jul 7, 2010
Messages
2,020
2 things to note: 1: the throttle cable is adjusted to set the idle remove the brass fitting from its holder and turn it until the throttle arm makes the lever hit the idle stop - 2: you have to adjust the low speed in the water in forward gear; set the needles 1 1/4 turns out from seated to start the adjust for best running, can't help you with timing.
 

Chris1956

Supreme Mariner
Joined
Mar 25, 2004
Messages
27,033
I think 1979 was the changeover from distributor ignition with 1 coil to Alternator Driven Ignition (ADI) with 6 coils. Timing is unique to each type of ign. So what do you have?

Did you replace carb gaskets, floats and inlet needle and seats, when cleaning them? If not, it is a real good idea. Some carbs use thecopper inlet needle gasket, some don't. Invert the carb covers and observe the carb levers. The top lever should be straight across. Bend the lower lever to make it so. Turn the cover right side up. The distance between the two lever ends should be 1/4". Floats have a tiny spring on their tops. These rust away and the floats crack or dissolve, hence the recommendation to replace them.

In both cases, carb idle mixture needles should be set 1-1/2 turn open. The first timing adjustment is when the carbs are closed, but ready to open. For distributor models this timing spec is 4-6* BTDC. For ADI the spec is 0-9*ATDC. Max spark advance is 21*BTDC for both.

To time it, remove the prop. Remove spark plugs 2-6 and install them into their wires and ground their bases. Put timing light on Spark Plug #1. Advance throttle until carbs are closed, but ready to open, and crank motor, ign on, by jumpering the starter solenoid. Read the timing pointer.

On the distributor models, you must loosen the two 5/16" bolts on the distributor brass collar to adjust the carb "fingers" position.

On the ADI models, you adjust one of the set screws on the throttle arm to adjust the carb actuation arm, or the trigger arm length.

Now set the throttle to max and crank the motor and read the max spark advance. On distributor models, adjust the "Max Spark Advance" set screw on top of the distributor to get the correct timing.

On the ADI model adjust another one of the set screws on the throttle arm to set it.

Adjust the throttle stop screw above the distributor to stop the throttle when carbs are full open but not quite forced against the stops.

The ADI has yet another set screw on the throttle arm to set throttle stop,

Install the spark plugs, launch her, start and warm the motor and adjust the carb idle mixture screws, one carb at a time, top to bottom, a bit at a time in gear at idle, until she will accelerate smoothly and still idle reasonably. It is trial and error for us novices. I recommend a fresh 50::1 mixture to do this adjustment.

Of course, most of this is spelled out in a service manual, which I highly recommend.
 

Curtis W.U.

Cadet
Joined
Apr 29, 2018
Messages
17
What I have is a serial number 5526880 mercury 115 hp 2 cycle inline 6. It has 6 coils and 2 switch boxes. Serial number is in two places the freeze plug and the frame. As to a service manual I have not found the correct one everyone of them says it is for this 115hp but when you look in it there is no 6 cylinder inline, there is a V6 cylinders, 4 cylinders etc. So I am hesitant about buying one when everyone I have found has not been the right one.
I have not rebuilt the carbs just cleaned them. A friend of mine has a mercury and has reworked his carb several times and he helped with the cleaning and said it should run good. The floats have the springs and are not rusted or cracked and the seals looked good. The carb was not that dirty it looked like someone had set the motor up for storage. the carbs do not flood out. The electric choke/primer works. But itpops back like it is backfiring when you use it whitout the throttle opened. It runs great at higher RPM. I know you have to put in the water to adjust the carb mixture correctly by having it idling in gear and turning them in until it starts choking down then backing out 1/2 turn on each carb. But you have to get it to idle correctly to do that. I have not had this in the water only have the water hose attached. I did put a new water pump in it.
I have been reading up on this but don't have the manual. But I have read that the rpm restrictor can cause loss of power.. I have been also thinking about the rpm restrictor (this does have one located on the front plate near the tilt relay) and wondering if it has changed values and is causing low firing near idle speeds. I wonder if it would hurt it to start it with the yellow/blk and black leads disconnected to see if it effects the running at idle.
One thing this motor set up for a couple years.
Reason I am trying not to spend much is I am on SS and only have limited funds.

Thank you
 

Curtis W.U.

Cadet
Joined
Apr 29, 2018
Messages
17
2 things to note: 1: the throttle cable is adjusted to set the idle remove the brass fitting from its holder and turn it until the throttle arm makes the lever hit the idle stop - 2: you have to adjust the low speed in the water in forward gear; set the needles 1 1/4 turns out from seated to start the adjust for best running, can't help you with timing.
This boat has a spring loaded foot pedal I had to adjust the holder so the idle arm would return to idle position. The carb linkage is adjusted to where carb baffle is almost closed but with no pressure on it. I really don't like this throttle setup. Like driving a car :)
Thanks
 
Last edited:

jimmbo

Supreme Mariner
Joined
May 24, 2004
Messages
12,944
Shows to be a 79, which would be an Inline 6

Service manual for it
 

Curtis W.U.

Cadet
Joined
Apr 29, 2018
Messages
17
Shows to be a 79, which would be an Inline 6

Service manual for it
I made a bid on it but will be 7 days before I know if I will get it lol
 

Curtis W.U.

Cadet
Joined
Apr 29, 2018
Messages
17
If you need it bad, Buy It Now for twenty.....
That would mean I would be paying 31.50 for it since he wants 11.50 to ship it. I have to hold it as low as possible because I am retire and have very limited funds. Also I am not in any hurry. Been working on this boat for about 8 months now as I get funds 😂. Slow but sure win in the end.
Thank you
 

Chris1956

Supreme Mariner
Joined
Mar 25, 2004
Messages
27,033
The Mercury 115HP inline 6 was one of the most popular and successful motors ever built. The last one was built in 1988.

You clearly need the service manual for it, as it has specific link and synch procedures, and does not usually act as you have described.

Once you get the carbs clean and the floats and timing set correctly, she should idle well, but not accelerate, until the mixtures are adjusted. Since your motor does not do that, something is amiss.

The hot foot throttles were popular, although I have never worked on one.

You must (must) rebuild the waterpump before you use this motor. otherwise, it can easily overheat, and you will be looking at hundreds of dollars in new parts and many hours to repair, and you must do the work yourself.

Check the wiring harness on the engine. Many will have lost insulation by now and must be replaced.

Ii recommend you save up some $, so you can buy the impeller repair kit ($50), the service manual, the gaskets inlet needles and seats and floats (~$50). You do have a timing light? You will also need to set the timing pointer. A caliper works well. A steel ruler can work in a pinch.
 

Curtis W.U.

Cadet
Joined
Apr 29, 2018
Messages
17
The Mercury 115HP inline 6 was one of the most popular and successful motors ever built. The last one was built in 1988.

You clearly need the service manual for it, as it has specific link and synch procedures, and does not usually act as you have described.

Once you get the carbs clean and the floats and timing set correctly, she should idle well, but not accelerate, until the mixtures are adjusted. Since your motor does not do that, something is amiss.

The hot foot throttles were popular, although I have never worked on one.

You must (must) rebuild the waterpump before you use this motor. otherwise, it can easily overheat, and you will be looking at hundreds of dollars in new parts and many hours to repair, and you must do the work yourself.

Check the wiring harness on the engine. Many will have lost insulation by now and must be replaced.

Ii recommend you save up some $, so you can buy the impeller repair kit ($50), the service manual, the gaskets inlet needles and seats and floats (~$50). You do have a timing light? You will also need to set the timing pointer. A caliper works well. A steel ruler can work in a pinch.
I have a timing light coming in today, I have already replaced the water pump, and I have already rewired the bad wiring.
I check to make sure there was nothing major wrong with engine back 8 months ago. Then I started by removing the flooring/replacing the flooring, replacing the sump pumps, live well pumps, replumbed it, removed and cleaned fuel tank and repairing the electrical. This is a project I am doing and knew before I started on it it would take time due to limited funds.
The motor ran somewhat when I first started it about 8 months ago but would not idle. I waited until I got the boat finished before starting on the engine. Then I started by cleaning the carbs and fooled with it for a couple days and got it to idle but it was about 400 rpm to high and would die when you lowered it as if it was runing out of fuel and would jump if put into gear at the higher RPM. I fooled with the timing advance screw because I could hold it back and it would idle a little lower and now it will not idle but at a high rpm. I did set that screw back where it was. Since the play in the linkage at the carb is what is allowing the movement I used a light spring to stop it from moving with out the throttle being pressed. I have made a bid on a manual but if I have to pay more then my bid I will buy new one for 49$ from Mercury if I have to before paying over half the cost of a new one for this used one which may are may not have all the pages or is completely readable (you never know until you get the book what actual shape it is in). It says on website not refundable so will be taking chance even with the bid I made it is 21.50 with shipping.
 

Chris1956

Supreme Mariner
Joined
Mar 25, 2004
Messages
27,033
Curtiss, Small engine mechanics will not help you with your thoroughbred motor. And your motor is a thoroughbred. Get the manual and follow it exactly, or you will not have a motor.
 

Curtis W.U.

Cadet
Joined
Apr 29, 2018
Messages
17
Curtiss, Small engine mechanics will not help you with your thoroughbred motor. And your motor is a thoroughbred. Get the manual and follow it exactly, or you will not have a motor.
Chris I will get a manual. I checked the time following your instructions and it was 5 degree ATDC I adjusted it to 4 degrees BTDC. It seams to run better at lower RPM now but I am just going to have to wait on manual. It still dies out at idle after a about 10 seconds. Could be the carbs and or plugs. It is now acting like it has a small miss at idle like one of the plugs is not firing all the time at low RPM. You are correct about this being a thoroughbred. I will wait on doing anything more until I get a manual, new set of plugs and new carburetor kits. But the timing was way out of the 0-9 degrees BTDC where it should have been. So this was part of the problem. I am now thinking it is several things causing this not just one.
Thank you for your help This got me started on the right track.
 

Chris1956

Supreme Mariner
Joined
Mar 25, 2004
Messages
27,033
Idle pickup timing on your ADI motor should be 0-9* ATDC.

Did you set the timing pointer?
 

Curtis W.U.

Cadet
Joined
Apr 29, 2018
Messages
17
Idle pickup timing on your ADI motor should be 0-9* ATDC.

Did you set the timing pointer?
I said it backwards lol. I should have said it was 5 degree BTDC I adjusted it to 4 degrees ATDC. The label on it has 0 to 9 and 0 to 21
1663936373972.png
 
Last edited:

Curtis W.U.

Cadet
Joined
Apr 29, 2018
Messages
17
No I did not set the pointer because I did not have the correct caliper but will borrow one when I start over using the manual. I figured to set every thing per the manual and get the best starting point. This way I have the best starting point for troubleshooting. I am waiting on the manual to do anything further. As you said you can not use a trail and error method on this higher tech engine. As you said this is a thorough bred and need to be done right.
I had forgotten about working on a friends 80 hp until you stated about it being a thorough breed. I had a friend bring me a Johson 80 hp to help repair several years ago. The 80 ECI, altenator windings, ECI windings,ECI switch box, rectifier and pickups was burnt out (appeared to be lightning damage from a near strike not direct hit) and all of it had to be replaced (cost was over 800$ worth of parts). The manual on it gave specific instructions on tests that had to be made and I made those tests before replacing those parts to insure the p[arts was bad and made them agian after to insure there was no issues. To do that you had to have that special meter. I bought the special test meter for checking those voltages and we did get that motor purring like a kitten. But that was just after I was forced to retire 😂. My Memory seams to be getting worse with age 😆
 

Curtis W.U.

Cadet
Joined
Apr 29, 2018
Messages
17
Got a question lol. I ordered a dial indicator and it will be in on the 29th. I read the manual and understand everything up to step 9 under Timing adjustments.

8. Connect timing light to number 1 plug
9. With engine in neutral, hold throttle lever so that the idle stop is against stop. Crank engine with starter motor and adjust primary pickup screw (figure 6) to align the specified pickup mark on timing decal with timing pointer. Rertighten jam nut on adjustment screw.

I have not read anything about the specified pickup mark and do not see which mark they are talking about. The picture below shows the
.464...............lll21 l...... 9ll6ll3ll0llll5llll10lll15 .. .. ... where is the specified pickup mark?
 

Attachments

  • IMG_20220927_144706627.jpg
    IMG_20220927_144706627.jpg
    1.3 MB · Views: 2
  • IMG_20220927_144619595.jpg
    IMG_20220927_144619595.jpg
    1.1 MB · Views: 2

Curtis W.U.

Cadet
Joined
Apr 29, 2018
Messages
17
Never mind about it I found it in front of book under specifications. 5-7 degrees ATDC for this engine.
 

Curtis W.U.

Cadet
Joined
Apr 29, 2018
Messages
17
I followed manual completely, I did set the .464 pointer but when I disconected the blk/wht as manual calls for, the timing showed to be so far out I could not see the markings. I was able to adjust the idle timing but the screw head is about 1/4 inch from all the way in, before with the screw head was about 3/4 of an inch out. I finally got to 7 degrees and the high RPM time I set at 20 degree mark as the manual called for. I finally got everything set as it is supposed to be but I ran into a problem. When I went to reconnect the Idle stabilizer blk/wht I got to really looking at the stabilizer wiring and the red lead was missing (looks like it hasn't been hooked up for a long while). So I stripped back the outer black cover and found it but when I went to strip it, it is so decayed it falls apart. Looks like the wire itself is corroded. The isulation is still intact and movable. Not so sure I want to hook it back up because of what I have read about them causing major issues but then I am still learning and want some advice. I have not tryed starting the engine and will not until I know more about this.
Any help will be most appreciated.
 
Top