1978 Islander 22 I/O

DLNorth

Chief Petty Officer
Joined
May 26, 2016
Messages
432
You are off to a very good start, and good choice on the replacement engine.
And a note, based on that rating plate (and the paint), that boat is likely a '79.
You might take the Hull number of the back corner when you talk to SC and see if they can provide more info.
 

66Holiday924

Chief Petty Officer
Joined
Aug 21, 2017
Messages
525
I did a little more deconstruction work. I removed the transom assembly and I've been thinking about the windshield. This boat is going to need a new windshield. The two front panes are plexiglass. I toyed with the ideas of new glass from a local glass shop and contacting Starcraft for a recommendation on where to find a brand-new replacement. I settled on looking for a used one and I think I have one that's going to work great.

They used to make windshields that flip open (I don't know if they still do). So thinking about that, and how nice it is to be able to open up to the breeze on a hot day on the lake, that's what I started looking for. I found one and I have arrangements to meet a gentleman in Chicago to pick it up, in a couple weeks.

Based on the measurements, this new windshield could either flex the side windows out a little to get around the aluminum rail that is sticking up, or I can cut the aluminum rail off and it won't have to flex at all. I am not fond of the aluminum rail sticking up. It's a great place for debris and gunk to collect. So I'm thinking, hack it off, replace it with a flat trim piece, and I'm thinking sawzaw for that job but please chime in if you have a better idea.
 

Attachments

  • IMG_4088.JPG
    IMG_4088.JPG
    4.2 MB · Views: 12
  • IMG_4096.JPG
    IMG_4096.JPG
    5.6 MB · Views: 13
  • IMG_4097.JPG
    IMG_4097.JPG
    2.4 MB · Views: 14
  • IMG_4098.JPG
    IMG_4098.JPG
    5.8 MB · Views: 14
  • IMG_4099.JPG
    IMG_4099.JPG
    2.1 MB · Views: 14
  • 341003891_6093854740728156_8019447270741204034_n.jpg
    341003891_6093854740728156_8019447270741204034_n.jpg
    173 KB · Views: 14
  • 326910077_6002475599849830_2803967965492114768_n.jpg
    326910077_6002475599849830_2803967965492114768_n.jpg
    174 KB · Views: 12
  • DIHY8070.JPG
    DIHY8070.JPG
    1.8 MB · Views: 14
  • FAMO1837.JPG
    FAMO1837.JPG
    2.5 MB · Views: 14

66Holiday924

Chief Petty Officer
Joined
Aug 21, 2017
Messages
525
I don't think Starcraft is going to answer me regarding the fuel and engine weight capacity. All they would say is that they would not exceed what was in the boat... I think it's a liability issue on their part. If you can't exceed what was in it, that would mean the boat can never be repowered because the newer 4 cylinder is probably heavier than what was in it...

I think, looking at the capacity plate in the context of the whole thing, the 1065lb fuel and engine limit is understood better. The boat has a total capacity limit, based on how it comes out of the factory. The plate says 2000lbs. (people and gear) is the most you can add to it. That's based on the the original fuel and engine weighing 1065lbs. So, if you exceed 1065lbs the 2000lb gear and people capacity is no longer applicable and must be adjusted. That's what makes sense to me. The boat came with jump seats right next to the engine. There could easily be a 200lb guy in each of those seats adding 400 lbs. to the back of the boat... The hull doesn't know if the weight is due to a heavier engine or some dude(s) sitting next to it.

So, I think it's ok, to be a little heavier on the engine and fuel but adjust the capacity limit for gear and people for the boat. Which is fine with me, I only plan on it being a four person boat...
 
Joined
Aug 9, 2023
Messages
20
Pretty much makes sense to me. With as big a update as you're doing and I think you have a good bit of depth under the cockpit sole, what about ditching the 2 aft tanks and putting in a 30(?) gal belly tank? The best info I could find on the dressed weight of your original engine transom mounting hardware and outdrive was just under 700 lbs. Don't bet the farm on that though.
 

66Holiday924

Chief Petty Officer
Joined
Aug 21, 2017
Messages
525
what about ditching the 2 aft tanks and putting in a 30(?) gal belly tank?

I have to do a little more thinking and homework, but I am definitely planning to ditch the two tanks that were in it.

I'm thinking belly tank, but again I need to do a little more homework. I think a nice, big heavy tank in the belly would make the boat ride better.
 

66Holiday924

Chief Petty Officer
Joined
Aug 21, 2017
Messages
525
Just when I thought all hope was lost, Starcraft responded. I asked if the engine weight meant the engine, engine + drive, or the engine + drive + transom assembly. He responded that it is meant for the engine & drive.

Another good tidbit of information I got from Starcraft was that on the Islanders that had the 4.3, the lag bolts going into the stringers were 2.5" long, 0.5" diameter, Grade 5, and the wood used in the stringers was 1.5" 13 ply - Marine grade ply,
 
Last edited:

havoc_squad

Senior Chief Petty Officer
Joined
Mar 5, 2011
Messages
708
Just when I thought all hope was lost, Starcraft responded. I asked if the engine weight meant the engine, engine + drive, or the engine + drive + transom assembly. He responded that it is meant for the engine & drive.

Another good tidbit of information I got from Starcraft was that on the Islanders that had the 4.3, the lag bolts going into the stringers were 2.5" long, 0.5" diameter, Grade 5, and the wood used in the stringers was 1.5" 13 ply - Marine grade ply,
Do you mean the mercruiser transom assembly housing bolts or are you referring to bolt hardware for securing wood to the hull for front engine mounts?
 

66Holiday924

Chief Petty Officer
Joined
Aug 21, 2017
Messages
525
Do you mean the mercruiser transom assembly housing bolts or are you referring to bolt hardware for securing wood to the hull for front engine mounts?
They built some Islanders with a 4.3 in them. So, I asked them about the front mounts on those boats. They said the wood used in the stringers for those was 1.5" thick, 13 ply - Marine Grade Plywood. They said the lag bolts that were used on the front engine mounts were 2.5" long, 0.5" diameter, Grade 5.

I believe, from looking at pictures, their stringers were wrapped in aluminum. The wood under the aluminum would be the 1.5" marine grade ply.
 

66Holiday924

Chief Petty Officer
Joined
Aug 21, 2017
Messages
525
Tearing down the donor boat. It's kind of sad actually. This wasn't a bad boat. It had a little rot on a bulkhead and in the floor but the transom and stringers were still very solid. They used silicon to seal the transducer screws, so there was going to be trouble in the distant future. I have to say this Thompson was built like a tank. There were a few bonus goodies I got off of it.

- Brand new bow light, wasn't even hooked up, wires still had caps on them... It was just screwed down up there.
- Kenwood CD player - we'll see about the condition later
- back-to-back seats - sold for $250
- Aluminum boarding ladder - Listed for $75
- 27 gallon belly tank, siphoned 13-14 gallons out of it
- A whole bunch of stainless hardware. Somebody got tired of the staples and used a bunch of stainless screws on some of the cushions. Call me cheap but I removed and kept it if the screw head was still perfect. They come in handy if you're building a boat. They can be used in wire management and fastening different things to the transom and deck.

I don't know what I'm going to do with the 27-gallon belly tank. I've been thinking I want a 40-50 gallon tank. They put a 52 gallon on some of the other Islanders. I don't know that I would ever use that much fuel, but I think the weight will make the boat ride smoother. Moeller has a 39 gallon belly tank I've been eyeing.
 

Attachments

  • IMG_4124.JPG
    IMG_4124.JPG
    4.7 MB · Views: 13
  • IMG_4125.JPG
    IMG_4125.JPG
    3.9 MB · Views: 13
  • FGFJ4198.JPG
    FGFJ4198.JPG
    4.9 MB · Views: 13
  • IMG_4119.JPG
    IMG_4119.JPG
    3.5 MB · Views: 13
  • UUPO7612.JPG
    UUPO7612.JPG
    3.2 MB · Views: 13
  • IMG_4122.JPG
    IMG_4122.JPG
    1.8 MB · Views: 10
  • PGBA7137.JPG
    PGBA7137.JPG
    1.4 MB · Views: 12
  • HXWX1125.JPG
    HXWX1125.JPG
    2 MB · Views: 13
Last edited:
Joined
Aug 9, 2023
Messages
20
Tearing down the donor boat. It's kind of sad actually. This wasn't a bad boat. It had a little rot on a bulkhead and in the floor but the transom and stringers were still very solid. They used silicon to seal the transducer screws, so there was going to be trouble in the distant future. I have to say this Thompson was built like a tank. There were a few bonus goodies I got off of it.

- Brand new bow light, wasn't even hooked up, wires still had caps on them... It was just screwed down up there.
- Kenwood CD player - we'll see about the condition later
- back-to-back seats - sold for $250
- Aluminum boarding ladder - Listed for $75
- 27 gallon belly tank, siphoned 13-14 gallons out of it
- A whole bunch of stainless hardware. Somebody got tired of the staples and used a bunch of stainless screws on some of the cushions. Call me cheap but I removed and kept it if the screw head was still perfect. They come in handy if you're building a boat. They can be used in wire management and fastening different things to the transom and deck.

I don't know what I'm going to do with the 27-gallon belly tank. I've been thinking I want a 40-50 gallon tank. They put a 52 gallon on some of the other Islanders. I don't know that I would ever use that much fuel, but I think the weight will make the boat ride smoother. Moeller has a 39 gallon belly tank I've been eyeing.
From what I see in the pics, you got a VERY good score on the trailer! If you got good paper with it, should be a quick profitable sale! I don't recall what you paid for the donor, but your closing in on the plus side of the money column.
 

Watermann

Starmada Splash of the Year 2014
Joined
Jan 12, 2013
Messages
13,753
Yeah I almost felt bad for a minute when I was stripping the Chris Craft donor but it was rotten to the core. Nothing is better for a late in life rotten glasser than to donate itself to resurrect a beautiful born again Starcraft tinny.
 

66Holiday924

Chief Petty Officer
Joined
Aug 21, 2017
Messages
525
Slow steady progress on the Islander. These past few days I worked on finishing the demo and getting it cleaned up so I can see what we're working with. The boat is coming apart really nicely. The transom was toast. Somebody got as many fishing hours out of that thing as possible, then rebuilt the bottom of it, fished some more and then braced it in there with plate aluminum... I ended up removing 80% of it with a shop vac.

I was delighted to see the beginnings of stringers on this boat. They put OMC stringer drives in some of them, and it appears this was "stringer ready".

The floor supports are a bit odd. They flare out. Back by the engine, they are about 25" apart, up by the cabin 22.25". The 25" in the engine area was a welcome site. I measured the front mount spacing on the Thompson. The bolts for the front mounts on my 4.3 are about 22.5" apart. So I 'might have lucked out pretty good.

Right now, the boat is in the shop. I'm having the holes from old fish finder transducers, speedometers, kicker engines, etc. etc. etc. welded shut. So, I sanded it down to give the welders some raw material around the holes and put blue painter's tape over the holes I want left alone.

I did this on my Holiday and I can't say enough about that. There's a lot of money riding on these refurbished boats (literally) and it's only costing me $300-$400 to have the old holes zapped shut. I think I was on forty-F-it when I quit counting the number of holes that I'm having closed.
 

Attachments

  • IMG_4181.JPG
    IMG_4181.JPG
    2.4 MB · Views: 12
  • IMG_4182.JPG
    IMG_4182.JPG
    4.1 MB · Views: 12
  • IMG_4183.JPG
    IMG_4183.JPG
    2.3 MB · Views: 11
  • IMG_4184.JPG
    IMG_4184.JPG
    5.6 MB · Views: 11
  • IMG_4185.JPG
    IMG_4185.JPG
    3.3 MB · Views: 10
  • IMG_4186.JPG
    IMG_4186.JPG
    6 MB · Views: 10
  • IMG_4192.JPG
    IMG_4192.JPG
    5.2 MB · Views: 9
  • IMG_4193.JPG
    IMG_4193.JPG
    5.1 MB · Views: 9
  • IMG_4194.JPG
    IMG_4194.JPG
    2.5 MB · Views: 8
  • IMG_4195.JPG
    IMG_4195.JPG
    6.3 MB · Views: 10
  • IMG_4196.JPG
    IMG_4196.JPG
    7.8 MB · Views: 10
  • IMG_4197.JPG
    IMG_4197.JPG
    6.4 MB · Views: 14
  • IMG_4198.JPG
    IMG_4198.JPG
    6.4 MB · Views: 13
  • IMG_4199.JPG
    IMG_4199.JPG
    6.1 MB · Views: 14
Joined
Aug 9, 2023
Messages
20
Looking at the inside face of the alum transom skin, it's just not clean and purty yet right? No corrosion/structural damage I hope. Was watching a resto on an alum bass boat and after removing the wood and cleaning the debris, he put a light in the hull and turned out the shop lights. WOW, it looked like a beautiful clear starry night sky!!!!
 

66Holiday924

Chief Petty Officer
Joined
Aug 21, 2017
Messages
525
Looking at the inside face of the alum transom skin, it's just not clean and purty yet right? No corrosion/structural damage I hope.

I did a preliminary cleaning on the inside. The brown discoloration comes right off. It has some pitting going on but nothing too serious looking and certainly nothing structural. The sheet metal shop I took it to will definitely speak up if they see issues. I'm going to address it with Marine Tex and then I'll paint it to get a barrier on it and protect against future corrosion & pitting.

I'll get it nice, pretty, and clean right before I start painting.
 

66Holiday924

Chief Petty Officer
Joined
Aug 21, 2017
Messages
525
Thinking ahead to the transom build. I want to extend my 1/2" horse collar all the way to the bracket, so that my horse collar is basically the same size as the transom. For anybody reading, is there any reason I can't do that? I'm thinking about different things that are mounted to the transom and I don't see why I couldn't do that. I don't think extending it would get in the way of anything.
 

Watermann

Starmada Splash of the Year 2014
Joined
Jan 12, 2013
Messages
13,753
The reasons I see not to is that it uses more resources, wood, glue, new longer bolts, if it has them you'll have to move the side brackets, the bottom bracket wont fit the additional width if it has one and adds more weight for no purpose really.
 

66Holiday924

Chief Petty Officer
Joined
Aug 21, 2017
Messages
525
The reasons I see not to is that it uses more resources, wood, glue, new longer bolts, if it has them you'll have to move the side brackets, the bottom bracket wont fit the additional width if it has one and adds more weight for no purpose really.
I want to go up to the brackets and stop, so at the brackets it would still be normal width. Basically, as big of a horse collar as possible. I don't think it would interfere with anything (i.e. power steering) coming off of the gimbal assembly if I did that.
 
Last edited:

66Holiday924

Chief Petty Officer
Joined
Aug 21, 2017
Messages
525
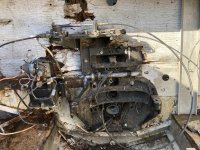
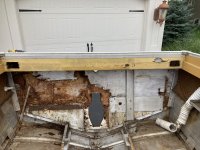
I've been thinking more about my stringers. According to MerCruiser, there aren't any forces from the engine (i.e. torque) on the forward mounts of my engine. All of those engine forces are translated into the transom through the transom mounts on the gimbal assembly.

The forward mounts are for engine alignment, and they carry weight. So, it's just a matter of having something in the correct position, secured to the structure of the boat (probably through the hull and to the transom), to bolt the engine mounts to.

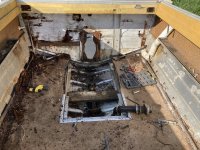
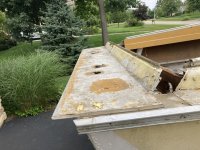
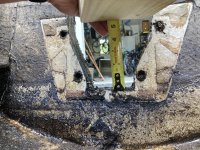
I took some measurements off of the Thompson before I junked it. The holes for the forward engine mount lags were 22.5" apart, or each 11.25" from the centerline, and 17" from the horse collar. So, I don't see why when installed in my boat, the engine mounts, wouldn't sit in the same spot, or very close to it.

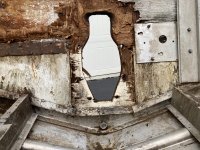
So, then there's the question of the height of the stringers. What I came up with, is that the height of the forward mounts as they relate to the bottom of the keyhole on the Thompson must be pretty close to the same when installed on the Starcraft. If the engine was aligned on the Thompson and the mounts were x" above the bottom of the keyhole, I think it's reasonable to say the mounts will be pretty close to the same measurement above the keyhole on the Starcraft when installed and properly aligned.

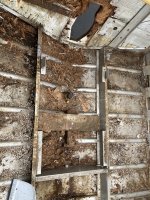
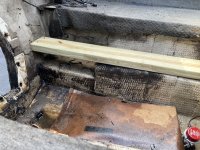
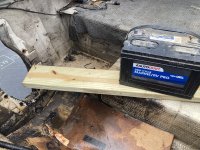
So, all this to say I'm going to try to build my stringers so that there is plenty of meat (margin of error) to bolt the mounts to in the location from the transom, and I'm going to build them so they can be very easily added to, to achieve the correct height. I envision being able to add sections of plywood to raise and lower it in 1/2" increments to get it inside of the window that the mounts themselves can be adjusted.

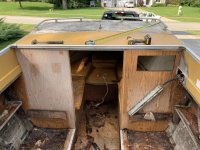
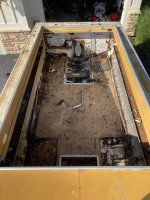
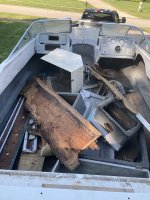
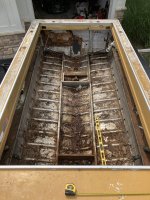
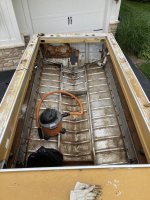
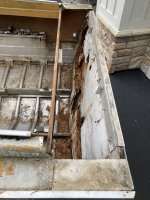
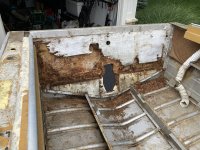
It's a huge bonus that the boat has stringers in place that I can work with. Now I just need to get something roughly in place based on the Thompson's measurements with the understanding that it may vary slightly, so the design needs to have some flexibility.
 

Attachments

  • IMG_4105.JPG
    IMG_4105.JPG
    5.4 MB · Views: 9
  • IMG_4106.JPG
    IMG_4106.JPG
    6.6 MB · Views: 9
  • IMG_4111.JPG
    IMG_4111.JPG
    3.2 MB · Views: 9

66Holiday924

Chief Petty Officer
Joined
Aug 21, 2017
Messages
525
I got the boat back from the shop today and couldn't be happier with their work!

There was some pitting, and a 4"x8" area where it had some pinholes, probably due to some corrosion caused by one of the steel or treated wood patch jobs. The shop fixed that area, patched the rest of the holes, and says I'm in pretty good shape. It looks solid to me. It's so worth the money to have the clean slate and peace of mind.
 

Attachments

  • IMG_4590.JPG
    IMG_4590.JPG
    2.9 MB · Views: 11
  • IMG_4591.JPG
    IMG_4591.JPG
    6.3 MB · Views: 11
Top