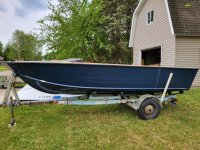
1978 22' V5 Super Sport CC

strov68

Seaman Apprentice
Joined
May 19, 2011
Messages
45
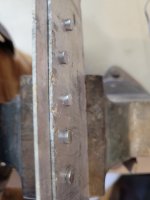
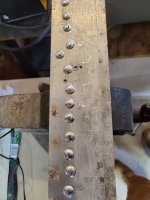
I really appreciate all the help fellas. I feel like I haven't gotten very far lately as I have been trying to figure out what all I need to do. I did try out doing some solid rivets for the first time ever on some scrap.
20210331_144413.jpg
20210331_144442.jpg
20210331_144607.jpg
I was using a cheap air hammer from Menards and a 6 in long 1" bolt for a bucking bar.
20210331_144621.jpg
After getting the air turned down a little it stopped jumping off the rivet head so much leaving those moons. Being my first time I didn't know how long it would take to set a rivet, but it seemed like it was taking too long. I switched to a 4lb sledge hammer for the bucking bar and it seemed to go a little faster.
Should I be pushing the bucking bar fairly hard and would a heavier one be better?
 

The John

Petty Officer 2nd Class
Joined
Nov 16, 2009
Messages
123
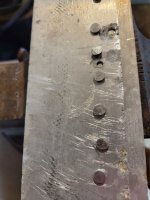
I really appreciate all the help fellas. I feel like I haven't gotten very far lately as I have been trying to figure out what all I need to do. I did try out doing some solid rivets for the first time ever on some scrap.
View attachment 336700
View attachment 336701
View attachment 336702
I was using a cheap air hammer from Menards and a 6 in long 1" bolt for a bucking bar.
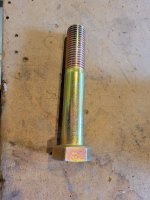
View attachment 336703
After getting the air turned down a little it stopped jumping off the rivet head so much leaving those moons. Being my first time I didn't know how long it would take to set a rivet, but it seemed like it was taking too long. I switched to a 4lb sledge hammer for the bucking bar and it seemed to go a little faster.
Should I be pushing the bucking bar fairly hard and would a heavier one be better?
I am planning on using the same method for my build (using a 4pd sledge) so I am happy to hear it worked for you. I think Riveting is a trail and error kind of thing when you start out, so keep at it and learn what works best for you.
 

SHSU

Lieutenant Junior+Starmada Splash Of The Year 2019
Joined
Mar 8, 2017
Messages
1,744
Don't leave the pop rivets in, you should replace them know as they will fail in the future. I know its a pain, but its worth doing it right the first time.

As for the rivets you drove, ya they looked better as you go further down. So those lower ones you had less air. I found that as well when we did ours. All in all though, they look good for your first time.

For the bucking bar, with the number you are saying you are replacing its worth the money to get a true heavy bar. If only a couple, ya the sledge works, but don't think it will be good in the end.

SHSU
 

Watermann

Starmada Splash of the Year 2014
Joined
Jan 12, 2013
Messages
13,795
It's tough practicing solo setting solid rivets and be sure you don't run your air hammer at full tilt pressure, mine likes to run at 40 psi, it hammers great and doesn't hop all over.

Yeah those types of repairs are done by someone from the outside of boat which is never the proper way to go about it. You're going in the right direction and found out nothing is ever easy with these boats and normally because of what someone else has done.
 

strov68

Seaman Apprentice
Joined
May 19, 2011
Messages
45
Still plugging along, but it is slow going. I haven't had much time and the time and I have been replacing gunnel rivets and started replacing the broken rivets holding the inner rub rail channel on.

Also got my monster 1/4" solids. Did a couple practice ones and I am glad I picked up this other kobalt air hammer too.
1618014257725.png
Blows per min and stroke are much closer to an actual rivet gun than the cheapo harbor freight style one and it worked much better, especially on the 1/4" rivets. Plus, it is a lot more comfortable to use.

My next plans are to finish up the gunnel rivets and then prepare to flip her for bottom stripping. I would like to do the flip before putting the new transom in, but I am worried about flexing the hull too much. Would a 2×4 spanning the transom up at the gunnels and another one lower by the tie down eyes be enough or should I replace the transom wood first?
 

SHSU

Lieutenant Junior+Starmada Splash Of The Year 2019
Joined
Mar 8, 2017
Messages
1,744
My next plans are to finish up the gunnel rivets and then prepare to flip her for bottom stripping. I would like to do the flip before putting the new transom in, but I am worried about flexing the hull too much. Would a 2×4 spanning the transom up at the gunnels and another one lower by the tie down eyes be enough or should I replace the transom wood first?

That's how I did it. I used a couple 2x4 with clamps for the flip. I think I used a couple blocks or screws to keep the hull shape in place once flipped so the hull wouldn't contorted as I worked on it, but can't remember for sure.

SHSU
 

strov68

Seaman Apprentice
Joined
May 19, 2011
Messages
45
Haven't had much time lately to work on the boat. Got the lower unit pulled to replace the impeller and seals.
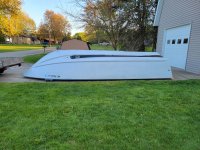
Also, finally had a chance to get it flipped. I had an elaborate plan involving my engine hoist, but eventually just pulled it off the trailer onto the grass, rolled it over with my dad and brother, and slid it over onto the driveway on some 2x4s.
20210510_201405.jpg

Turns out that bedliner was hiding more corrosion where it was sitting on the bunks even though the inside of the hull looked good.
20210510_201420.jpg

I will know more when I get the paint stripped, but this is probably going to interfere with my plans on keeping the bottom of the hull bare aluminum. It looks like I am going to have to fill those pits with epoxy and paint it now.
 

SHSU

Lieutenant Junior+Starmada Splash Of The Year 2019
Joined
Mar 8, 2017
Messages
1,744
Nothing like a turtle in the driveway!!! Ya, I did similar when flipping. Dad and brother helped and took under a minute to actually flip.

Bummer on the corrosion. Guessing previous owner used pressure treated wood to make the bunks. The copper naphthenate will eat the aluminum and make it into swiss cheese.

Looks like you have some blind rivets too. I would look at replacing those properly with solids. As they secure your ribs, those are key for your structural integrity.

SHSU
 

strov68

Seaman Apprentice
Joined
May 19, 2011
Messages
45
Nothing like a turtle in the driveway!!! Ya, I did similar when flipping. Dad and brother helped and took under a minute to actually flip.

Bummer on the corrosion. Guessing previous owner used pressure treated wood to make the bunks. The copper naphthenate will eat the aluminum and make it into swiss cheese.

Looks like you have some blind rivets too. I would look at replacing those properly with solids. As they secure your ribs, those are key for your structural integrity.

SHSU
Yeah right now it seems like there are more blind rivets than good solid rivets left.
 

strov68

Seaman Apprentice
Joined
May 19, 2011
Messages
45
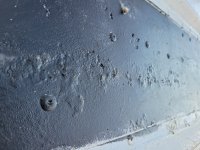
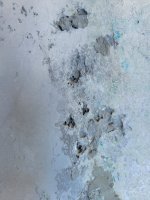
Well I got a lot of the paint stripped off with citristip and a putty knife and power washer. The corrosion is worse than I thought.... several spots the pitting went all the way through the hull.
20210522_192946.jpg

So now my options.... I am thinking of filling the pits with PC-11 epoxy and then putting a huge 12ft long patch between the chines as shown below.
20210522_193001.jpg

I'm not sure what my other options are. I don't trust just epoxy and paint to hold with holes all the way through. I could probably get away with several smaller patches, but I am worried the bunks will catch on them when loading.
 

SHSU

Lieutenant Junior+Starmada Splash Of The Year 2019
Joined
Mar 8, 2017
Messages
1,744
So now my options.... I am thinking of filling the pits with PC-11 epoxy and then putting a huge 12ft long patch between the chines as shown below.


I'm not sure what my other options are. I don't trust just epoxy and paint to hold with holes all the way through. I could probably get away with several smaller patches, but I am worried the bunks will catch on them when loading.

PC-11 or JB Weld to fill the pits and then back butter a patch with 5200 and solid rivet it into place.

As for length, its up to you if you want to go the whole length in one shot or not. You will see several of the guys here have done similar patch work and I haven't heard of any issues with it catching. The hull should be floating when you are putting it on the trailer so it shouldn't catch any edges. Plus it would damage the bunk before the patch.

SHSU
 

strov68

Seaman Apprentice
Joined
May 19, 2011
Messages
45
Well, I have decided to put this project on the back burner for now. I am going to finish stripping the paint off the bottom and them pit her back on the trailer still in the turtle position. This will make it easier to replace all the blind rivets once I get to that point again.

I am pausing this one, because I ended up finding a 1978 Holiday 18ft that has already been started for super cheap.

20210527_163720.jpg

I will more than likely be able to at least get this one on the water this year and then use it while I work on the big V5.
 

SHSU

Lieutenant Junior+Starmada Splash Of The Year 2019
Joined
Mar 8, 2017
Messages
1,744
Looks like a nice paint job. Any pics of the interior?

SHSU
 
Top