1977 StarCraft 18' Super Sport Needs Rehab [SPLASHED 2017]

Watermann

Starmada Splash of the Year 2014
Joined
Jan 12, 2013
Messages
13,787
The steering is just the standard tilt tube set up right? Disconnect the linkage, loosen the large nut and it pulls right out... if there's enough room and if it's not corroded inside.
 

Old Irving

Petty Officer 2nd Class
Joined
Nov 29, 2015
Messages
151
Thanks for the steering info Watermann. I go out to the boat on monday and will remove the engine and transom.
 

Watermann

Starmada Splash of the Year 2014
Joined
Jan 12, 2013
Messages
13,787
Also I forgot to mention to turn the motor first to pull as much of the steering rod inside as possible.

Oh did you get the wheel off yet?
 
Last edited:

Old Irving

Petty Officer 2nd Class
Joined
Nov 29, 2015
Messages
151
How much Gluvit would I need to cover the interior of the hull below the waterline? A gallon or quart?
 

Watermann

Starmada Splash of the Year 2014
Joined
Jan 12, 2013
Messages
13,787
You only need a quart to seal all the seams and keel area, it's not necessary to coat the entire hull.
 

Old Irving

Petty Officer 2nd Class
Joined
Nov 29, 2015
Messages
151
I have a question about the types of rivets to use. To install the 5/8 inch wood decking I am looking to use 1 inch x 3/16 width rivets with flange head. Is this correct? Also, I wondered how I was going to place the rivets in the same location as the old holes. I now know this is impossible and I will have to drill new holes.

I also have a few rivets in the hull below the waterline I need to replace. I am going to use aluminum closed head rivets but what length should I use? Also, what size rivets should I use to replace the rivets in the transom? Attached is an image of part of my transom.
Thanks transom image.jpg
 

oldhaven

Chief Petty Officer
Joined
Aug 30, 2015
Messages
576
Also, I wondered how I was going to place the rivets in the same location as the old holes. I now know this is impossible and I will have to drill new holes.


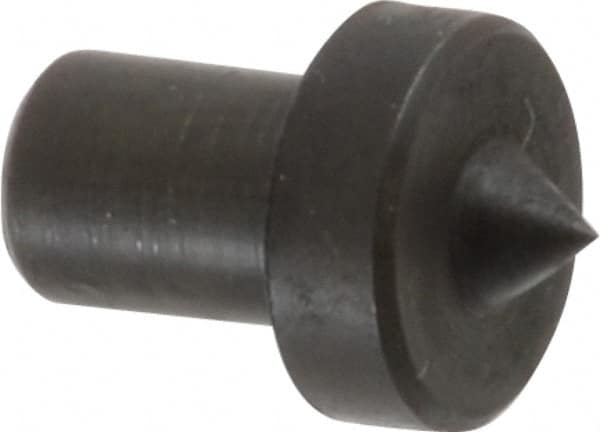
I have not yet tried these blind hole spotters, since my deck replacement will be next spring, but they should work for marking the existing rib end holes for rivets on the bottom of a dry fit deck. You could get a few, put 1 or 2 in the existing holes, carefully put the deck in place, then remove it and drill holes from the bottom at the divots. After the first few, a 3/16 rod in 2 or 3 of the drilled holes in the deck would position it for the rest of the marking and drilling. This is probably not so important for the holes in the stringers, but would help prevent too many holes or mislocation at the rib ends. These are from MSC, but a lot of places have them. If you have a lathe, they are easy to make.

Ron

http://www.mscdirect.com/product/details/04291126


Old Irving

Petty Officer 2nd Class
Joined
Nov 29, 2015
Messages
151
What type of carpet or vinyl do people recommend for the deck and side panels? I am thinking of going with a charcoal grey.
 

Watermann

Starmada Splash of the Year 2014
Joined
Jan 12, 2013
Messages
13,787
Vinyl deck covering, Nautolex makes some really nice stuff. For the side panels most of us have used the regular vinyl for upholstery.

I'm not sure about your transom rivet question, which rivets are those you're replacing?
 
Last edited:

Old Irving

Petty Officer 2nd Class
Joined
Nov 29, 2015
Messages
151
Watermann, I have not removed the transom yet so I am not sure but there are several rivets on the bottom of the transom. These may stay in.
 

Watermann

Starmada Splash of the Year 2014
Joined
Jan 12, 2013
Messages
13,787
Those rivets would be for the bracket at the bottom where the transom wood rests. Depending on the corrosion present you may not have to remove that bracket. You would want to replace them with solid rivets if removed, 3/16" x 3/8". It didn't sound as though you're going to be using solid rivets when you mentioned using closed end blind rivets.
 

Old Irving

Petty Officer 2nd Class
Joined
Nov 29, 2015
Messages
151
Finished disconnecting the outboard during the ice storm in NW Indiana. Next is the transom removal. Doesn't look like I will be able to use it as a template, it will be coming out in chunks.
 

Old Irving

Petty Officer 2nd Class
Joined
Nov 29, 2015
Messages
151
I got a lot done today. Removed 85 hp Mercury and transom. I purchased the 3/4 inch marine plywood in Chicago and drove to 1.5 hours to Indiana in the ice storm to work on the boat. This normally would not be bad but I had to keep the hatch open in my Element because the plywood was two feet too long. I drove with a blanket.

Below are a few of my findings from removing the transom. 1 How could the PO let the transom get this bad. 2 Why did the PO pour epoxy between the wood and aluminum transom. 3 Making a new transom is not too difficult without a template. I just took measurements and made a few adjustments. 4 Measure 8 times and cut once.
 

Old Irving

Petty Officer 2nd Class
Joined
Nov 29, 2015
Messages
151
Question. How has everyone replaced the side panels? Mine measure 8.3 feet which is longer than a sheet of plywood.
 
Last edited:

BWR1953

Admiral
Joined
Jan 23, 2009
Messages
6,178
I got a lot done today. Removed 85 hp Mercury and transom. I purchased the 3/4 inch marine plywood in Chicago and drove to 1.5 hours to Indiana in the ice storm to work on the boat. This normally would not be bad but I had to keep the hatch open in my Element because the plywood was two feet too long. I drove with a blanket...
Now that's dedication right there! Congrats on making progress under tough circumstances! :encouragement:
 

g0nef1sshn

Lieutenant
Joined
Feb 24, 2015
Messages
1,291
I looked but didnt find a pic of the backside, but this is what I did. Red line is split between two pieces. Black box is the joiner piece and screws. I believe I put wood glue or tite bond on before screwing together. Made sure that it would fit under the shelf before screwing too.

20150705_215251_resized.jpg
 

Old Irving

Petty Officer 2nd Class
Joined
Nov 29, 2015
Messages
151
Thanks Gonefshn, I will likely do what you did with the backing plate.
 
Last edited:
Top