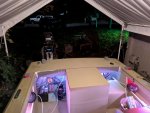
1977 StarCraft 18' SS restore

BWR1953

Admiral
Joined
Jan 23, 2009
Messages
6,176
My deck attaches to a bracket at the stern and I got it pretty close to flush.

As for the sides, it seems to be personal preference. I like to have the smallest possible gap because I don't want small parts like hooks, sinkers and whatnot to fall beneath the deck.
 

jbcurt00

Moderator
Staff member
Joined
Oct 25, 2011
Messages
25,030
Did your SS come w the stringers MB is describing? Ending about there would be fine.

Along the edges, close (narrow) enough to keep most boat 'junk' from slipping into the crack, big enough to let water run down to the bilge.........

3/16 sounds too tight if you plan to wrap the deck w vinyl, after fitment/cutting to shape/size
 

Watermann

Starmada Splash of the Year 2014
Joined
Jan 12, 2013
Messages
13,786
I left a 1/2" gap between the deck and transom.

The sides, you don't have to worry about that too much, just where the wood covers out to the rib ends. Side panels cover the transition between deck and sides.

The V5 plywood layout below is way different than the regular SS, your's should run side to side. So are you going to wrap the vinyl or lay it on the installed deck? You also transfer the hull angle to the edges as well.


y4m07uOcLSoDH1q05scyP-L6Qhp8_7Mg7KwZGqIutuxm3adGoGlwNjChhR9aHzFFUbjPkPYUYww7CCsCdowYEa0DVusfCKkUUC676XCUEbuCkJuxuk73Qhkural_rtRpyS2V2wnEler5ZbRZC_69mHT1wTpPLgHexOypuDN4ds3d_p7hx3kOg0q3CM7M4GKZQfu5JdFGxd03KDQCKgFHeQAFg
 

Decker83

Commander
Joined
Apr 5, 2011
Messages
2,592
I ran the plywood flush to the end of the "beams" under the deck that run up and down the hull. This made the floor end about an inch shy of the transom. My thinking was I wanted water to be able to drain into the bilge readily in case I took on a big wave.

My stringers or 1/2" away from the transom. I was thinking the same thing for the water to escape. Thanks for your input
mbrughton02
 

Decker83

Commander
Joined
Apr 5, 2011
Messages
2,592
My deck attaches to a bracket at the stern and I got it pretty close to flush.

As for the sides, it seems to be personal preference. I like to have the smallest possible gap because I don't want small parts like hooks, sinkers and whatnot to fall beneath the deck.

I thought about attaching some clip angles to the deck and the transom but I think that might be over kill..
I want the sides to be as close as I can get them without touching the aluminum.
Thanks for the input BWR1953
 

Decker83

Commander
Joined
Apr 5, 2011
Messages
2,592
Did your SS come w the stringers MB is describing? Ending about there would be fine.

Along the edges, close (narrow) enough to keep most boat 'junk' from slipping into the crack, big enough to let water run down to the bilge.........

3/16 sounds too tight if you plan to wrap the deck w vinyl, after fitment/cutting to shape/size

Thanks jbcurt00. Yes I have the stringers MB is talking about. That sounds about right to me.

I want to use the Mari Deck or the Nautolex vinyl. I want to glue the vinyl up the sides of the hull to seal it off..

Open to suggestion..
 

jbcurt00

Moderator
Staff member
Joined
Oct 25, 2011
Messages
25,030
If you're running up the sides, 1/8in..

w the ply edges angled to match the angle of the hull

Around the bow rib ends about the zame, 1/8
 

Decker83

Commander
Joined
Apr 5, 2011
Messages
2,592
I left a 1/2" gap between the deck and transom.

The sides, you don't have to worry about that too much, just where the wood covers out to the rib ends. Side panels cover the transition between deck and sides.

The V5 plywood layout below is way different than the regular SS, your's should run side to side. So are you going to wrap the vinyl or lay it on the installed deck? You also transfer the hull angle to the edges as well.


[IMG2=JSON]{"data-align":"none","data-size":"full","src":"https:\/\/31yifq.bn1302.livefilestore.com\/y4m07uOcLSoDH1q05scyP-L6Qhp8_7Mg7KwZGqIutuxm3adGoGlwNjChhR9aHzFFUbjPkPYUYww7CCsCdowYEa0DVusfCKkUUC676XCUEbuCkJuxuk73Qhkural_rtRpyS2V2wnEler5ZbRZC_69mHT1wTpPLgHexOypuDN4ds3d_p7hx3kOg0q3CM7M4GKZQfu5JdFGxd03KDQCKgFHeQAFg?width=577&height=1024&cropmode=none"**[/IMG2]

I would like to lay the vinyl on the installed deck like you did..
Did you make the edge cuts about 15 degrees for the side?
I need to look at your deck closer to see how you allowed the water to get to the bilge on Chief.
Thanks for the pics and the input. Watermann
 

Watermann

Starmada Splash of the Year 2014
Joined
Jan 12, 2013
Messages
13,786
The Chief I wrapped the deck pieces in vinyl before installing, the SS I laid the vinyl over the installed deck and put about 5 - 6" of vinyl up the sides.

The hull angle ever changes as you go. You can get the angle by cutting a scrap piece and fitting it to the hull, it may take a few tries to get it right. Then transfer that to your deck pieces.
 

Decker83

Commander
Joined
Apr 5, 2011
Messages
2,592
If you're running up the sides, 1/8in..

w the ply edges angled to match the angle of the hull

Around the bow rib ends about the zame, 1/8

Thanks again jbcurt00. I hope my old eyes can see 1/8 on my tape measure..:laugh:

Why am I not able to do multiple quotes. I click on multiple quote buttons and see at the top of the page how many quotes or their and it does not work.
 
Last edited:

Decker83

Commander
Joined
Apr 5, 2011
Messages
2,592
The Chief I wrapped the deck pieces in vinyl before installing, the SS I laid the vinyl over the installed deck and put about 5 - 6" of vinyl up the sides.

The hull angle ever changes as you go. You can get the angle by cutting a scrap piece and fitting it to the hull, it may take a few tries to get it right. Then transfer that to your deck pieces.

I guess I didn't read the Chief close enough..:facepalm:
I didn't think about the angle changing. Thanks for the heads up..
I still need to see how you have drainage for the Chief around the stern of the boat..
 

Watermann

Starmada Splash of the Year 2014
Joined
Jan 12, 2013
Messages
13,786
Monster hole in the deck with a 205 HP V6 sitting above it. :lol:

y4mLHbRzXLufIHAM_6DqRimHQAetHeQVOiZMUonb2RY9uX6oR18P3NFVgIAUMbyf8K1ohkdiLSrqUaJsaJdCNwxM8u6Iw10Anuu8FB48koeFtCGG22mpMPvDZ6346RByzbP6uotu0EF9HPq2tuWCzX-bm4a3Cc3QdfN_zrdtOrwvpam-_bBNe2M95K5mMIl26TvuMHDj_yKy5RadqPM13ukFA
 

Decker83

Commander
Joined
Apr 5, 2011
Messages
2,592
Thanks for the pic waterman. Did you leave any channels for the water to go under the dog house?

Well I had a disappointing weekend.. Saturday I got up and it was cold and some rain. Sunday I got up and had
sleet and ice.. No work on the boat this weekend.. Slowed down my momentum..:facepalm:
I will have a 3 day weekend next week.. Maybe the weather will hold out for me..:rain:
 

italianstal27

Chief Petty Officer
Joined
Feb 18, 2017
Messages
403
Our '76 holiday doesn't have any channels under the doghouse. Our doghouse is epoxied together and then painted except for the bottom edge where it touches the deck. That bottom edge was epoxied, roughly sanded with 80 grit, and then coated with a solid layer of 4200. That prevents the doghouse from marring the paint on our deck, or in your case, the vinyl. Any water ultimately drains to the left or right of the doghouse, because, in water, you're constantly rocking left to right

:)
 

Watermann

Starmada Splash of the Year 2014
Joined
Jan 12, 2013
Messages
13,786
Yeah no channels for water, I normally keep water on the outside of my boats :lol: unless it rains but with the Chief it's a cruiser and I don't go out when it's foul weather.
 

Decker83

Commander
Joined
Apr 5, 2011
Messages
2,592
Our '76 holiday doesn't have any channels under the doghouse. Our doghouse is epoxied together and then painted except for the bottom edge where it touches the deck. That bottom edge was epoxied, roughly sanded with 80 grit, and then coated with a solid layer of 4200. That prevents the doghouse from marring the paint on our deck, or in your case, the vinyl. Any water ultimately drains to the left or right of the doghouse, because, in water, you're constantly rocking left to right

:)

Thanks for the information italianstal27. I don't have a pattern to go by. I want to put 2 jump seats beside the dog house.
I'm not sure how the water will drain out to the back of the transom.. I guess I will work on that when I get to that point.
:welcome: aboard. Any thoughts and suggestion are welcome.
 

Decker83

Commander
Joined
Apr 5, 2011
Messages
2,592
I normally keep water on the outside of my boats :lol:

I was kinda trying to do that myself..:doh: The Admiral does not like getting wet..:fish:
I guess I need to get the foam and floor in and seating arrangement first..
 

italianstal27

Chief Petty Officer
Joined
Feb 18, 2017
Messages
403
We opted out of the seats back there for 2 reasons.

1) the gas tank was in the way (although we are strongly considering having a quick removable seat to go over the gas tank cover on port).

2) That's where we'll be throwing our crab pots out. Right next to the doghouse, starboard side, is prime real estate for baiting fishing lines, baiting crab pots, etc. Having a permanent seat there just didn't fit our needs.

When you build the interior up, don't try and control where the water flows. It won't hold up ;) The water is going to go everywhere. Just make sure every bolt or screw is covered in 4200 or epoxy to ensure water cannot follow the screw path.

Another key benefit to not having the jump seats is ease of access to the bilge for cleaning and engine maintenance if it's not working ;) Old boats and all...

-John
 

Attachments

  • photo285108.jpg
    photo285108.jpg
    183.2 KB · Views: 4

Decker83

Commander
Joined
Apr 5, 2011
Messages
2,592
Thanks for your advise italianstal27. Looks like you have yours the way you want it.

This boat will be used to fish from but I have 5 grand children and 2 daughters and there husbands that will also go out with the Admiral and myself.. I need all the seating I can get.. :lol:
Now if I can get them to pay for the gas, it will be a go..
 

Decker83

Commander
Joined
Apr 5, 2011
Messages
2,592
I had 3 days off this weekend.. The grand kids came over and spent the night Friday and stayed almost all day Saturday.
Didn't get much done with them around.
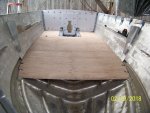
Sunday I started cutting the plywood for the floor.. Had the first sheet out and all setup to start cutting and down came the rain.. So not much done that day.
Today I started again and cut 3 of the sheets. It took a lot of time without any patterns to go by.
By the time I got the 3rd sheet cut, it started to rain again..
Here's a pic of what I have done..

100_4000.JPG
Hope everyone had a great Presidents Day..
 
Top