1977 Crestliner Muskie 7**, Outboat Restore Project

adament

Cadet
Joined
Jun 24, 2022
Messages
17
Hello Everyone, I have really appreciated all of the input that everyone gives, and have registered so I too can participate, and would like to show you my restore project.

I had been looking for the right boat for a while and finally found it, a 1977 Crestilner Muskie 775; a 17.4 foot boat with a tri-hull, solid outboard motor in good condition, solid hull and transom.

These forums have helped me considerably and I hope everyone can use a laugh, a chuckle, or use deep thoughts as to why things were done certain ways, if you see what I am seeing.
 

jimmbo

Supreme Mariner
Joined
May 24, 2004
Messages
13,446
Welcome to iboats

I look forward to seeing your Restoration.
40 yrs ago I almost bought a Muskie 775 from my Neighbour. It had the 370 for power. At the Time, I was in an OMC Family, and I was Leary about anything from Mercury.
 

adament

Cadet
Joined
Jun 24, 2022
Messages
17
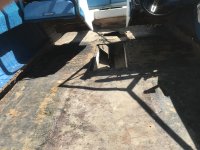
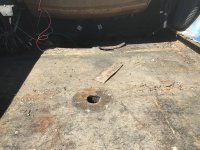
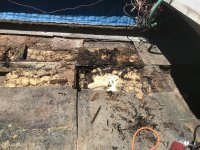
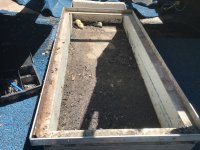
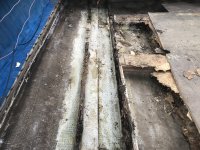
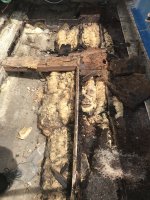
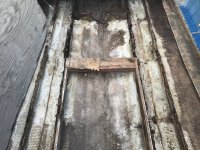
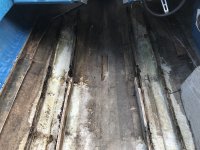
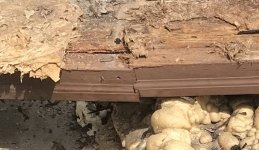
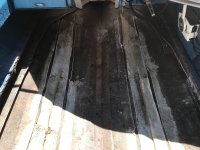
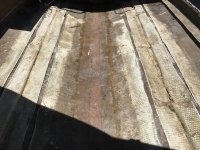
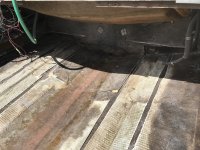
I knew the deck would need to be replaced, and was hoping maybe the stringers would be in good enough condition to keep (ha-ha), until I started cutting out the deck. The hole in the bow section is splintered and was likely caused by the weight of the previous owner. The wood looks to be original ½ inch marine plywood and was only rotted around the hole. The plywood extends to a cross member by the steering console. After that it’s all OSB to the stern bilge.

Yes that is OSB wood someone had used to replace the deck, my god why? The stuff that had fallen off the bottom I was able to scrape out like mashed potatoes. The resin is more than 1/4 inch thick in places, which begs the question of why they cheeped out on the decking but used so much resin, unless they just had it laying around. I'm guessing they just used whatever was lying around as they made sister stringers to reinforce the originals out of painted scrap wood, and reinforced a cross member out of an old door frame, just wow. The flotation foam appears to be original and was mainly dry except where they had mounted a swivel chair for the driver and water must have leaked in and was unable to drain.

There is a below deck storage box that I’m not sure if it is original or was put in latter, and I’m not sure I want to put it back in. I am still trying to figure out if I want to keep the original design (an open center bilge) or go with a entirely sealed bilge with flotation foam. The original build had foam down both inner and outer stringers but only a little bit down the center section to allow for drainage. I think I would prefer a completely sealed bilge but I am concerned about water getting in and not being able to drain. Thoughts would be appreciated.
 

Attachments

  • IMG_0251.JPG
    IMG_0251.JPG
    4.3 MB · Views: 16
  • IMG_0252.JPG
    IMG_0252.JPG
    5.1 MB · Views: 17
  • IMG_0253.JPG
    IMG_0253.JPG
    4.2 MB · Views: 15
  • IMG_0254.JPG
    IMG_0254.JPG
    4.7 MB · Views: 14
  • IMG_0255.JPG
    IMG_0255.JPG
    6 MB · Views: 15
  • IMG_0250.JPG
    IMG_0250.JPG
    4.5 MB · Views: 15
  • IMG_0249.JPG
    IMG_0249.JPG
    5.3 MB · Views: 18

adament

Cadet
Joined
Jun 24, 2022
Messages
17
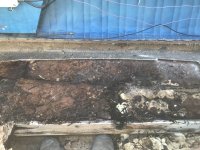
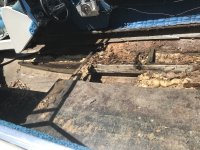
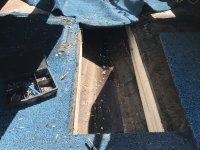
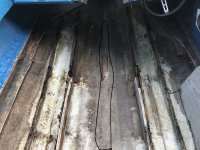
I have only cut out the starboard side so far to clean things up to get a better look at what I’m dealing with. I have all of the foam pulled out; the white areas would seem to indicate that it was the original foam.

I do have a few questions if anyone would like to provide input.

How close should I cut out the deck to the sides of the boat? Should I leave a lip or go flush?

Should I cut everything out first, deck and stringers? I was thinking of doing one side at a time as far as stringers so I would have a semi-stable place to work, but that may be contrary to how things should be done.

What kind of measuring or observations should I be making/taking for stringers before I cut them out? I was making templates out of cardboard, but this might not matter as from what I can tell the wood does not touch the hull but in a few spots and there looks to be over an inch gap in some places.
 

Attachments

  • IMG_0256.JPG
    IMG_0256.JPG
    4.4 MB · Views: 8
  • IMG_0258.JPG
    IMG_0258.JPG
    5.6 MB · Views: 8

buxmj

Petty Officer 1st Class
Joined
Jun 9, 2018
Messages
294
Welcome! If you need to take the cap off you will need to support the sides of the hull so it doesn't change shape as you put new structure back in. If you can save any of the old stringers (fore to aft) and bulkheads (side to side), they will give you partial or full templates. If you don't already have a multi tool get one, it will help get your cuts close to the hull, you need to cut and grind all lips down to fresh glass so you can get a good bond. I would take it all out at once, it will save with the headache of the worst part, the grinding. You don't want to do that more than once if you can avoid it. Get your PPE and respirator and get that step done as soon as possible. Sorry if I have shared info you already know, trying to cover as much as possible, we have all been where you are so good luck and keep us posted. Also, please post pics of the whole boat so we can see the cool lines of what will be a great boat again!
 

adament

Cadet
Joined
Jun 24, 2022
Messages
17
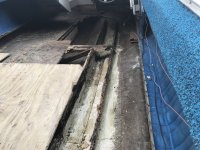
I was able to get the port side cleaned out today
Welcome! If you need to take the cap off you will need to support the sides of the hull so it doesn't change shape as you put new structure back in. If you can save any of the old stringers (fore to aft) and bulkheads (side to side), they will give you partial or full templates. If you don't already have a multi tool get one, it will help get your cuts close to the hull, you need to cut and grind all lips down to fresh glass so you can get a good bond. I would take it all out at once, it will save with the headache of the worst part, the grinding. You don't want to do that more than once if you can avoid it. Get your PPE and respirator and get that step done as soon as possible. Sorry if I have shared info you already know, trying to cover as much as possible, we have all been where you are so good luck and keep us posted. Also, please post pics of the whole boat so we can see the cool lines of what will be a great boat again!
Thanks for the reponce
 

adament

Cadet
Joined
Jun 24, 2022
Messages
17
Thanks for the response.

Hell no I don’t want to take the cap off. Everything above deck is in remarkably good condition for being 45 years old.

I had considered taking it out on a run after I had bought it, but there was concern the hull may buckle at full throttle. So I kept on taking things apart until I was satisfied. Now that everything has been pulled out and analyzed I can confirm that everything may have lasted for a good 2-5 years at full stress…I now have to put it back together, haha.

I am decent in auto body, so I know a trick or two, but boat design is 100% new to me and a lot different, except of course how to bond things together. I have assortment of pre-existing tools and PPE (mainly for auto body), they grind, they cut, and prevent early graves etc.

I have been trying to be cautious as to not go too far, even though my mind says I need to go further. Thinking on one side, all I need is something to bond to, on the other side, I need it to be flush and correct, when I don’t even know why that’s important.

From what I understand you say, I want to do as little grinding as possible, so cut deep within reason. I am also in agreement, fiberglass is nasty, and the cutting is the better part, once you get to sanding it’s going to get itchy (eyes and lungs protected).
 

adament

Cadet
Joined
Jun 24, 2022
Messages
17
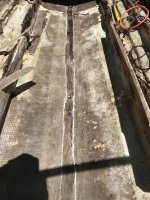
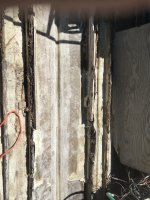
Here are some pics of the port side, much like the starboard side, OSB falling apart, random scrap painted wood used for sister stringers, and if you look to the center bilge you can see the door frame parts I was talking about. Just why? My favorite part, drywall screws, and assorted nails, weeeee.

Anyway, after I got it all cleaned out I noticed some delamination in the center. It seems to be a plywood piece beveled into the center joist as it were. I'm not sure what to call it yet, but I think I want to get that restored before I mess with the stringers.
 

Attachments

  • IMG_0261.JPG
    IMG_0261.JPG
    2.9 MB · Views: 14
  • IMG_0265.JPG
    IMG_0265.JPG
    4.7 MB · Views: 13
  • IMG_0266.JPG
    IMG_0266.JPG
    4 MB · Views: 13

jimmbo

Supreme Mariner
Joined
May 24, 2004
Messages
13,446
Looks like there is a fair bit of Glass that didn't get saturated with resin

I suspect the Keel has rotted as well
 

Wildey

Petty Officer 1st Class
Joined
Nov 24, 2021
Messages
202
Just when I thought I'd seen it all .....
OSB over finger jointed brick molding.
Jeeeesh !
Glad you tore into it, to fix it properly.
Cheers !brk mld.jpg
 

adament

Cadet
Joined
Jun 24, 2022
Messages
17
Just when I thought I'd seen it all .....
OSB over finger jointed brick molding.
Jeeeesh !
Glad you tore into it, to fix it properly.
Cheers !View attachment 364455
I don't think its brick molding, I think its an actual door frame, and spare parts and such. To be mounted correctly, I would have turned it sideways so the teeth line up for maximum stress; but I won't be using door parts...yet.
 

adament

Cadet
Joined
Jun 24, 2022
Messages
17
Looks like there is a fair bit of Glass that didn't get saturated with resin

I suspect the Keel has rotted as well
From what I can tell, only one person has performed below deck repairs. I think the rotten keel as it were is only a 2" strip of marine plywood mounted horizontaly, encaased in some glass an resin, so not a big deal. However the more I take out of this boat I feal the more flexibilty exists, so I need to be cautious.
 

kcassells

Fleet Admiral
Joined
Oct 16, 2012
Messages
8,715
Thats a center keel stringer. Needs to be dug out and replaced. Either with new wood or filled with pb then glassed over.
Similar to a "strake".
 

adament

Cadet
Joined
Jun 24, 2022
Messages
17
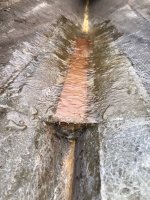
I was able to get the strake done today, not pretty but should last a while. The original strake wood was 1” marine plywood beveled at a 30° angle. There were two sections, one 5’ long from the stern, and another about 4’ long in the bow. After I cut out the top glass I was able to just pop out the stern section in one piece, the bow section needed chiseling out in places. From what I can tell, the manufacture had laid CSM into the bottom, placed the wood, and then glassed over with 2-3 layers of CSM; it seemed pretty thin and cut away easily so it may have just been 1-2 layers. Anyhow, I believe the reason the seal failed is that there is a noticeable drop in the bow section after the strake wood ends and water can pool there if the boat isn’t stored at a very steep angle. To correct this, I added an addition foot or so of wood up until the angle was getting too steep, and then finished with PB for the last 6-8” to eliminate any potential for pooling water.

From Kcassells suggestion, I opted for a mix of ¾” marine plywood with PB to fill the lower void, as I wanted to stick with the ¾” I had planned on using overall; and I couldn’t find any 1” marine plywood around and likely wouldn’t have bought any just for this. The bow section had a deep strake that narrowed, so I had to reduce the width and shorten the length to remain flush with the stern section of wood.

There were a few complications that impacted the less than desirable outcome I had experienced. 95°F isn’t the best temperature to be playing with resin. The resin manufacture stated a 10-12 minutes work time at 75°F at their given ratio for hardener, so I opted for a 50% ratio for the PB, but this really only gave me about 3 more minutes at the 95°F I was working with outside. After doing the first 2’ section I realized there was no way in hell I could mix enough PB fast enough to do an 8’ section, so I ended up cutting the wood in half.
After the initial 2’ section, I had developed somewhat of a rhythm with readied containers of ¼” chopped strand glass, snow cone mix (cabosil/fumed silica), resin, mixing and etc. and it all went fairly well. I could have used less PB, but I wanted to make sure I had so much PB that when I pressed the wood in it would squish out the sides and ends so I could be sure the wood was floating in PB and I had a good amount left over to use to bead the edges.

I did run into some trouble with the 2nd and 3rd layers of CSM, I kept on knocking debris from the rotten stringers on top of the mat and didn’t notice until I had the mat coated with resin. I only have pictures of the first 2’ section with 3 layers of CSM, as I didn’t finish the rest until it was getting dark, and I was damn sticky at the end (it sounded like someone was playing with a roll of duct tape every time I touched something). The first section was also kind of crap because I was using a roller incorrectly, for the rest I figured out to just use the chip bush to knock out most bubbles and it went much better (except for the random crap I had knocked into the mat).
 

Attachments

  • IMG_0267.JPG
    IMG_0267.JPG
    2.7 MB · Views: 16
  • IMG_0270.JPG
    IMG_0270.JPG
    2.4 MB · Views: 14
  • IMG_0271.JPG
    IMG_0271.JPG
    4 MB · Views: 14
  • IMG_0273.JPG
    IMG_0273.JPG
    2.3 MB · Views: 15
  • IMG_0274.JPG
    IMG_0274.JPG
    3 MB · Views: 17
  • IMG_0275.JPG
    IMG_0275.JPG
    2.2 MB · Views: 17

adament

Cadet
Joined
Jun 24, 2022
Messages
17
More progress has been made and here is my current update. If I am doing something wrong, tell me why, it would be greatly appreciated.

To remove the rotten ass stringers, I used a reciprocating saw and tried to fillet them out so I would have the least amount of glass left and a good template. However the wood crumbled like a crouton as soon as it was separated, so I just trashed them. I had previously taken measurements every 6” where there was a noticeable slope, and then only every 12” after. When I cut stringers out and looked at them I could swear drunk sailor had cut them, I could not discern a relating angle or slope, however they were very rotten.

Concerning hard spots, I did take account that there were only two points of contact to the keel, one in the bow and one in the stern on each stringer. Absolutely no other wood below the deck had contact with the keel (with the exception of the strake, as it was mounted latterly), everything was floating with tabbed glass, and it blew my mind and had me thinking as to why.

Unfortunately I was a bit wishy/washy with what I wanted to do concerning the heavy weave stringer glass. I started out wanting to cut it all out but noticed how great of a bond it still had, so I stopped and thought I would just grind the leftover lips down. Being frustrated with how much fiber dust was being generated I went back to the complete removal option, but it just didn’t pan out in my mind. Some spots I thought were delaminated, took me 10-15 minutes screwing around with chisels, cutting and grinding, when I should have just let it be. To me with it is added strength, it would makes no sense to remove unless delaminated or otherwise undesirable.

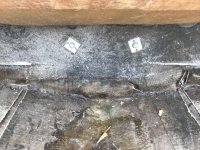
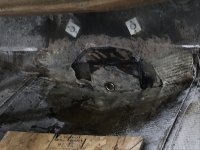
There was some ugliness I didn’t want to see, but I wanted to know anyway. The glass on the stern below the bilge was cracked, so I cut out a fairly large section to get a better idea of what was going on. The section around the drain hole was composed of what I think was dimensional wood and was hard as a rock but wet. The transom wood above was comprised of marine plywood had begun to rot. In concerns to the transom motor mount, when pressing on the motor, the whole boat and trailer moves more than any flex on the transom, so it’s still in good shape (as far as I am ignorant), but the rot process has set in. The first inch of transom wood, I could pull out with my fingers, the rest I had to chisel and cut out with an oscillating tool. I chose to use PB to pack the back, pressing in the replacement wood and covered and leveled with PB. I then used one layer of CSM and used 6x8” sections of 1708 biaxial glass. I do understand I am only slowing things down, and delaying the inevitability that the transom will need work.

As I had only used mat and cloth glass separately in auto body, I have to say I am a hell of a fan of the biaxial cloth/mat, it’s very nice and have greatly enjoyed using it.
 

Attachments

  • IMG_0276.JPG
    IMG_0276.JPG
    4.2 MB · Views: 13
  • IMG_0277.JPG
    IMG_0277.JPG
    4.6 MB · Views: 13
  • IMG_0278.JPG
    IMG_0278.JPG
    5.3 MB · Views: 14
  • IMG_0279.JPG
    IMG_0279.JPG
    4.3 MB · Views: 13
  • IMG_0280.JPG
    IMG_0280.JPG
    4.3 MB · Views: 12
  • IMG_0281.JPG
    IMG_0281.JPG
    1.6 MB · Views: 14
  • IMG_0283.JPG
    IMG_0283.JPG
    4 MB · Views: 13

Baylinerchuck

Commander
Joined
Jul 29, 2016
Messages
2,726
Boat manufacturers left much to be desired when it came to the details. That’s why your seeing gaps under the stringers and all that roving. I wouldn’t worry with removing all of that roving. You’re going to bed the stingers in PB anyway, so that will fill in the channel left by the last stringers. As far as the transom, as long as all the rot was removed, and the wood was dry you should be good to glass in new. If it was me I would replace all the transom wood. Easier to do now than later when the floor is in. Also now you can see that fiberglass alone will eventually allow water to pass into the substrate. Using gelcoat or a bilge paint over the new glass will keep that from occurring in the future.
 

adament

Cadet
Joined
Jun 24, 2022
Messages
17
Boat manufacturers left much to be desired when it came to the details. That’s why your seeing gaps under the stringers and all that roving. I wouldn’t worry with removing all of that roving. You’re going to bed the stingers in PB anyway, so that will fill in the channel left by the last stringers. As far as the transom, as long as all the rot was removed, and the wood was dry you should be good to glass in new. If it was me I would replace all the transom wood. Easier to do now than later when the floor is in. Also now you can see that fiberglass alone will eventually allow water to pass into the substrate. Using gelcoat or a bilge paint over the new glass will keep that from occurring in the future.
Thanks for the reply Baylinerchuck,

Do you need to bed the stringers in PB? or PL Premium etc.

I have spent several hours on this site and others trying to find out what is what, concerning the hardiness, and flexibility of PB, and whether you should or need to fill any voids. One person will say PB is softer than wood and a minute later someone is saying it’s harder, I’m thinking in terms of hardspoting in the stringer. In many cases I read, nothing is used and an empty gap is preserved. I ended up cutting all of my stringers yesterday, so that ship has sailed in terms of bedding them in anything, I could cut new ones but I don’t think it is needed, but I don’t have long term experience in this regard.

Although the manufacturers work looks a bit sloppy, it has held up great for 45 years with over 2” gaps in places with no filler. For my current plan, I bought 3 studs to use to suspend the stringers at deck height and tab them in one side at a time; however I am still up in the air about whether I should be using PB to fill the void, either fully, not at all, or enough to encapsulate the stringer for water resistance, as that seemed to be the main point of contention regarding leaving a void.

The stringers I cut were meant to preserve a ½” gap throughout; as I thought that anything more would be overkill. I do understand the science behind very large gaps, in that the larger the gap the wider the force of the load is spread out into the glass. So I guess my concern is would I be creating hard spots by filling the void completely?
 

adament

Cadet
Joined
Jun 24, 2022
Messages
17
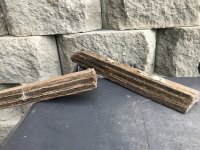
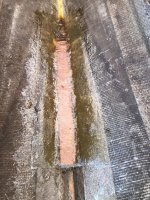
I was wondering if anyone has tried a truck bed liner like rhino-liner or herculiner for a deck coating? I saw a few examples of people using them as an outside hull coating but not too much of anyone using it on the deck. From what I understand there is no UV protection so it will fade, but it could be coated for UV, or even just recoated.

Originally I was just going to go with putting carpet back in, as I don’t know what I preferred, but a rubberized, hardened non-slip coating sounded interesting enough for me to commit. I figured I could always use carpet, either temporarily or permanently affixed, and would also have a decent watertight protective barrier regardless.
Any thoughts?
 
Top