1976 Tom Boy Boat, 1976 40 HP Johnson Outboard and who knows what Trailer

gm280

Supreme Mariner
Joined
Jun 26, 2011
Messages
14,604
I guess this means I am the only one left with a 1998 Chevy Blazer!
Well the 98 Blazer didn't go too far. I gave it to my son for his son's (our grandson) vehicle...once he gets his driver's license. We bought it new and put 198,000 miles on it before buying a Cadillac XT5. Amazing the difference driving the XT5 verses the Blazer. But the Blazer did everything we asked of it. And since it looks extremely great yet, inside and out, and runs pretty well still, I will get to see it often. I have to say that Blazer was a solid framed vehicle that had a factory towing package on it and all the niceties too.
 

Willyclay

Captain
Joined
Sep 8, 2006
Messages
3,257
I am also passing my Blazer to my son for his soon-to-be driver. Still performing well with 130K. Ours came with the factory handling package, Bilstein shocks and 3.42 rear-gear, but I added the hitch, trans cooler, extra-capacity trans pan plus the trailer wiring harness. It has been a good one!
 

gm280

Supreme Mariner
Joined
Jun 26, 2011
Messages
14,604
I am also passing my Blazer to my son for his soon-to-be driver. Still performing well with 130K. Ours came with the factory handling package, Bilstein shocks and 3.42 rear-gear, but I added the hitch, trans cooler, extra-capacity trans pan plus the trailer wiring harness. It has been a good one!
All the extras you added came with our Blazer from the factory. And I can say, it never let me down over the long years we drove it. It was/is a top notch purchase in my book...
 

gm280

Supreme Mariner
Joined
Jun 26, 2011
Messages
14,604
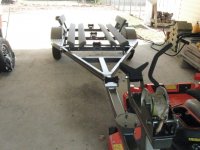
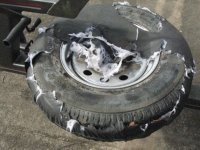
Now that the old Blazer is gone (to my grandson) I have room to pull the boat trailer into the breezeway and get it ready for the boat to slide on. Problem is, the squirrels have taken their toll on it. So I may have to re-carpet the runners and of course rewire the wires they chewed through. And of course make a new spare tire cover. Have a look. Not really that difficult but still some rework needed...
Seems they loved chewing on this cover...
IMG_0001.JPG
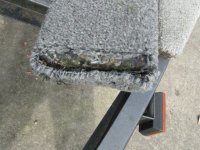
And even the carpet...
IMG_0002.JPG
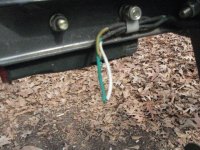
And let's not forget the wires...
IMG_0003.JPG
Of course it needs a really good washing and going over as well.

Anybody want some pet squirrels...I can trap them and ship tomorrow...
 

gm280

Supreme Mariner
Joined
Jun 26, 2011
Messages
14,604
Murphy's law is surely amazing. I totally rebuilt the '76 Johnson 40 HP engine years ago and it set on the engine stand in the shop all that time. Not even any leaks or anything remotely wrong with it as it set there. Now I am ready to mount the engine, and would you know it, I have a puddle of lower gear oil on the floor below it that just dropped up a few days ago. Can Murphy get anymore invasive...? Looks like it is coming from the shifter pivot screw. Hopefully an "O" ring? SMH
 

Willyclay

Captain
Joined
Sep 8, 2006
Messages
3,257
Murphy's law is surely amazing. I totally rebuilt the '76 Johnson 40 HP engine years ago and it set on the engine stand in the shop all that time. Not even any leaks or anything remotely wrong with it as it set there. Now I am ready to mount the engine, and would you know it, I have a puddle of lower gear oil on the floor below it that just dropped up a few days ago. Can Murphy get anymore invasive...? Looks like it is coming from the shifter pivot screw. Hopefully an "O" ring? SMH
Be careful removing that screw because there is a gotcha involved. Maybe one of the forum gurus will chime in with specifics. Good luck!
 

gm280

Supreme Mariner
Joined
Jun 26, 2011
Messages
14,604
Be careful removing that screw because there is a gotcha involved. Maybe one of the forum gurus will chime in with specifics. Good luck!
Oh yes, I do realize that removing that screw CAN cause some OH NO issues with the shifter pivot falling out of alignment. I am going to do this as carefully as possible and if it does move out of place, well I will drop the lower section to fix it. But I think I can remove that screw and install a seal or "O" ring without doing more damage then good. We will see... Thanks for the concern and heads up.
 

gm280

Supreme Mariner
Joined
Jun 26, 2011
Messages
14,604
Sure looks like the oil leak is coming from the pivot screw seal. A mere $3 part that for some reason decided to leak now... I'll check to see how tight it is. But if need be, I will replace it. I just hope Murphy isn't hanging around when I do that... lol
 

gm280

Supreme Mariner
Joined
Jun 26, 2011
Messages
14,604
You are safe! I have Mr. Murphy fully occupied up here at the Edge of America.
Not so sure about you having Murphy all occupied with you.

With so much going on around here, I finally had a few minutes to look at the oil leak. I got a Philips head screw driver and tried to see if it was merely a loose screw. Well seems it is. BUT as I turned it to tighten it a few turns, I was amazed how many turns I turned it and it wasn't getting tight. Then Murphy set in. Not yet verified, but it looks like it may be stripped out. I only hope it is stripped on the screw itself and not the case. But of course, it probably will be the case, being the softer of the two metals. Why it waited this long to start leaking is anyone's guess. Seems I will have a few options with this fix. Either replace the lower case section (if that could be located), OR tap it out for the next larger thread size. If I go to the next larger screw size, I will have to turn down the screw to make the actual pin the same diameter as the stripped one. Not a huge deal since I have a metal lathe, but still a PITB. I also could aluminum weld it up and redrill and tap...or even use some JB weld. But I am not sure I would trust anything but a solid fix I know would work. Otherwise I would always have it in the back of my mind that it would leak out on the water.

Who would have guessed that ready to install the engine, and this crops up... Oh the pain, the pain...

But like they say, it could have been worst...
 

gm280

Supreme Mariner
Joined
Jun 26, 2011
Messages
14,604
Well a little more investigation and it seems the threaded screw is perfectly find. Which means the lower foot case has some questionable threads. But, seems like those questionable threads are only the first couple. Any screw longer then that, threads fine. So I checked the diameter and thread pitch and it seems it is a 1/4" x 28 TPI. And since I have some of those, I will turn the unneeded threads off to allow a couple more threads to grab the good threads of the case and install. Since I VERY CAREFULLY removed the screw a few times now, and used a long thin probe in it's place, all is still aligned and good. So once I get the new screw turned, I will remove the thin probe and install the new pivot pin and we should be good to go. But we will see.
 

gm280

Supreme Mariner
Joined
Jun 26, 2011
Messages
14,604
Well I finally turned a new pivot screw for the lower case. And for the most part it turned out pretty well. I fitted it in and it tightened very secure. However, when I installed the "O" ring on the screw, it wouldn't even start threading...exactly like the original screw was doing. I now don't think any case threads are stripped out, but merely the "O" ring is holding it out enough to even grab the threads. So I think I will turn a little off the head to allow the "O" ring to set and still thread in. Sounds like a real issue, but not so much when you consider there isn't many threads in the casing to start with being such a thin casing. So a relief cut at the head of the screw should work. And for the record, I must have installed and removed the pivot screw at least 15 times now and not one issue with anything moving out of alignment.

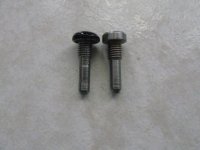
Pivot Screw (1).JPG
The screw on the right is my version. Notice at least one more thread then the original.
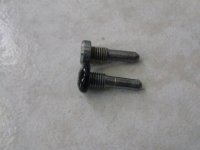
Pivot Screw (2).JPG
I started out with a typical 1/4" x 28 TPI hex head bolt. I turned it round and slotted it for a flat blade screwdriver fit and chamfered the edge.
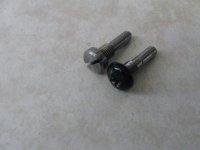
Pivot Screw (3).JPG
I couldn't figure out how to make it a Philips head screw, so the flat slot has to work... I will probably heat it and quench it in oil to blacken it to match pretty well with the engine paint. And that treatment help abate corrosion as well.
. I hope that luck holds up...
 

dingbat

Supreme Mariner
Joined
Nov 20, 2001
Messages
16,083
However, when I installed the "O" ring on the screw, it wouldn't even start threading...exactly like the original screw was doing. I now don't think any case threads are stripped out, but merely the "O" ring is holding it out enough to even grab the threads
Guessing you reused the existing "swollen" o-ring?
 

gm280

Supreme Mariner
Joined
Jun 26, 2011
Messages
14,604
Guessing you reused the existing "swollen" o-ring?
Actually no. I used a new one and it isn't working. So I will cut a little off the head of the screw where the threads stop to allow a good fit of the "O" ring and start threading. The old "O" ring wasn't ballooned or swollen up, but mostly smashed near flat. So I "O" ring now.
 

dingbat

Supreme Mariner
Joined
Nov 20, 2001
Messages
16,083
Actually no. I used a new one and it isn't working. So I will cut a little off the head of the screw where the threads stop to allow a good fit of the "O" ring and start threading. The old "O" ring wasn't ballooned or swollen up, but mostly smashed near flat. So I "O" ring now.
Humm........makes no sense unless some of the threads stripped off the original bolt
 

gm280

Supreme Mariner
Joined
Jun 26, 2011
Messages
14,604
Humm........makes no sense unless some of the threads stripped off the original bolt
Actually I think what caused the pivot screw to be loose and not tighten up initially was the fact that I was working with the advance timing plate position and flipping it from neutral to forward and reverse to see how the different setting effected the throttle/ignition plate. And I think that worked that pivot screw loose doing that. So I guess I need to clean the threads on both the casing hole and pivot screw and install with some Loctite when installing it for final. I drained the oil and will thoroughly clean everything of oil and install with Loctite and refill foot oil again. With so many other things going on, getting time to start back on it is a priority decision now. Seems I want everything done at the same time. ANd obviously that can't happen...Doh...........
 

gm280

Supreme Mariner
Joined
Jun 26, 2011
Messages
14,604
Yesterday I actually MOVED the trailer into the breezeway to start the repairs so I can put the boat on it. The squirrels had a field day with it over the years and now I have to fix everything they damaged. I was amazed and shocked at the amount of moss and such growing on the carpet also. A good hosing off seems to have taken care of that issue. I am planning to totally wash the entire trailer today and then work the wiring and other shredded carpet issues. And since the step parts were carpeted as well, I have acquired some heavy duty diamond plate (1/2" aluminum, I think) to replace them while I'm at it. Then no more carpet for side-steps. I think I will also re-grease the bearings to be on the sure side too. So once I finish the trailer repairs, the boat goes on and engine too. Closer for sure for a splash... I have to admit, I am both anxious and even a little worried at the same time. I mean this was/is a 100% total rebuild project of everything. I'll be pleased if it floats...
 

gm280

Supreme Mariner
Joined
Jun 26, 2011
Messages
14,604
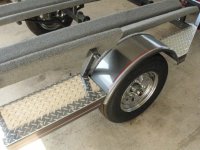
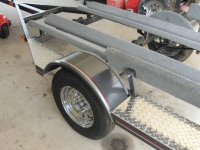
Well, I did get some progress with the trailer portion of this project. Since the carpeted side steps were pretty much rotted, yea, I know should have never used painted plywoods for such steps. I decided to forgo replacing them again with more plywood. Instead I got some 1/4" ( I guess it is thicker then that, but the main thickness is at least 1/4" not including the raised diamonds) diamond plate. Initially I was going to use the same stainless still hardware to install the diamond plate, but instead decided to use some heavy duty 3/6" large head hard aluminum rivets. And that was the perfect thing after seeing how they turned out. I also fixed the squirrels issues with the chewed up wires. I had to lengthen the wires and resolder them back together. So that is also finished now. I still have some carpet to repair and I was wanting to repack the wheel bearings as well. That is where an issue showed up. I removed the bearing buddy cap and red watery oily liquid drained out of the bearing side. I didn't check the other side, but I honestly thought Red and Sticky was supposed to be some great stuff. This trailer basically hasn't moved since the original finish a few years back. So has anyone else had any Red and Sticky grease issues? I attached some pictures.
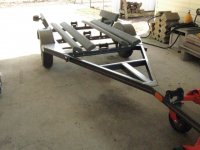
Trailor 2 (1).JPG
An overall view of trailer 2.0...
Trailor 2 (2).JPG
The diamond plate installed with the large head rivets. That diamond plate took a lot more time to cut and fit then I originally thought. Once you get the plate cut to size, then the grinding and polishing all the edges starts. That took a lot of time and tons of aluminum particles were everywhere. But there is nothing but absolute smooth edges now.
Trailor 2 (3).JPG
Picture of the opposite side.
Trailor 2 (5).JPG
Nice to see a good shine on the trailer now. Boat install is coming next...once I fix the carpet on the end of a few runner bunks.
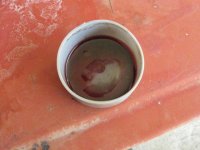
Trailor 2 (4).JPG
I attached this picture of the liquid from the Red and Sticky wheel bearing grease. Any ideas?
 
Top