1976 18' Starcraft Holiday Restoration

Watermann

Starmada Splash of the Year 2014
Joined
Jan 12, 2013
Messages
13,798
No they're not coming back from PB oblivion...
 

GreenHoliday

Seaman Apprentice
Joined
Aug 5, 2016
Messages
42
CC, not being able to see those pictures is killing me - I only vaguely remember the brackets you installed. I just used my lunch break to slog through the mud in my business attire at the scrap metal yard. I bought 20' worth of .080 sheet aluminum (new stock) cut 6" wide for the side brackets, a la WM's fix. I don't know if $30 is a good deal everywhere, but it definitely was compared to the $92 quote I got at another place. Hopefully that will get me about 8 brackets on each side of the hull plus a couple feet leftover for exterior patches on the cracked rib ends.

It looks like I will be able to work on the boat Saturday. In the meantime, I am going to wait for someone who knows more than me to say, "Don't remove the epoxy that is currently in place if it isn't leaking." Otherwise, Saturday looks to be a fun day full of sanding and scraping.
 
Last edited:

Pusher

Lieutenant
Joined
Sep 2, 2014
Messages
1,273
So, is a guy better off putting a brace OVER the cracked chine or before/after it?

It might affect whether you clean out the epoxy now or later down the road
 

classiccat

"Captain" + Starmada Splash Of The Year 2020
Joined
Dec 20, 2010
Messages
3,412
No they're not coming back from PB oblivion...

sorry guys...i'm guessing you're well aware of the $399 that photobucket now wants / year for "3rd party hosting". :eek:

try browsing my SS library.

In the meantime, I'll dig for some new ways to share files. OuterChineBracing20131220b_zpsdcf1b2c8.JPG 2013-12-31 18.50.10_zpspjixoir1.JPG
 

GreenHoliday

Seaman Apprentice
Joined
Aug 5, 2016
Messages
42
I was able to work on the boat for a little bit on Saturday. I didn?t get a ton done, but I was able to plan the next few steps. The biggest obstacle to my process right now is that the boat is 100 miles away from me. That means transporting a lot of tools, having materials in different locations, etc etc etc? it really is a pain, especially for someone not known for his organizational skills. On the bright side, my brother-in-law basically completed the trailer and it shed 45 years of wear and tear in one week.

Now for the updates:
  1. The cracked spray rail/chine: We sanded the outside of the chine to get an idea of what we were dealing with. We found a long crack? 47? to be exact. Most of it is hairline and it is probably 1/8? at its worst point. I thought I took a picture of it to post, but I guess I didn?t. Whoops. There is one place where the aluminum is slightly buckled and the outside of the existing patch could use some cosmetic touchup before paint. I may lose some of you here, but I am not going to remove all of the existing epoxy. The patch itself is solid and not leaking, so I don?t know what else I would do to improve what is already there. I don?t think brazing will work and I have no interest in taking it to a welder and possibly warping the hull.
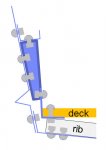
  2. The hull reinforcement/bracing: As I mentioned before, I had my stock aluminum cut into 6? strips. Unfortunately, the space between the aft 6 (or so) ribs is only about 5.5?. I probably would have known this if the boat was in my imaginary barn and I could just go out and look at it instead of 100 miles away. So now I need to cut those braces narrower before bending them. As for bending, I made a rudimentary brake out of scraps in my garage (1x lumber and door hinges). I couldn?t believe how well it handled the .080 aluminum? until I got careless and snapped one of the pieces of wood. It worked well enough that I will rebuild it and try again with the rest of the braces. All in all, I will be adding 8 or 9 braces to each side of the hull and making some 2?x4? ?band-aids? to reinforce cracked rib ends on the outside of the hull. Some people would probably give up on this hull, but I?m not one of those people. I am confident we will get her braced up and in better shape than ever.
  3. The leaking keel: I gotta hand it to WM. He was right and I was wrong (no surprise there). The source of the leaking keel was indeed water coming from a leaky rivet above the keel strip leaking down the outside of the hull and into the keel strip. This was quickly confirmed by adding food coloring to the leak coming from an especially bad rivet on the outside of the hull. Green water came dripping out of the weep hole seconds later. I am confident that a handful of new rivets and Coat-It will solve that problem for good. Thanks, WM!
Until I get back to the boat with the bent braces, patches, and riveting materials, we are sealing and painting the deck, backing plates for the seats, and transom. I think most of the brainwork is done until I get to the dash. I am pretty unhappy with the original layout and materials used. I might try to do something with composite decking/fencing materials.

Thanks to everyone for all of the help so far. I promise to have more pictures next time I get to the boat.
 

GreenHoliday

Seaman Apprentice
Joined
Aug 5, 2016
Messages
42
I'm afraid I'm completely overthinking my pedestal choices and could use some help from anyone that has experience. I am set for the driver and front passenger seats (they will be permanent), but I can't decide on which style of removable pedestal to go with on the rear seats. As usual, I read way too many reviews and now I don't know what to do. The only thing I have decided is 2 3/8" over 3/4" pin style for the added stability.

People seem to complain about the taper-lock/wedge styles getting stuck all of the time.
Springfield's plug-in styles have a plastic bushing in the base that breaks frequently and can't be replaced without replacing the whole base.
That leaves the Attwood/Swivl-Eze 238 series and the Springfield Click-Lock/Spring-Lock series.

Does anyone have any experience with any of the three choices above?

Thanks in advance.
 

Watermann

Starmada Splash of the Year 2014
Joined
Jan 12, 2013
Messages
13,798
Sorry I use the 3/4" pin models Swivel Eze, I'm around 260, my lightest fishing buddy is around 250 and we have zero issues with the bases, pedestals or the seat mounts. I find them very solid actually and you don;t have a huge gaping hole in the deck either.
 

GreenHoliday

Seaman Apprentice
Joined
Aug 5, 2016
Messages
42
I might be able to get at the boat this weekend and I think I am ready start drilling out the rivets for the cracked rib ends. Before I do so, I was hoping someone with experience could green light my plan. Am I making a mistake by drilling out all 4 of the rivets pictured below even though only the two 2 are leaking/compromised?
cracked ribs.jpg

While I am not one to drill more rivets than I have to, I think the 2" x 4" patches I cut will provide more much more stable than a smaller patch only covering the top two rivets.

Just thought I should make sure before I go crazy drilling holes. Most or all of the old threads dealing with this issue no longer have photos.

Thanks
 

Pusher

Lieutenant
Joined
Sep 2, 2014
Messages
1,273
Seems like a proactive approach to me but I've not done this myself. Make sure your patch material isn't so thick it causes a rigid spot that will form more cracks.

Do you guys backbutter the patches with anything?
 

Watermann

Starmada Splash of the Year 2014
Joined
Jan 12, 2013
Messages
13,798
Although I didn't extend the patches to that second set of rivets I did remove and replace them just to be safe in case they had loosened.
 

GreenHoliday

Seaman Apprentice
Joined
Aug 5, 2016
Messages
42
I was planning on using .080 aluminum buttered with 5200 for the patches. Will also coat the solid 7/16" long rivets going through the patch, hull, and rib with 5200.

WM, do I need to butter the whole backside of the braces too? Also, can you confirm that you only used 4 rivets per brace, i.e, two on the bottom and two on the side of the hull? I was originally planning on 6 or 8 per brace but now I'm thinking that is overkill.
 

Watermann

Starmada Splash of the Year 2014
Joined
Jan 12, 2013
Messages
13,798
The fewer holes you have to drill in the boat to get the job done the better. You can probably add a rivet in the patch ends towards their middle that goes through the outside patch, bottom and the brace on the inside, 2 birds with one stone.
 

GreenHoliday

Seaman Apprentice
Joined
Aug 5, 2016
Messages
42
Thought I would post a few pictures of the trailer since it's all I have for now. Spent last weekend meeting my new nephew instead of working on the boat... a trade-off I was glad to make.

IMAG0151-1075x608.jpg

IMAG0149-608x1075.jpg

We did get the empty hull off blocks and back on the trailer to get ready for riveting. All of my riveting tools and seats arrived... I think we will be happy with them. I ended up going with the Springfield Spring Lock system for the rear two seats... sort of in between the two options I laid out before. Hopefully our crew is happy with them because like everything else with this rebuild, I went over budget. Oh well.
 

Attachments

  • IMAG0151-1075x608.jpg
    IMAG0151-1075x608.jpg
    181.7 KB · Views: 1
  • IMAG0151-1075x608.jpg
    IMAG0151-1075x608.jpg
    181.7 KB · Views: 1

GreenHoliday

Seaman Apprentice
Joined
Aug 5, 2016
Messages
42
And now I'll come clean that posting trailer pictures was a desperate attempt to keep people interested because I have a few questions about the new dash layout. I am thinking about scrapping the steps/console that help a person access the bow. I want to remove it not because no one ever uses it, but because we use those steps so often in our 16' Holly. I prefer to fish standing on the bow so it's a lot of up and down. The steps are a little clumsy to use coming down and often times I lean on the windshield and sort of jump down. I feel like a better ladder system could help remedy this and also open up the access to storage (aka dog sleeping area) under the bow.

My idea was to mount a stow-away ladder under the bow. They are called under platform sliding ladders and are sold on iboats. They are usually mounted under swim platforms, but I don't see why one wouldn't work for this purpose. It could be stowed away when we are loading gear under the bow and would actually make the bow area accessible. Does that stupid console provide a lot of support to the dash area that I'm not considering? Other models seem to get along fine without it.
ladder.jpg

With that console out of the way, I would scrap the whole layout and make it look more like a Jupiter's dash. Our Sunchief has a flat dash and continuous dash tray that runs the full length of the beam and I like it much more than the Holiday set up. That brings me to mounting the steering wheel, gauges, switches, radio, etc... Is that going to be too many holes to poke in the bow support board? It doesn't seem to be an issue on the Jupiters et al. but I don't know if they are engineered differently. My other option is to fasten a new, continuous dashboard via blocks/brackets/whatever to provide clearance for the back of the wheel and the gauges.

Any and all opinions are welcome.
 

Attachments

  • ladder.jpg
    ladder.jpg
    7.2 KB · Views: 0
  • ladder.jpg
    ladder.jpg
    7.2 KB · Views: 0

Watermann

Starmada Splash of the Year 2014
Joined
Jan 12, 2013
Messages
13,798
If the original ladder is the center support then I would say you'd have to replace it with something, as you know the SS have consoles with legs on either side of the center windshield that opens that screw into the deck and have a backing. You could fab up supports on either side of the retractable telescoping ladder to remedy that support issue.

For the bow arch support being full of gauge holes, if you used something like 3/4" ply I don't see that it would be and issue with the added supports mentioned above.

y4moGu5bCFkzlUqUER28UJmz_nsJWaNaDbrPFJk52Mq6cMJWCkWlSmxebfPFAFxS1LjwHIvx4irD80LfhoJbK11AcGxnDhwS0eWe6sG2VAqxpsX3IkuSM4AS3lJZvgGOJssRLF1DeAwDQny2uuZyJn0QNtYDJGdLVw0tLep1Pw5SzGnPB1irYhnnNowfrBHK-NnNoXBFiuygh9fR4STNQ7xXg
 

ezmobee

Supreme Mariner
Joined
Mar 26, 2007
Messages
23,767
I think you could beef up the support behind the dash to support the bow without the console there. I like your idea. I have one of those swim platform/ladders you are proposing.
 

Pusher

Lieutenant
Joined
Sep 2, 2014
Messages
1,273
That's not a bad idea. I think I like it.

Another option that might help climbing down is mounting an arch. I really enjoy grabbing mine all Indiana Jones status and swinging down.... But then I enjoy some dramatization.
 

GreenHoliday

Seaman Apprentice
Joined
Aug 5, 2016
Messages
42
Hey! That's more traction than I expected that idea to get! Another possible option I thought of tonight while painting my basement and having a few pops is camper/RV scissor steps.
Screenshot_20170729-010836-432x768.png

As I see it, the advantages are: larger steps, sturdier, it seems to have a nice locking mechanism, and it is portable... I could mount another bracket on the inside of the gunwale and I'd have one heck of a ladder for the older members of my family to board. The possible disadvantages are: they would be more visible than the underplatform ladder (they fold up to 7-8 inches depending on whether I got the 2 or 3 step version), possibly harder to install, ugly/out of place on a boat with no other diamond plate.

If I am able to make a continuous dash tray, I kind of like the idea of getting the 3-step version and modifying it so the top step is permanently mounted flush with a cutout in the tray. The bottom two steps would accordion up and lock to it.

I have lots of time to think about it, but it's never too early. I appreciate the feedback.
 

GreenHoliday

Seaman Apprentice
Joined
Aug 5, 2016
Messages
42
Got to work on the old Holly this weekend and actually made some decent progress. We drilled out the last 4 rivets on each of the rib ends where there were hairline cracks or where we thought there could be an issue in the future (9 on one side and 8 on the other). Then we placed a scab on the outside of the hull and bucked solid rivets through the hull, ribs, and scabs. We may have gone a little overboard on how many we did, but now I have peace of mind that there will not be any more cracking on the rib ends.

We also got 8 braces installed on each side of the hull to isolate the spray rails. Besides the scabs and braces, we had about 20 miscellaneous rivets to replace from our prior leak tests. All in all, we set about 150 rivets. We did all of the drilling on Friday night and all of the riveting on Saturday.
IMAG0173-1075x608.jpg
IMAG0176-1075x608.jpg
IMAG0174-1075x608.jpg
Here were some of my biggest takeaways from the weekend of hull riveting:

-I didn?t find the punch to be much of a help when drilling out the brazier head rivets. We had better luck drilling a pilot hole with a small (3/32??) bit and then stepping up to a 3/16? bit.
-I did not buy a bucking bar. I was the guy inside the boat. Depending on whether I was bucking on a rib or in the open, I used an old railroad spike for tight spaces and a 4 lb. steel drilling hammer for the open areas. We got along just fine.
-Somehow, I think I got different alloys for the solid rivets I bought. The 7/16? rivets were softer and much easier to install than the 3/8?. Ultimately, both created a watertight seal, but the harder (shorter) rivets took SIGNIFICANTLY more effort to buck. Perhaps a tungsten bucking bar would have helped here, but I?ll never know.
-We set our compressor a little higher than most. 55 psi gave us the best results.
-You guys were not kidding about how messy that 5200 is! My hands are still a mess.
-The inside of a bare aluminum hull on a sunny day is a great place to catch a suntan/burn.

We did a leak test after setting the rivets (before we used the Coat It) and there were still some minor leaks (including the front keel strip going up the bow), but there was a huge improvement. We rebucked a few of the rivets and ran a thin bead of leftover 5200 on the outside of the front keel strip because all of the rivets looked rock solid but there was still a little water oozing out of that seam. That left us with 2 small drips: 1) a rivet that we know we did a poor job of replacing, and (2) the rear edge of the front keel strip that we couldn?t seal with 5200 because the trailer roller was in the way. We drained, cleaned, and dried the hull Saturday night before applying the Coat It. Unfortunately, a combination of carelessness, slight inebriation, and poor communication led to me not knowing there was only a 30 minute working time. I got halfway done with the boat before the can started getting extremely hot and then it was all downhill from there. It wasn?t long before we had a block of epoxy in a can. Oh well, you live and you learn.

The plan going forward is to ?Coat It? the rest of the boat for good measure and do a final leak test. I think we are going to be bone dry. The deck, transom, floor joint supports, and seats are ready to be installed. Still need to pick up some closed cell foam. This week didn?t result in a lot of visual progress, but we should progress quickly now that the hull reinforcement and leak testing is largely behind us.

Finally, I used that vinyl spray paint to paint the ugly yellow panels underneath the bow and I am very happy with how it turned out. Sorry for the poor picture.
IMAG0170-1075x608.jpg
 
Top