1976 18' Starcraft Holiday Restoration

Candutch

Chief Petty Officer
Joined
May 8, 2015
Messages
637
That's a tough break GH, sorry to see you have those issues. It's all repairable which is the good news, just take the advise from those here that are in the know (I'm not one of them) they have already and will chime in with their first hand experience and knowledge. Whatever you do don't shortcut it or discount advise as overkill because the last thing you want after all the tI'm and money is a catastrophic failure on the water.
Goodluck with the repairs and looking forward to the resto.
 

GreenHoliday

Seaman Apprentice
Joined
Aug 5, 2016
Messages
42
I'm quickly finding out that I don't know what I don't know. In my case, I don't know if there are supposed to be weep holes in the ridges under the boat. I know they have a name but I don't know what it is.

I filled the inside of the hull for the leak test. It wasn't pretty. Hopefully there is a video link to the test. I didn't know how to describe what is going on with pictures only.

Thanks in advance for any help. The holes that are present are symmetrical on the port and starboard ridges. Leads me to believe they are supposed to be there to let those ridges drain... or PO accidentally drilled through the hull on both sides.

 
Last edited by a moderator:

Watermann

Starmada Splash of the Year 2014
Joined
Jan 12, 2013
Messages
13,787
Yeah that deck support stringer with the crack is an easy fix, stop drill the crack and patch over it to isolate the crack like you said. Once everything is replaced with new and solid it won't be an issue. The PO used the old gal with completely compromised structural pieces for a long time to cause that sort of damage.

The keel strip down the center is riveted on the outside of the boat hull and is supposed to have those holes but no water should come from the inside and leak out of them. Was the water maybe running down the sides and just coming out of the holes in the keel strip?

There must be some missing or leaking rivets. My SS had a bunch of bad rivets and the keel strip was removed completely and then put back on with new solid rivets with 5200.
 

GreenHoliday

Seaman Apprentice
Joined
Aug 5, 2016
Messages
42
It's been a busy week at work. Time for an update on our progress last weekend.

We got the new transom cut, fit, and laminated. No real problems to speak of.... yet. New deck got cut and fitted. Left stringer was patched and and riveted back to the ribs. Is there a consensus on the best way to reinforce the seams between the deck boards? PO had a piece of 1/16 inch aluminum running between the stringers at the seams. That didn't seem to do much, but I don't think anything would have considering the left stringer was just lying on the bottom of the hull.

We also got the boat off the trailer and on blocks so my brother in law can work on the trailer. I was happy with the work we got done but wasn?t happy with the unexpected work that showed up.

Now on to the two most pressing issues:

1) The cracked spray rail: I understand I need to reinforce the hull in this area (or all over). Before I do that, should I remove all of the Marine-Tex (or maybe 5200??) that is currently slopped on there to see what I'm really dealing with, OR should I leave the inside alone and sand the outside smooth and repatch as needed before painting? I will say that we put a lot of water in the hull during our leak test and verified that the current patch did not leak. Assuming it is Marine-Tex and I should remove it, what is the best way? I have read that heating it with a torch makes it pliable and easier to remove. I just don't want to warp or damage the hull by using heat. Any advice? That goes hand in hand with my next question: If I have to completely clean the goop away, should I repair the crack with Marine-Tex and/or 5200 or use a torch and aluminum brazing rods?

I am having a hard time finding other people's approach to reinforcing their hulls. WM, your approach is rock solid, but I will keep looking for different solutions before I make a move.

2) The leaking keel strip: WM, thanks for confirming that those holes are supposed to be there. They looked too perfect to be accidental, but I don't have much faith in the PO. The leak test revealed about 15-20 leaky rivets, most of which were by the damaged spray rail. The good thing is that I don't think any of the ribs are cracked. It?s worth noting that I did not gluvit the inside seams before the test. Everything that leaked will be replaced. That being said, I don't think there is any way that all of the water in the keel strip came from rivets leaking down the hull and into it. The hole in the keel strip was leaking before any of the rivets above it started leaking. The amount of water dripping from the hole also increased as the hull filled up with more water and the water pressure built up. When I would put my finger over the hole and plug the leak, water would come billowing out the top of the keel strip at a rate that exceeded all of the leaky rivets combined. If water was only entering from the outside, I can?t see how that would happen. I still think water is entering the keel strip from inside the boat? somewhere.

Thanks again for any advice.

One thing that I just realized and is equal parts funny and disconcerting is that this page has a decent amount of views and not one single person has said anything along the lines of "nice looking boat." Ha!
 

Watermann

Starmada Splash of the Year 2014
Joined
Jan 12, 2013
Messages
13,787
Hey super nice Holly ya got there! :lol:

So you have another issue to check the boat for, I didn't see you comment on it but I can see there are rib end cracks.Yours are not the worst I've seen either.

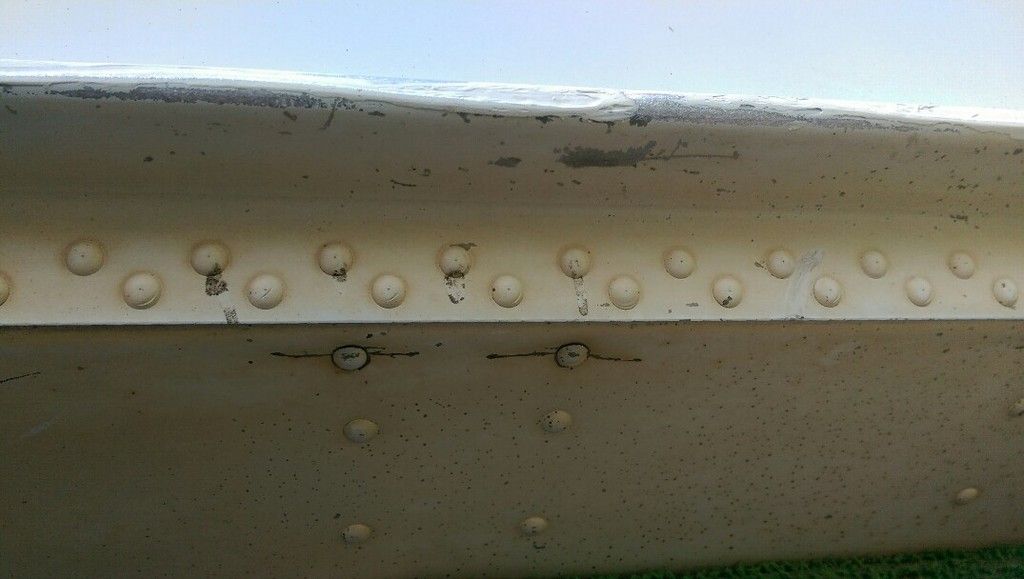
See those 2 rivets at the top under the cracked spray rail? Those are rib end cracks, also a common problem that myself and others have repaired.

IMAG0098-1075x608_zpsunzbituo.jpg
 

Watermann

Starmada Splash of the Year 2014
Joined
Jan 12, 2013
Messages
13,787
I am having a hard time finding other people's approach to reinforcing their hulls. WM, your approach is rock solid, but I will keep looking for different solutions before I make a move.

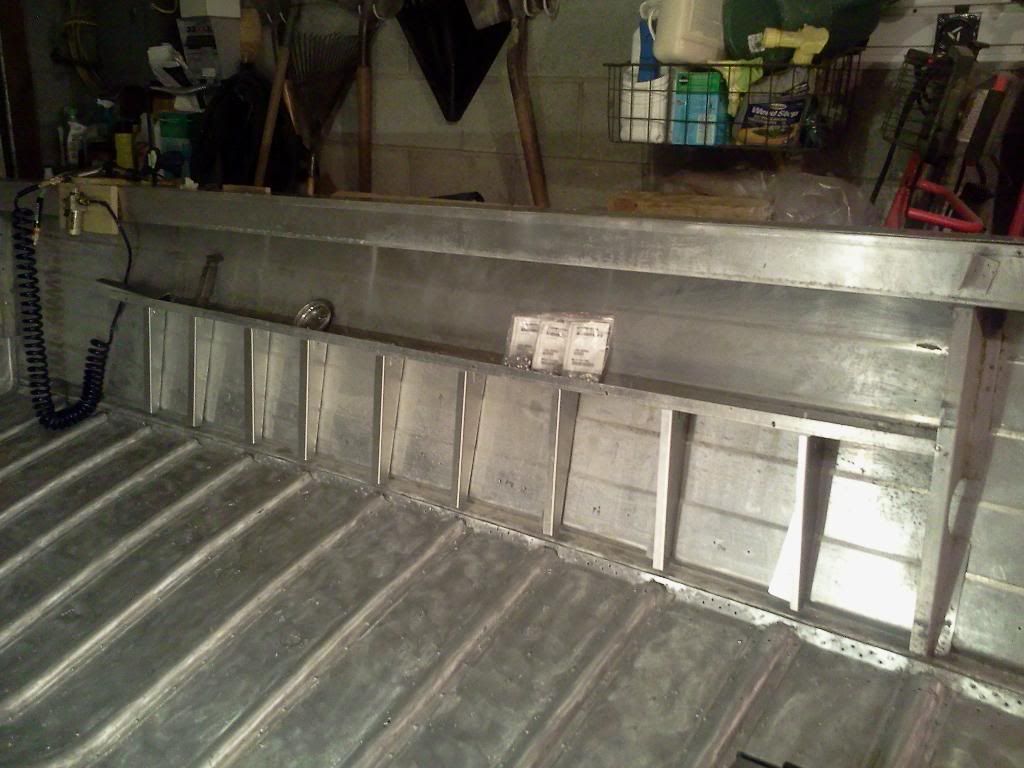
Yeah thanks but Starcraft engineers came up with the braces not me, the factory started installing them under the ribs to stave off the rib end cracks and spray rail cracking issues. Here's my 79 SS with the factory installed braces.

Still tho let us know if you come up with a better method to brace and isolate that rail.

IMAG2222.jpg
 

GreenHoliday

Seaman Apprentice
Joined
Aug 5, 2016
Messages
42
The Starmada seems to be chock full of welders, machinists, and carpenters. Some of my questions to this point may have tipped you off to the fact that I am none of those things. I seriously doubt I will be the savior on this one.
 

Watermann

Starmada Splash of the Year 2014
Joined
Jan 12, 2013
Messages
13,787
I'm none of those but I can figure out how to fix just about anything. The restoration of these old boats should be your therapy, not the reason for it.
 

Tnstratofam

Commander
Joined
Aug 18, 2013
Messages
2,679
The restoration of these old boats should be your therapy, not the reason for it.

Well said Watermann!

I will add that most of us had never rebuilt/restored a boat when we started our first projects, but with allot of help from this outstanding forum and its amazing members we all managed to turn out decent boats.

Some of us like Waterman, DozerII, Budski, Jaoutside, and Chemicalwire to name just a few brought their boats back to better than new. With inovations and fixes that are absolutely brilliant and mind blowing!

Your Holiday is very fixable and she is a good looking boat with more potential than a few leaky rivets and any leaky keel can hide.
 
Last edited:

Candutch

Chief Petty Officer
Joined
May 8, 2015
Messages
637
Well said Watermann!

I will add that most of us had never rebuilt/restored a boat when we started our first projects, but with allot of help from this outstanding forum and its amazing members we all managed to turn out decent boats.

Some of us like Waterman, DozerII, Budski, Jaoutside, and Chemicalwire to name just a few brought their boats back to better than new. With inovations and fixes that are absolutely brilliant and mind blowing!

Your Holiday is very fixable and she is a good looking boat with more potential than a few leaky rivets and any leaky keel can hide.

X2...I didn't have a clue when I started and just over 2 years later I am almost done. It's all thanks to the help and knowledge shared by the guys right here on this forum.
Enjoy the process, like Watermann said "The restoration of these old boats should be your therapy, not the reason for it."
 

GreenHoliday

Seaman Apprentice
Joined
Aug 5, 2016
Messages
42
I guess I came off a little too dejected there. Rest assured, I?m not too worried and I?m very much enjoying the project so far. I appreciate the encouragement. We will get Colonel Mustard floating one way or another.

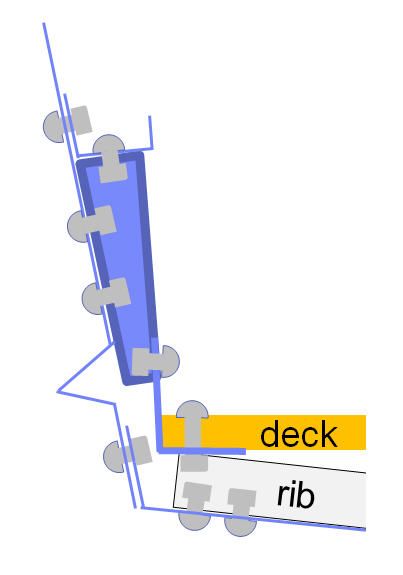
I did some brainstorming and was wondering if either of my ideas are plausible solutions for isolating the cracked spray rail. I guess both approaches would best be described as hybrids between the methods used by WM and Grandad. I know classiccat did some great work too, but unfortunately, PB is currently holding all of his pictures at gunpoint. Since I have at least one cracked rib end (probably more now that I know what to look for), I was thinking about inserting braces like WM did, but putting them under the ribs rather than in between them. It seems to me that I could kill two birds with one piece of metal that way. Is there a benefit to having those brackets between the ribs as opposed to under them?

My other idea would be to try and combine Grandad?s two braces into one piece of bent aluminum, i.e., run a single, continuous patch under several of the rib ends (buttered with 5200 and riveted through the hull) and then have a 14? tail pop riveted into the side pocket frame. I don?t recall if Grandad had a crack in his spray rail and I don?t know if that side pocket frame is beefy enough to give me the support I need. Does it make a difference that this approach would place all downward pressure on the gunwale onto the hull rather than on top of the ribs?

Before I buy a brake, what thickness of aluminum do people use for this bracing? Also, I found a couple different air hammers that have a variable speed control. They are cheaper than devoted solid rivets guns and I could use it in other applications later. As I understand it, the variable speed function is the only real difference between the two guns. For reference, I will try to upload Grandad?s photos through imgur.

Z5H3XIo.jpg


FPQDbKl.jpg
 

Watermann

Starmada Splash of the Year 2014
Joined
Jan 12, 2013
Messages
13,787
Hey yeah you did seem a little dejected by all the curves the old holly is tossing your way.

The reason I didn't try to put the braces under the ribs is 2 fold. You have to have a relief bend in the rib to allow for the thickness of the brace to go under it and not have the rib sitting off the bottom for a ways. The factory puts that bend in the rib end to allow for this with later models. The reason the rib ends crack is due to the pressure from the bottom being pushed upward and it flexing back down into place, over and over again until the AL stress cracks. I had 2 small cracks just starting at the rib end that I repaired on the outside rather than lifting the ribs upward and putting the patch on both sides.

With intact strong decking and side panels sitting on top of the ribs combined with the hull braces that isolate the spray rail I figured that would solve any issues with rib end cracking or spray rail failure down the road. After all the only reason these boats have those issues is because people use them with rot compromised decking and side panels. So that's why not all boats have an issue (most don't) and the majority of guys never even bother to add braces to their boats that don't have them factory installed.
 

Pusher

Lieutenant
Joined
Sep 2, 2014
Messages
1,273
This is probably one of those stupid ideas I tend to have from time to time, but could you use some low temperature aluminum weld rod? I was thinking stop drill the crack, brace it and then weld.
 

GreenHoliday

Seaman Apprentice
Joined
Aug 5, 2016
Messages
42
WM, how thick was the aluminum you used for your bracing? I can't find the info in your thread. Also, do you recall if all of the stock aluminum was bent to the same angle, or if it varied in depending on which ribs you were in between? Thanks.
 

GreenHoliday

Seaman Apprentice
Joined
Aug 5, 2016
Messages
42
And Pusher, I don't think its a stupid idea. I could definitely be wrong, but I think the downside to using those rods for a project like this is that the hull is so large and thin that heat dissipates too quickly for a propane torch to be effective.

Once I get back to the boat, I plan to remove all of the epoxy that PO caked on and then go from there. In the meantime, I am ordering some rivets and the tools necessary to get bucking. I hope installing the solid rivets is as much fun as I imagine it to be.
 

Watermann

Starmada Splash of the Year 2014
Joined
Jan 12, 2013
Messages
13,787
I used .080 5052 AL for the braces, road signs work perfectly. :lol: I used a table saw with a non-ferrous metal blade to cut them all to size.

The bend angle can change as the hull changes to a V but I think I stopped adding them before that happened.

Let me know if you need any advice on what rivets you'll need and such.
 

GreenHoliday

Seaman Apprentice
Joined
Aug 5, 2016
Messages
42
WM, I have read the debates on 1100 vs. 2117 and I think I know where you stand! I plan to use the 3/16" x 3/8" long braziers but will get some 7/16" in case those aren't long enough with the added thickness of the bracket.
 

Pusher

Lieutenant
Joined
Sep 2, 2014
Messages
1,273
And Pusher, I don't think its a stupid idea. I could definitely be wrong, but I think the downside to using those rods for a project like this is that the hull is so large and thin that heat dissipates too quickly for a propane torch to be effective.

Once I get back to the boat, I plan to remove all of the epoxy that PO caked on and then go from there.

Yeah, I'm not sure how great the bond would be and this looks to an acetylene torch. I can't think of anyone on here that's tried it in the threads I've lurked in.
 

classiccat

"Captain" + Starmada Splash Of The Year 2020
Joined
Dec 20, 2010
Messages
3,412
Bummer about photobucket...hopefully they show up soon!

If i were to do it all over again, I wouldn't have touched the overlap-seam rivets. Opening that up resulted me in disturbing the sealant... I'll be relying mainly on epoxy products to keep her dry (gluv-it, g-flex, etc.).

My advice would be to stick to vertical risers as in this shot:


Then use separate pieces of 0.090" aluminum to connect the risers to the ribs (I'll get there eventually!)... this is insurance in case the side panel becomes compromised....and/or the connection between the deck/side panel becomes loose over time.

 
Top