1975 oday 22

1975oday22

Chief Petty Officer
Joined
Sep 2, 2022
Messages
590
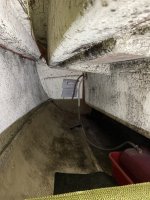
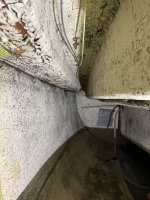
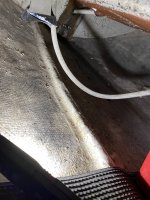
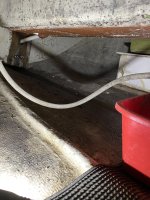
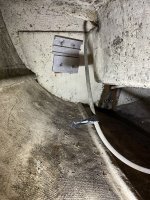
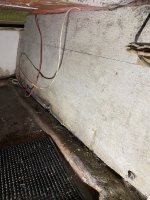
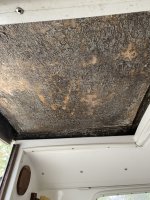
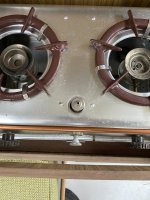
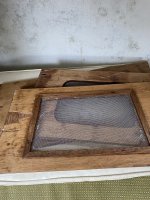
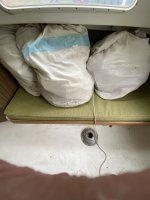
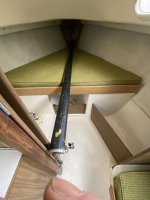
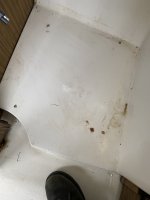
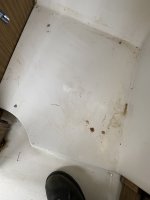
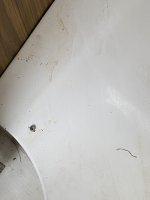
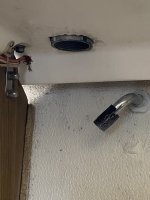
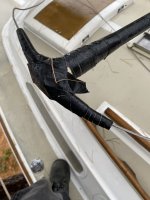
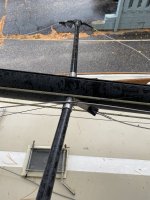
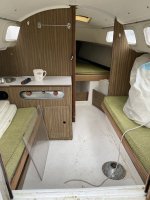
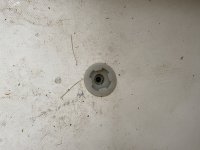
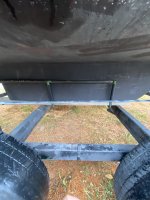
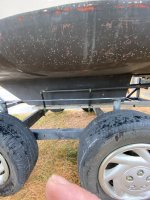
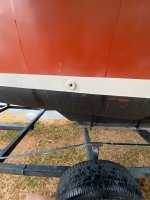
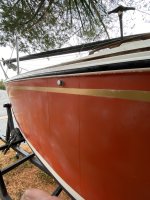
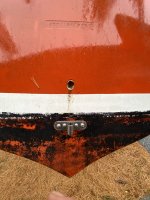
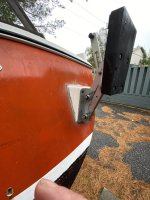
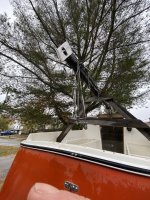
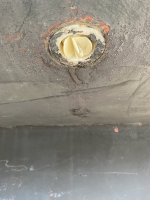
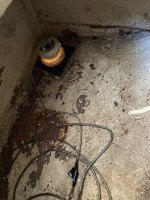
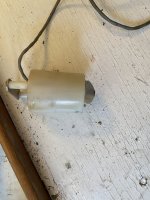
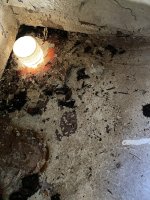
alright my soon to be , became my now to be. lol got it home yesterday afternoon. as i was doing a hin lookup i found out that it was not a 1982 but a 1975. but, there is no cracking or softspots anywhere to be found. i assume it was stored indoors for its time. the cabin sole is rock solid as is the deck and cockpit. . i took a look inside it today. from pictures that i could not see the whole boat inside. just the main areas, i decided to further investigate it. upon further inspection. this is what i found. i found there to be alot of mildew under the cockpit sole. under the sink, and the berth wall. this will have to be addressed before i let anyone in it. there is no water tank, the mast and boom has been painted black, from what the boom looks like it is copper.. all sails are there. looks like all rigging points are solid and all rigging is there as well. i will be needing to get a top mast light. including the cover for the boom . the paint seems to be chipping off under the cockpit . its a fixed keel . so there is no center board at all. the electrical needs some attention. as well as the wiring. . all in all shes solid.
 

Attachments

  • IMG_3073.JPG
    IMG_3073.JPG
    2.1 MB · Views: 14
  • IMG_3074.JPG
    IMG_3074.JPG
    2.3 MB · Views: 12
  • IMG_3075.JPG
    IMG_3075.JPG
    2.2 MB · Views: 10
  • IMG_3076.JPG
    IMG_3076.JPG
    2.3 MB · Views: 10
  • IMG_3077.JPG
    IMG_3077.JPG
    2.9 MB · Views: 11
  • IMG_3078.JPG
    IMG_3078.JPG
    2.4 MB · Views: 12
  • IMG_3079.JPG
    IMG_3079.JPG
    2.2 MB · Views: 12
  • IMG_3080.JPG
    IMG_3080.JPG
    2.8 MB · Views: 12
  • IMG_3081.JPG
    IMG_3081.JPG
    2.1 MB · Views: 12
  • IMG_3082.JPG
    IMG_3082.JPG
    3.2 MB · Views: 11
  • IMG_3083.JPG
    IMG_3083.JPG
    3.3 MB · Views: 11
  • IMG_3084.JPG
    IMG_3084.JPG
    1.5 MB · Views: 11
  • IMG_3085.JPG
    IMG_3085.JPG
    1 MB · Views: 11
  • IMG_3086.JPG
    IMG_3086.JPG
    1.7 MB · Views: 11
  • IMG_3087.JPG
    IMG_3087.JPG
    1.7 MB · Views: 11
  • IMG_3088.JPG
    IMG_3088.JPG
    1.1 MB · Views: 12
  • IMG_3089.JPG
    IMG_3089.JPG
    1.4 MB · Views: 12
  • IMG_3090.JPG
    IMG_3090.JPG
    2 MB · Views: 12
  • IMG_3091.JPG
    IMG_3091.JPG
    1.7 MB · Views: 12
  • IMG_3092.JPG
    IMG_3092.JPG
    1.3 MB · Views: 11
  • IMG_3093.JPG
    IMG_3093.JPG
    1.8 MB · Views: 9
  • IMG_3094.JPG
    IMG_3094.JPG
    1.3 MB · Views: 9
  • IMG_3095.JPG
    IMG_3095.JPG
    1.6 MB · Views: 9
  • IMG_3096.JPG
    IMG_3096.JPG
    2.2 MB · Views: 8
  • IMG_3097.JPG
    IMG_3097.JPG
    2.1 MB · Views: 9
  • IMG_3098.JPG
    IMG_3098.JPG
    2.6 MB · Views: 9
  • IMG_3099.JPG
    IMG_3099.JPG
    1.6 MB · Views: 10
  • IMG_3100.JPG
    IMG_3100.JPG
    1.3 MB · Views: 10
  • IMG_3101.JPG
    IMG_3101.JPG
    1.8 MB · Views: 9
  • IMG_3102.JPG
    IMG_3102.JPG
    2 MB · Views: 9
  • IMG_3103.JPG
    IMG_3103.JPG
    2.4 MB · Views: 9
  • IMG_3104.JPG
    IMG_3104.JPG
    2.1 MB · Views: 9
  • IMG_3105.JPG
    IMG_3105.JPG
    3.3 MB · Views: 14

IslandExplorer

Petty Officer 1st Class
Joined
Oct 21, 2019
Messages
370
Sweet, congrats! That thing looks pretty clean already really, the mildew underneath should be easy to get out of there with a good bleaching and brushing and letting sunlight in if possible. What's the plexi glass piece? Is that a sunroof insert for the hatch? Did they say why water tank was removed? Probably real easy to replace but just curious.
 

1975oday22

Chief Petty Officer
Joined
Sep 2, 2022
Messages
590
oh its clean , yes it is. and ya i was thinking bleach. but mildew cleaner after i scrape away the paint i think will suffice. and then a preventer after that. the plexi pieces are actually my companionway door. and they did not say why tank was removed. but it should be an easy fix. although when i went top side i looked at the port filler. and it says waste water. not just water fill. so i am assuming it had a porta pottie that had a tank for waste .... then it could be pumped out? dont know. i have to research that more. as for my hatch cover. it looks like it had fire? not sure. thats something else i have to find out.....
 

IslandExplorer

Petty Officer 1st Class
Joined
Oct 21, 2019
Messages
370
oh its clean , yes it is. and ya i was thinking bleach. but mildew cleaner after i scrape away the paint i think will suffice. and then a preventer after that. the plexi pieces are actually my companionway door. and they did not say why tank was removed. but it should be an easy fix. although when i went top side i looked at the port filler. and it says waste water. not just water fill. so i am assuming it had a porta pottie that had a tank for waste .... then it could be pumped out? dont know. i have to research that more. as for my hatch cover. it looks like it had fire? not sure. thats something else i have to find out.....
Ah, custom companionway door with screened windows, I like it. Plexi looks super thick! That mildew preventer spray for outside furniture actually works pretty good. Or maybe some Kilz topcoat under there.

The filler thing I think I have figured out- There is a special model porta potti (Visa MSD) that actually has a pump out and vent hose connection, it's pretty cool, advantage of holding tank pump out ability and simplicity/compact size of camper toilet. So I bet they got one of those (not wanting to carry the toilet out for emptying) and swapped the water fill for a waste pump out fitting for the potti. Guessing they just ditched the water tank after that rather than going to the trouble of adding another 2 thru hulls for water fill and vent.
 

1975oday22

Chief Petty Officer
Joined
Sep 2, 2022
Messages
590
yep custom . gotta love it. lol. as for the waste water cover, i believe you are right. i looked up the visa msd and yes it matches. so i will be buying another and installing. as for water tank. i have yet to find out where that originally sat.... i dont know if it was under the sink or the v berth. if it was under the vberth then i am in trouble. as the vberth has no storage hatches. its 2 pieces of ply screwed down. as for my hatch. the po saw fit to scorch it as there was wasp nests on it. stupid really. but nothing is deformed so i will just scrape it and repaint it.
 

IslandExplorer

Petty Officer 1st Class
Joined
Oct 21, 2019
Messages
370
yep custom . gotta love it. lol. as for the waste water cover, i believe you are right. i looked up the visa msd and yes it matches. so i will be buying another and installing. as for water tank. i have yet to find out where that originally sat.... i dont know if it was under the sink or the v berth. if it was under the vberth then i am in trouble. as the vberth has no storage hatches. its 2 pieces of ply screwed down. as for my hatch. the po saw fit to scorch it as there was wasp nests on it. stupid really. but nothing is deformed so i will just scrape it and repaint it.
I don't know about you, but the mystery of the sealed vberth would be tough for me.. There isn't even an inspection hole? Maybe just foam or nothing in there but who knows!
 

1975oday22

Chief Petty Officer
Joined
Sep 2, 2022
Messages
590
I don't know about you, but the mystery of the sealed vberth would be tough for me.. There isn't even an inspection hole? Maybe just foam or nothing in there but who knows!
ya i think tomorrow i will get my drill and tackle that situation. maybe even take the boards right out and cut in a few hatches.
 

1975oday22

Chief Petty Officer
Joined
Sep 2, 2022
Messages
590
well here is another pic i have accumulated today. . i noticed water below my sealed settee on starboard side. (along with a very wet towel) wondered how the heck water could get in there. as my bilge is above the keel and sealed on both sides, i looked closer and found that some kind of electrical device is there, well thinking its a pump, i decided to go and look underneath. so i did. and what did i see? not a pump but something that looks like a old fashioned water wheel. (not that its old fashioned, just how i saw it.) i then went back inside to follow where the wire went too. hmmm , have ya guessed it? well that wire goes straight up to my speed gauge. yep it needs to be rebedded . i will also be rebedding all deck hardware as well. .
 

Attachments

  • IMG_3114.JPG
    IMG_3114.JPG
    2.5 MB · Views: 4

IslandExplorer

Petty Officer 1st Class
Joined
Oct 21, 2019
Messages
370
well here is another pic i have accumulated today. . i noticed water below my sealed settee on starboard side. (along with a very wet towel) wondered how the heck water could get in there. as my bilge is above the keel and sealed on both sides, i looked closer and found that some kind of electrical device is there, well thinking its a pump, i decided to go and look underneath. so i did. and what did i see? not a pump but something that looks like a old fashioned water wheel. (not that its old fashioned, just how i saw it.) i then went back inside to follow where the wire went too. hmmm , have ya guessed it? well that wire goes straight up to my speed gauge. yep it needs to be rebedded . i will also be rebedding all deck hardware as well. .
I found a waterwheel like that on my boat too! Can be nice having a dedicated standalone speedometer vs having to use your plotter. Haven't decided if I'll keep mine. So it's leaking around that fitting there? Like from the rain or did you do a test splash!?
 

IslandExplorer

Petty Officer 1st Class
Joined
Oct 21, 2019
Messages
370
how much so? cant be anymore then 100.
I still haven't gotten to the point of pumping out yet on mine (still new/unused) but was wondering what it costs on average. Luckily around New England it is free at the fuel docks is what I'm told but depending where you are- who knows. Probably be good to look into!
 

1975oday22

Chief Petty Officer
Joined
Sep 2, 2022
Messages
590
I found a waterwheel like that on my boat too! Can be nice having a dedicated standalone speedometer vs having to use your plotter. Haven't decided if I'll keep mine. So it's leaking around that fitting there? Like from the rain or did you do a test splash!?
no splash test. but it was in the water before i got it. and the towel that was in there was soaked and water still sits in there . without a place to go.....
 

1975oday22

Chief Petty Officer
Joined
Sep 2, 2022
Messages
590
well i took the speed sensor out today and cleaned up the hole. removed the rotted wood that was in place. will be using butyl to seal it back up and no wood added.
 

Attachments

  • IMG_3113.JPG
    IMG_3113.JPG
    2 MB · Views: 2
  • IMG_3126.JPG
    IMG_3126.JPG
    2.6 MB · Views: 2
  • IMG_3176.JPG
    IMG_3176.JPG
    2 MB · Views: 2
  • IMG_3177.JPG
    IMG_3177.JPG
    2.7 MB · Views: 2

flashback

Captain
Joined
Jun 28, 2002
Messages
3,818
Probably had a plywood backing plate, no wood in the hull.. I had a knot meter just like it.. the paddle wheel gets jammed with algae, that's the downside. But it doesn't need external power from a battery.
 

1975oday22

Chief Petty Officer
Joined
Sep 2, 2022
Messages
590
Probably had a plywood backing plate, no wood in the hull.. I had a knot meter just like it.. the paddle wheel gets jammed with algae, that's the downside. But it doesn't need external power from a battery.
as far as i can tell its all done by 2 magnets built onto the wheel. wich is very old tech, but the most accurate in my books.... however my speed gauge is stuck on i believe 5-6 knots and wont go down to zero . lol whats the fix on that? yes it had a plywood backing plate . thats a big nono.... i cant for the life of me figure out why someone installed it that way. it was fully rotted. pried out with flat screw driver. so its been leaking like this for years im guessing. luckily there is no core below the water line. just fibreglass.
 

IslandExplorer

Petty Officer 1st Class
Joined
Oct 21, 2019
Messages
370
Probably had a plywood backing plate, no wood in the hull.. I had a knot meter just like it.. the paddle wheel gets jammed with algae, that's the downside. But it doesn't need external power from a battery.
Self powered is definitely really nice in my opinion! So the kind he has just needs a good cleaning time to time to keep the algae off but otherwise is a reliable and reasonably accurate design in your experience would you say?
 

flashback

Captain
Joined
Jun 28, 2002
Messages
3,818
Self powered is definitely really nice in my opinion! So the kind he has just needs a good cleaning time to time to keep the algae off but otherwise is a reliable and reasonably accurate design in your experience would you say?
Yes as long as the gauge is ok. Op mentioned it's stuck tho.
I'm not certain how accurate it is but is a useful tool when racing sailboats. It basically allows you to maximize your speed. 1/2 knot makes a difference.
 

IslandExplorer

Petty Officer 1st Class
Joined
Oct 21, 2019
Messages
370
as far as i can tell its all done by 2 magnets built onto the wheel. wich is very old tech, but the most accurate in my books.... however my speed gauge is stuck on i believe 5-6 knots and wont go down to zero . lol whats the fix on that? yes it had a plywood backing plate . thats a big nono.... i cant for the life of me figure out why someone installed it that way. it was fully rotted. pried out with flat screw driver. so its been leaking like this for years im guessing. luckily there is no core below the water line. just fibreglass.
Probably bc it was the quickest and or easiest way, that's how a lot of DIY installs go... Since you don't normally have to worry about wood in your particular hull someone just had to add some for ya! šŸ˜… 
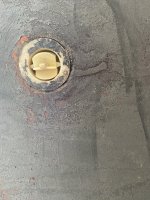
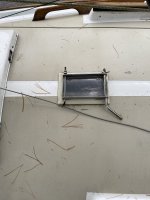
Sealing it back up without the wood sounds like a really good idea. Have you tried spinning the wheel by hand with it connected? Does the guage react at all +/- or stuck in that one spot?

Old tech is better a lot of times in my opinion. A lot of modern age stuff does 10 extra things I don't want or need and just clutters up the true purpose. Maybe you just need a new guage for it.
 

IslandExplorer

Petty Officer 1st Class
Joined
Oct 21, 2019
Messages
370
Got the wiring started by first establishing power from house battery 1 in the bow compartment to the 12 circuit main fuse panel by the sink. A few close-ups of the heat shrink connectors with the glue inside. Was great to see the panel light up and to now be able to turn the water pump on with the flip of a switch.
IMG_20231017_144316.jpgIMG_20231017_173454.jpgIMG_20231017_163202.jpgIMG_20231017_163739.jpgIMG_20231017_163828.jpgIMG_20231017_163839.jpgIMG_20231017_163833.jpgIMG_20231017_163954.jpgIMG_20231017_164008.jpgIMG_20231017_163801.jpgIMG_20231017_175628.jpgIMG_20231017_175655.jpgIMG_20231017_175515.jpg
 
Top