Nice work Figmo. I'm very interested in seeing your bow deck once completed. I'm thinking this is the winter I resto my 16 SS, although I'm worried about not being ready next spring. Thanks for sharing your work. I've been thinking and learning about this for 4 years or so. I want to have all my ducks in a row before I start.
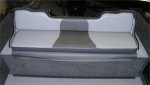
I recently looked at a 2018 SC and it gave me some ideas. They have a flip down bench seat in the back, that becomes a casting deck. The splash well area, is much more utilized for storage also. I really want a rod locker under the middle of my bow casting deck.
Keep it up.
Hello PlayD0h,
I am glad you find this helpful. It is without a doubt that I would have been spinning my wheels on some aspects of this project without the assistance of the community here. If I can pay that forward, then all the better.
I hear you on timelines, I was hoping to have this ready for the long weekend in May of 2019, but I have now come to the conclusion that I might not make that date. Since starting this, my main emphasis has been to try and do it right. I would rather go over my planned splashed date by a couple of months, then invest the time and effort and have a crappy product at the end.
Actually the splash well (SW) does add to the structural integrity of the boat. If you look at how it is connect to the transom and the gunnels on both sides, it is reinforcing. However, having said that, there are people here that have changed their SW design to be more functional and still maintain the structural integrity of their boat. The best example I can think of would be Candutch's build, see Link:
https://forums.iboats.com/forum/own...starcraft-super-sport-180-gonna-try-a-restore
Keep in mind that the 18 ft boats generally have belly fuel tanks and as such do not require space at the back, and above deck level for fuel tanks. Unfortunately for me, I will not have a belly tank and will need the space under the SW for the fuel tanks. The end result is that I will leave my SW as is. I am relocating the batteries to front to create some additional space in the back under the SW for 2 fuel tanks.
Once I get the deck boards in, I will be painting the boat, and then working on the design for the front casting deck. I will be sure to take lots of pictures of the framing, but again look at Candutch's work, it is really quite good and will give you a lot of ideas.
As for fishing rod storage, I have decide to mount the "rocket launchers" on the back gunnels of my boat to keep them out of the way. I need the storage in the front for other items. That decision came after considerable deliberation. For yourself, you will want to look at others for inspiration, and then make your own decisions as to the layout of your boat. It is your boat, and you have to be happy with your final product. At least that is the lesson that I have pulled from this process thus far.