1974 Starcraft SS16 Restortation

FIGMO

Petty Officer 1st Class
Joined
Jun 18, 2017
Messages
321
I thought about putting the drain hole where you did but im used to accessing the plug from the inside. will the knee brace be on the other side of it now? or do you use a different plug? Maybe I missed it earlier

You are making me seriously want to find another one to tear into!! I have a fiberglass layout boat project needing done but tin is alota fun!

From what I have seen on this site, it appears that most attached their plugs from the outside (Candutch for example). I know that I have always attached mine from the outside, so this should not impact on anything other than allowing more water to escape from the hull of the boat.
 

FIGMO

Petty Officer 1st Class
Joined
Jun 18, 2017
Messages
321
Looks great Figmo. I was going to move my drain to the same spot but just got lazy. I wish I would have done it now. I install my plug from the outside so there would be no issues with the knee brace for me.
BTW, nice BIG flag!

Thanks Candutch.

After drilling out the knee brace and seeing just how much junk had accumulated under there, I decided that I would consider relocating the drain to where both Watermann and SHSU did. Due to the original drain being about an inch higher on the hull, the water sits in there allowing sediment to collect in the knee brace. That was the deciding factor to relocate.
 

FIGMO

Petty Officer 1st Class
Joined
Jun 18, 2017
Messages
321
Was it not possible to put the extender ring on the inside where is should be?

I had the phobia at first about drilling holes in boats until I bored a hole in the water jacket of my Johnson to add a tell tale, that cured me drilling into a powerhead, it really takes some stones :lol:

Hey Watermann,

Based on the diagram above, they had the "O" ring to the inside of the hull. Remember I am a neophyte!

Agreed, I don't feel as apprehensive about drilling more holes now that I have done it once successfully (well I can't say that for sure as I haven't leak tested the boat yet). I still have to do holes for the bilge and live well drains.

What are your thoughts on using the old drain way for the live well pump?
 

Watermann

Starmada Splash of the Year 2014
Joined
Jan 12, 2013
Messages
13,794
That old hole would work fine to use as a livewell intake but I think most are 3/4" so you may have to use a little extra 5200.

On the bilge drain hole, the outside is supposed to be flush and the spacer goes on the inside. I would not use an O ring, it will fail sooner or later where 5200 won't.
 

Candutch

Chief Petty Officer
Joined
May 8, 2015
Messages
637
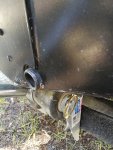
This is my bilge drain from the outside. From the state of the ss when I bought it this is original. Maybe it's different for different models.IMG_20180712_135621.jpg
 

Watermann

Starmada Splash of the Year 2014
Joined
Jan 12, 2013
Messages
13,794
Yeah your right, not sure what I was thinking (12 hour nightshifts maybe?) the spacer looks half the size of the one you get for a kit. He did a great job of putting it on there. :thumb:
 

Candutch

Chief Petty Officer
Joined
May 8, 2015
Messages
637
I hate 12 hr nightshifts, 10 more years and I will never have to work another one.
 

FIGMO

Petty Officer 1st Class
Joined
Jun 18, 2017
Messages
321
That old hole would work fine to use as a livewell intake but I think most are 3/4" so you may have to use a little extra 5200.

On the bilge drain hole, the outside is supposed to be flush and the spacer goes on the inside. I would not use an O ring, it will fail sooner or later where 5200 won't.

Hello Again,

Yes indeed on the "O" Ring. I did put a coating of 5200 on the drain tube before tightening the two rings in place. Double coverage on that one.
 

FIGMO

Petty Officer 1st Class
Joined
Jun 18, 2017
Messages
321
This is my bilge drain from the outside. From the state of the ss when I bought it this is original. Maybe it's different for different models.

Hey Candutch,

Sorry for the delay in responding, been busy running around. Finally on leave for a couple of weeks. I think your right about the location of the bilge drain on different models. In your picture it looks like the drain is on the starboard side vice the port side of the transom. Do you have a picture with a wider view of the back of the boat?
 

FIGMO

Petty Officer 1st Class
Joined
Jun 18, 2017
Messages
321
Looks great, not too bad for having been in the wrong regiment. Obviously I'm with Watermann when it comes to leaving the bottom naked. Paint gets beat up on the rocks and such if you tend to beach lots and it won't take long to look like crap.

I would have though your paint scheme would incorporate maroon and sky blue:bounce:

Actually, a maroon top stripe with the Pegasus at the back would be pretty cool.

Well you and Waterman have convinced me to leave the bottom aluminum (plus I'm cheap and this will save me about 200 bucks in paint and primer, must be the tight fisted Scott in me). However, it does mean that I will have to do some buffing of the bottom.
 

FIGMO

Petty Officer 1st Class
Joined
Jun 18, 2017
Messages
321
Hey Gents,

So today my brother came over and helped me rivet the Z and Knee Brace back on the boat. I am a little concerned that we may have put it a little to high on the transom. See photos:

20180716_172638.jpg
Looking at the ends I could not remember if the two holes had to line up with the ends of the transom??

20180716_172648.jpg
Same on this side....

20180716_172626.jpg
You can see how the wood for the transom sits above the aluminum skin.

20180716_172603.jpg
It seems like the aluminum has wowed out in the back, quite the gap.

On another note, I am assuming that I will need to have the wood for the transom in place with all the hardware before I paint the back of the boat. Otherwise the screws and such will not get painted. Am I right in that assumption?
 

FIGMO

Petty Officer 1st Class
Joined
Jun 18, 2017
Messages
321
I completed the leak test today and discovered that I have a number of small leaks along the seam where the hull meets the transom, and in bow. After hunting around for a bit I discovered that my local supplier carries Gluvit (85.00 ouch) for a quart.

As I am on a budget per month, I have to take the paint back in order to get the Gluvit and West System for the wood. My supplier is good with it. I think he realizes that I am going to be into to him for a reasonable amount of cash over the next few months.

Some pictures of the leak test. Good news is that the rivets my brother and I put in don't leak!


Click image for larger version  Name:	20180717_105502.jpg Views:	1 Size:	192.1 KB ID:	10615222

No major issues with the leak test, just a couple of rivets and along some seams, all of which I marked

Click image for larger version  Name:	20180717_105807.jpg Views:	1 Size:	178.2 KB ID:	10615223

Our rivet job held together, no leaks!

Click image for larger version  Name:	20180717_103305.jpg Views:	1 Size:	163.0 KB ID:	10615224

You can see where is leaking along the seams, this looks like a job for Gluvit.

Click image for larger version  Name:	20180717_103341.jpg Views:	1 Size:	175.5 KB ID:	10615225

Same situation on the bow.

Click image for larger version  Name:	20180717_110043.jpg Views:	1 Size:	287.9 KB ID:	10615226
Dueling bilge drains. As it turns out my supplier has the perfect live well pump that has a 1" inlet. Once I cut the old drain off, it should fit perfectly and at the right angle so I don't have to worry about it riding up against the hull.

Well off to exchange my paint for West System and Gluvit.
 

Watermann

Starmada Splash of the Year 2014
Joined
Jan 12, 2013
Messages
13,794
Take some time to clean that keel valley really well and use a bunch of gluvit in t here, working it in with a brush. I make a lake up there in my boats and manipulate the tongue jack to keep it from running aft.
 

FIGMO

Petty Officer 1st Class
Joined
Jun 18, 2017
Messages
321
Take some time to clean that keel valley really well and use a bunch of gluvit in t here, working it in with a brush. I make a lake up there in my boats and manipulate the tongue jack to keep it from running aft.

Hey Watermann,

Thanks for the advice on the Gluvit. I have some blocks of wood I can use under the castors on the cradle, that should do the trick. Just returned from the store with the Gluvit and West System. I am going to do the leak work first for today, and then leak test again tomorrow to make sure I got everything. The hull was actually pretty good, it was just the seams that seemed to be leaking. A couple of rivets here and there that I marked. Based on what I read, one quart of the Gluvit should be more than adequate for my project.

That West System was freaking expensive at 200.00 for the two part epoxy. Hopefully it will be enough. To confirm, two coats of epoxy on the flat surfaces and 4 on the edges. The guy at the store indicated that I could use the epoxy as the binder for the two transom halves. Does that make sense to you?
 

FIGMO

Petty Officer 1st Class
Joined
Jun 18, 2017
Messages
321
Mr. Watermann,

What did you think of the transom pictures? Did that look too high you?
 

BWR1953

Admiral
Joined
Jan 23, 2009
Messages
6,195
Check page 11, Post 158 of my Kingfisher thread on all the gyrations I went through to be absolutely sure that I got the Gluvit into all the micro-recesses where it could possibly reach. I also bucked all suspicious and leaky rivets. Several hundred.

But the end result was an absolutely DRY boat! Not a single leak in the boat after sealing things up! No water in the boat, ever. :nod:

Here's the linky... https://forums.iboats.com/forum/own...ve-returned-with-a-starcraft-this-time/page11
 

FIGMO

Petty Officer 1st Class
Joined
Jun 18, 2017
Messages
321
Check page 11, Post 158 of my Kingfisher thread on all the gyrations I went through to be absolutely sure that I got the Gluvit into all the micro-recesses where it could possibly reach. I also bucked all suspicious and leaky rivets. Several hundred.

But the end result was an absolutely DRY boat! Not a single leak in the boat after sealing things up! No water in the boat, ever. :nod:

Here's the linky... https://forums.iboats.com/forum/own...ve-returned-with-a-starcraft-this-time/page11

Hey BWR,

Thanks for the advice. After looking at your pictures, did you have to roll the boat around in order to get the Gluvit to stick in place? You also mentioned that you did a couple of applications. I am looking at the product, and I have and a large can and a small bottle that you have to mix together. How did you get the mixtures right by doing a partial can? I suppose I could always mix half of both and do two applications that way.
 

BWR1953

Admiral
Joined
Jan 23, 2009
Messages
6,195
Hey BWR,

Thanks for the advice. After looking at your pictures, did you have to roll the boat around in order to get the Gluvit to stick in place? You also mentioned that you did a couple of applications. I am looking at the product, and I have and a large can and a small bottle that you have to mix together. How did you get the mixtures right by doing a partial can? I suppose I could always mix half of both and do two applications that way.

Howdy. What I did was to roll the boat into a particular orientation, apply the Gluvit and walk away, letting it cure overnight. Then the next day I'd move it differently and apply again. Took me several days to get it all done, if I recall correctly.

As for the mixture, it's a straight ratio. I don't remember exactly but let's say it's 5 to 1. Doesn't matter which units of measure, just use the correct ratio. 5 cups to 1 cup, 5 tablespoons to 1 tablespoon, 5 liters to 1 liter and so on.

And hold your nose! It smells bad! LOL! :lol:
 

Watermann

Starmada Splash of the Year 2014
Joined
Jan 12, 2013
Messages
13,794
Yeah the transom wood should be flush to the top of the AL transom skin so the cap will cover it and the OB motor will line up with the holes..
 

Candutch

Chief Petty Officer
Joined
May 8, 2015
Messages
637
Hey Candutch,

Sorry for the delay in responding, been busy running around. Finally on leave for a couple of weeks. I think your right about the location of the bilge drain on different models. In your picture it looks like the drain is on the starboard side vice the port side of the transom. Do you have a picture with a wider view of the back of the boat?

Yes, my drain is on the Starboard side. I will have to see if I can find a pic of the entire transom. As far as the aluminum and wood go, I had to belt sand down a few spots on the wood and re-seal it and trim down a bit of aluminum as well. I had the same bowed out aluminum, it will all get sorted once you attach the motor and other things through the transom. Nothing to worry about there.
Good find on the 1" live well inlet.
 
Top