1974 Starcraft SS16 Restortation

ShoestringMariner

Lieutenant Commander
Joined
Apr 18, 2015
Messages
1,600
Has the caulking let go on your window? The starboard side of my windshield set has a loose glass panel because the caulking has let go. It no longer keeps the window frame square or rigid. I need to reglaze mine
 

FIGMO

Petty Officer 1st Class
Joined
Jun 18, 2017
Messages
321
Hey Shoestring,

Sorry for the delay, nope the caulking is good to go. It is definitely the piano hinge on the folding window. My neighbour and I actually just bent it up a bit and now it fits perfectly. Not that I recommend that approach, it was nerve wracking.
 

FIGMO

Petty Officer 1st Class
Joined
Jun 18, 2017
Messages
321
Hey Guys,

Sorry for the "radio silence" for the last two months, but I have been busy. Which includes the boat. In last two months I have got a reasonable amount done, and took photos throughout. So hopefully I can get caught up in the next two weeks with my posts so that you can see where I am. I have also been meaning to go and see Budski and his son, but again have been tardy in getting that done. I am hoping things open up a bit more in August so I can catch up.

This series of photos is focused on the aluminum supports for the casting deck. I will be reinforcing the alum supports with 3/4" marine grade plywood. I had a some left over from the transom build, plus my neighbour had some and gave it to me. Its good to have nice neighbours. :joyous:

1.jpg I started with the two inner supports, and made cardboard mock ups for the batteries. I am going with the batteries in the front, leaving room for the two fuel cells under the splash well.

2.jpg Added the side and front supports.

3.jpg Same thing different angle.

4.jpg


5.jpg
I put a battery case in to give it some perspective. you can see the drill hole for wiring in the front of the console.

5a.jpg
Next post I will include the wood structures before moving on the actual casting deck and bow reinforcement.
 

ShoestringMariner

Lieutenant Commander
Joined
Apr 18, 2015
Messages
1,600
Looking great, I’ve got the same thing planned for mine, dual batteries and all. Can’t wait to see more pics
 

bchaney

Petty Officer 1st Class
Joined
Jul 3, 2018
Messages
246
Nice work. Having the batteries up front should help balance the boat. What do you mean by fuel cells? Gas tanks or are you running your boat off hydrogen?
 

FIGMO

Petty Officer 1st Class
Joined
Jun 18, 2017
Messages
321
Nice work. Having the batteries up front should help balance the boat. What do you mean by fuel cells? Gas tanks or are you running your boat off hydrogen?

Yup a hydrogen powered boat. I really don't know what I was thinking there....
 

FIGMO

Petty Officer 1st Class
Joined
Jun 18, 2017
Messages
321
Hello again,

As promised the next series of photos for the 3/4 “ wood fitted to the aluminum supports. As follows:

6.jpg
First piece cut for the very front of the alum supports worked out pretty good. You can see that I have already drilled holes for the wiring from the dual bank battery charger that will be located in the very front of the bow.


7.jpg
All the wood supports cut and put in place, including holes drilled for wiring. I had to use clamps in order to get the wood to stand up straight. It should not be a problem once everything is riveted in place.


8.jpg
This just shows the drill holes for the wiring that will go port to starboard, vice bow to stern.


9.jpg
More of the same.

10.jpg
Better shot of the front. The cross hairs are for centering the dual bank charger.

11.jpg
Same thing, different angle.

13.jpg
Another side shot of the drill holes to route the wiring port to starboard.

15.jpg
Just a front shot.

Next will be the start of the casting deck.
 

FIGMO

Petty Officer 1st Class
Joined
Jun 18, 2017
Messages
321
Some pictures of the casting deck going in. As follows:

Click image for larger version  Name:	16.jpg Views:	1 Size:	113.5 KB ID:	10773022
Wood cut to fit for the casting deck, including the section under the bow.

Click image for larger version  Name:	17.jpg Views:	1 Size:	149.6 KB ID:	10773023 another shot of the same.

Click image for larger version  Name:	18.jpg Views:	1 Size:	134.9 KB ID:	10773024 access points cut with supports for the hatches.

Click image for larger version  Name:	19.jpg Views:	1 Size:	150.2 KB ID:	10773025
Side shot.

Click image for larger version  Name:	20.jpg Views:	1 Size:	168.1 KB ID:	10773026 Everything pretty much done and fitted.

Click image for larger version  Name:	21.jpg Views:	1 Size:	137.3 KB ID:	10773027
And the final shot of the casting deck before applying the epoxy to everything.

Some side panel shots are next.
 

ShoestringMariner

Lieutenant Commander
Joined
Apr 18, 2015
Messages
1,600
Man, that’s looking killer already!!
living vicariously through your project until I can get to the same stage. Taking notes!
 

Watermann

Starmada Splash of the Year 2014
Joined
Jan 12, 2013
Messages
13,794
Wow that's a lot of hatches to get right :lol: Looking good :encouragement:
 

FIGMO

Petty Officer 1st Class
Joined
Jun 18, 2017
Messages
321
Some more progress:

I decided to lay out the side panels for the boat. Instead of going with the template from the original side panels, I want to extend mine up to the bottom of the side gunnel about an inch up. I want to tie this into the live well that will be situated on the port side. In addition to that, I will have to cut one continuous piece to close the splash well off from port to starboard. From that I will cut doors for access to the fuel tanks, bilge pump and live well pump. My plan is to center them, about 2' to 2.5' wide in order to allow me to slide in under the splash well. I will not cut that piece until all the paint, carpet and vinyl are done. That should give me an accurate measurement before I cut the wood.

And the Pics!

Click image for larger version  Name:	22.jpg Views:	1 Size:	146.5 KB ID:	10775482
This is a shot of the port-stern section of the boat. Normally there is a piece of aluminum that runs from the splash well to the deck that supported the side wall. However, as I am running my side panel up to the gunnel, that should make up for any structural support that aluminum piece would have provided. Plus i can tie in the stern splash well sections to both side panels. That should really tighten things up.

Click image for larger version  Name:	23.jpg Views:	1 Size:	121.6 KB ID:	10775483
So the front half of the port side. The aluminum support that sticks out at the bottom on the right of the picture, will be cut down to size before the final installation.

Click image for larger version  Name:	24.jpg Views:	1 Size:	128.3 KB ID:	10775484
Okay so this is a mess. The owner before my friend's dad took position of the boat absolutely butchered the area where the throttle control is positioned. In order to hide this and still ensure that most of the boat information plate can be read, I build up the starboard side panel.

Click image for larger version  Name:	25.jpg Views:	1 Size:	109.8 KB ID:	10775485
You can see the extension I included to hide that mess, and yet you can still make out most of the information plate (?).

Click image for larger version  Name:	26.jpg Views:	1 Size:	163.4 KB ID:	10775486
Just a shot showing both sides, and the only cooler I own that I can sit on without crushing it.....

Click image for larger version  Name:	27.jpg Views:	1 Size:	104.1 KB ID:	10775487

Last one and an extra. I wanted to be able to support my wiring running down both the port and starboard side of the boat. I noticed that there were bolts and nuts under the gunnel supporting the rub rail. So I took one of the nuts off and went the bolt shop and bought a bunch of nylon nuts to match up to the bolts. I then ordered some 1.5" cable hangers. My son and I bolted them all in place running from bow to stern along both the port and starboard sides. This should make it fairly easy to get all my wiring in place without a lot off headaches. I intend on running the bulk of the wiring prior to installing the side panels and splash well.
 
Last edited:

FIGMO

Petty Officer 1st Class
Joined
Jun 18, 2017
Messages
321
Been Shoppin:

28.jpg
Over the last four months I have been ordering electrical components. Everything from Battery switch to LED lights and pumps.

29.jpg I got a real good deal on all of the electrical wire for 50% off. Dual bank charger and more live well plumbing.

30.jpg
When I was pricing out the wiring to run from the batteries to the motor, it turns out that 20' of 2AWG wire is over $200.00. And then I saw the booster cables at 20' and 2AWG for $40.00. If it ends up not being enough, then I will simply buy another set of booster cables. I still can't believe that........:glee:
 

ab59

Ensign
Joined
May 10, 2017
Messages
979
That's too funny , I used jumper cables on my last boat as well for the same reason 😎. Works good and plenty heavy . Great job your doing there, I like the look of the natural wood mixed with a little vinyl myself just kinda goes together in my eye anyways.
My wife says that I always spend too much money on " stuff " for the boats , I wish I could get her to have a look at your post , maybe she would change here mind a little. 😃
 

knezzer

Petty Officer 1st Class
Joined
Apr 8, 2012
Messages
214
Dooood ! I just got caught up on your build... Looks Awesome. You've been given'r. You picked up some nice gadgets to add to the project. Keep it up !
 

classiccat

"Captain" + Starmada Splash Of The Year 2020
Joined
Dec 20, 2010
Messages
3,412
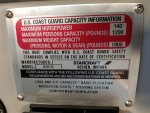
JBWeld will make short-work of those gunnel holes...giving you full view of your capacity plate :lol:
 

Watermann

Starmada Splash of the Year 2014
Joined
Jan 12, 2013
Messages
13,794
Man that's a parts haul!

Looks like you need a new capacity plate, they're easy to have a re-pop made up.

20190623_172457.jpg
 

Watermann

Starmada Splash of the Year 2014
Joined
Jan 12, 2013
Messages
13,794
Things start getting a bit complicated when you get up towards the consoles on how to go about setting up the helm. My V5 SS has the solid side panels without pockets due mainly to the elevated rear casting deck. Here is how my helm area is set up.

y4m-udEM4yXMORCNtuax0HqT0v4opQUqmEtjmr6y2PEIZ3ONPhxv7ZrhMd-Wzr1ZPmEoECgxfMEnEaSORJRDJOPeUf7u3mMJgE564hXMZLWLyHONIq7y3z1J9XW33WnDqxYXboAvlzA-qt_WZorq-Y-2ZWBemwhy2D9cwHfv3OQyZWf_vpg7rfQNAqzNJD93RiPhnWotwlI_cHKVv3dptnkvQ


y4mHm4CRhWdvmr4CW_g7Nodqae4vuposgaHqagvl4oh_mK_kiJVAHCfjOYGdPmxOcW64a4qp-liLG_0KpFbFcPnokYs4el-CoPqe9lCRGoeVb3Cza6DswhN3wO5GY9WFYZVRdB3GhK6D4p4g53wgm73qXY2FAYR_PP_sWcjFgGzkUzTHvXCxbYrF3uuxpwVFd6hI45T-hRW0MJSs85yzqQW1Q
 

FIGMO

Petty Officer 1st Class
Joined
Jun 18, 2017
Messages
321
Hey Guys!

Lots of good posts, I really appreciate the feedback. As I am catching up on posts for work that I have already done, in some cases in am already on the next stage or two for a given portion of the boat, such as the side walls (trying to catch up on the pics).

I really like the photos of Watermann's control system. Very tidy and clean looking, not sure mine will be as slick as that. As long as it is functional and looks acceptable, then I can be good with that.

I will put some pics up tonight of the side panels as they stand. I will be putting epoxy on side panels and the fronts of the consoles tonight. That will be the last of the epoxy work that I can do for now. Next will be to empty out the boat, and clean the garage out in order to finish the painting.
 

FIGMO

Petty Officer 1st Class
Joined
Jun 18, 2017
Messages
321
Some more pics:

Click image for larger version  Name:	31.jpg Views:	1 Size:	154.1 KB ID:	10776586
Port side shot with the live well positioned. I cut the access for storage and the speakers. Because of the positioning of the live well and the way the lid will open, I decided not to take the storage space all the way back like it is on the starboard side.

Click image for larger version  Name:	32.jpg Views:	1 Size:	146.8 KB ID:	10776587
Close up of the live well in relation to the side panel. The live well takes up a fair amount of room, but still provides adequate space for a pedestal seat in the center rear.

Click image for larger version  Name:	33.jpg Views:	1 Size:	177.5 KB ID:	10776588
Starboard side with the gang switch hole, speaker and storage space cut. You can also see that I pre-drilled the holes for the deck lights. I will be using blue LEDs throughout except the storage compartments, which will get white LEDs.

Click image for larger version  Name:	34.jpg Views:	1 Size:	178.2 KB ID:	10776589
Finished putting epoxy on the 3/4" wood for under the casting deck.

Some pics of the live well next with the plumbing in place.
 
Top