1974 Starcraft SS16 Restortation

Watermann

Starmada Splash of the Year 2014
Joined
Jan 12, 2013
Messages
13,798
Nice to have Jr around for these rare things, livewells are tough to come by, especially AL ones and my V5 SS has his handy work on it too with the fuel filler face plate he made.
 

FIGMO

Petty Officer 1st Class
Joined
Jun 18, 2017
Messages
321
Hey Gents,

Knezzer I hope things are well in Saskatchewan!

It is really nice to have both John Snr (Budski), and his son John, living so close by. They are good people, and John Jnr does some nice work.
 

Candutch

Chief Petty Officer
Joined
May 8, 2015
Messages
637
The livewell looks great. Hope it warms up soon for ya, looking forward to seeing you get back to the boat. We had a great week here in Calgary with temps in the mid to high teens but now the reality of March has kicked in an it is 0 and freezing rain.
 

FIGMO

Petty Officer 1st Class
Joined
Jun 18, 2017
Messages
321
Hey Gents,

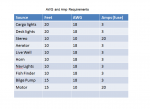
I am attempting to figure out my wiring requirements (AWG and Amps) based on the accessories I plan on running. I came up with the following numbers (lengths are approximate):

Click image for larger version  Name:	AWG.PNG Views:	1 Size:	12.6 KB ID:	10719395
That is based on a chart I located as follows:


Click image for larger version  Name:	Gauge Amps.PNG Views:	1 Size:	48.9 KB ID:	10719396

Does this make sense? I am open to suggestions/recommendations. All the lights I am running on the boat will be LED, so very little draw.
 

FIGMO

Petty Officer 1st Class
Joined
Jun 18, 2017
Messages
321
Further to my last:

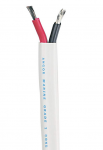
I can get marine grade duplex wire from Amazon for 66.00 (CAD) for 100' of 18 AWG. That might leave me a bit short, but I think I was generous with some of the measurements. So 100' should satisfy this project. I would be curious to know how much wire you guys have used in previous restorations.

Pic of the Duplex wire:

duplex wire.PNG
 

Watermann

Starmada Splash of the Year 2014
Joined
Jan 12, 2013
Messages
13,798
I ran a single 12ga ground and primary 20amp with inline fuse to my fuse block from an isolated deep cycle battery separate from the main motor battery. The electronics are also on their own circuit with fuse away from the block. Keep in mind none of the current draw is at it's rated fuse draw or they would pop and chances are you won't be using all of them at once either. 20 amps for a stereo is a crazy high number, I'd recheck that. With 12 or 10 ga wire to a fuse block you'll be in good shape. Remember your house is ran with 20 amp circuits and wiring running high draw appliances like microwaves and the admirals hair dryer. :lol:
 

FIGMO

Petty Officer 1st Class
Joined
Jun 18, 2017
Messages
321
Hi Watermann,

Perfect, good to know. I think I am doing the same thing as you with the 20 amp from the battery to the bus bar. The bus bar takes blade fuses for the different components.

I have a picture I put to together for the routing of the lines. I used one component as an example:

Gang wiring.png

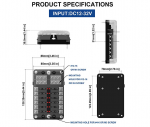
As for the stereo, I will double check the requirements for that, but I could have swore it was 20 amp. Picture of the bus bar I got:

bus bar.PNG
 

Watermann

Starmada Splash of the Year 2014
Joined
Jan 12, 2013
Messages
13,798
Looks like a good plan to me way above factory work I've seen. :thumb:
 

FIGMO

Petty Officer 1st Class
Joined
Jun 18, 2017
Messages
321
Hey Watermann,

What gauge wire would you recommend for the battery to motor if the distance was 15'?
 

Watermann

Starmada Splash of the Year 2014
Joined
Jan 12, 2013
Messages
13,798
Guess that depends on what you plan on running, if it's for your set up above with the power hungry stereo I'd use 10 ga primary and ground. Otherwise I used 12 ga on my setup and turned everything on to test it out while honking the horn and no fuses popped.
 

FIGMO

Petty Officer 1st Class
Joined
Jun 18, 2017
Messages
321
[
Guess that depends on what you plan on running, if it's for your set up above with the power hungry stereo I'd use 10 ga primary and ground. Otherwise I used 12 ga on my setup and turned everything on to test it out while honking the horn and no fuses popped.

That is what I will be doing for the wiring from one battery to the consul to run all the accessories. I was thinking about the gauge of wire required to run power from the second battery back to the motor. I was intending on powering the trolling motor, bilge pump and outboard motor off of one battery. From what I have read, I will need a fairly thick gauge to get adequate power from the battery to the starter for the outboard motor, about a 15' distance. I was thinking maybe a 4 gauge wire.
 

Watermann

Starmada Splash of the Year 2014
Joined
Jan 12, 2013
Messages
13,798
I'd advise against sharing your main motor starting battery with the trolling motor as it will eat up the charge more than anything else. My starting battery is isolated and only powers the main motor and gives switched power to the controls. Also having the starting batt as close as you can get it to the motor is best.
 
Last edited:

MNhunter1

Lieutenant Junior Grade
Joined
May 12, 2014
Messages
1,059
Hi FIGMO,
Sorry, looks like my thread was closed due to inactivity and the PM function currently has some impairments, so hope you don't mind me replying here..

I didn't notice any inconsistencies with the height of the side supports for the bow deck. I placed a straight board across the bow from one support to the other to determine the height needed for my frame, then built it accordingly. Never noticed any discrepancy with the height from one side to the other.
 

FIGMO

Petty Officer 1st Class
Joined
Jun 18, 2017
Messages
321
Hi FIGMO,
Sorry, looks like my thread was closed due to inactivity and the PM function currently has some impairments, so hope you don't mind me replying here..

I didn't notice any inconsistencies with the height of the side supports for the bow deck. I placed a straight board across the bow from one support to the other to determine the height needed for my frame, then built it accordingly. Never noticed any discrepancy with the height from one side to the other.

Hello MNHunter1,

Sorry I haven't been tracking replies, I have been trying to figure out other spacing issues. You are of course correct. I decided to cut the casting deck wood using the existing wood frames from the bow as a template. I then used it like you did to double check the height issue with my supports. What I realized was that my aluminum frame was out by about 1/8 of an inch. So drilled it out and sanded it down, and dry fitted the supports before riveting them. That pretty much did the trick, the supports fit nicely under the casting deck.

The next thing I am going to do is work on the spacing and height of the consoles so I can properly fit the casting deck. I want to make sure the windows line up properly before I drill the holes for the legs of the consoles. Those issues are my next post.
 

FIGMO

Petty Officer 1st Class
Joined
Jun 18, 2017
Messages
321
Hello Gents,

I have cut the casting deck for the bow of the boat. However, I need to figure out the positioning of the aluminum supports under the casting deck. Before I can do that I need to line up the positioning of the console legs. As I have seen, this can be an issue for the alignment of the windows. As such I used nuts and bolts to temporarily secure the sides of the consoles to the gunnels.

The next thing I did was to re-attach the windows to the console to double check its alignment. I left the legs of the consoles loose so I could move them around and align the legs taking in consideration the positioning of the windows.

What I have discovered is the the center folding window is sagging, and rubbing on the starboard side console. Some pictures:


D1.png

D2.png

D3.jpg
D4.png
Initially I thought I would shim the bottom leg of the port side console, but caused a noticeable difference in the console height. So what I think I will do is use stainless steel washers with the window bolts to raise the port side window. That should eliminate the sagging problem with the folding window. I will hide the washers in weather stripping that I will use between the windows and the consoles.

I am really interested your guys thoughts on this approach.
 

dozerII

Admiral
Joined
Oct 25, 2009
Messages
6,527
You will probably find the hinge is worn on the starboard side of the pass through window. In the past I have taken the pin out of the hinge, if it is worn badly replace it, but it is more than likely the aluminum on the window frame that is worn. I have tightened them up by using a pair of vice grips set to just slightly squeeze the hinge pin slot. I used some small scraps of aluminum to protect the frame from damage from the vise grips. It takes a while to get it right as you have to keep fitting the pin to check your progress.
 

DirtyHarry83

Petty Officer 1st Class
Joined
Jun 5, 2012
Messages
305
FIGMO

I had an issue where my center window sagged. Mine happened from the top part of the hinge bracket widening from the rivets giving up a little. I am looking for some tiny rivets that I can add additional new strength to the window.

I feel like the windshield was one of the hardest points to get adjusted, and even after the fact it will still show you (likely no one else) that there are still possible adjustments to suit your liking. Anyone else would say, "Wow that looks great. When do we go out on the water?"

You will probably find the hinge is worn on the starboard side of the pass through window. In the past I have taken the pin out of the hinge, if it is worn badly replace it, but it is more than likely the aluminum on the window frame that is worn. I have tightened them up by using a pair of vice grips set to just slightly squeeze the hinge pin slot. I used some small scraps of aluminum to protect the frame from damage from the vise grips. It takes a while to get it right as you have to keep fitting the pin to check your progress.

I used a C clamp with some pieces of plywood.
 

FIGMO

Petty Officer 1st Class
Joined
Jun 18, 2017
Messages
321
Hey Dozer and Harry,

That looks like sound advice. I will give it a whirl this weekend and let you know how it turns out.
 
Top