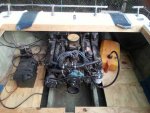
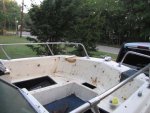
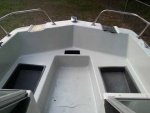
1973 Trisonic tri-hull custom resto: update 6-5

starleen2

Cadet
Joined
May 16, 2012
Messages
24
Re: 1973 Trisonic

Re: 1973 Trisonic

Not much new happening except buffing out a faded gel coat – filling screw holes, and wiring. I found out that on this boat there is NOT a fuse box – only inline fuses soldered in (somewhere) along each line. I’m thinking about installing a fuse buss so I can have some protection for some circuits. I managed to save the carpet when it was pulled up and it cleaned up pretty good – I may re-use it since it matches the sidewalls. Getting almost too hot to work – Texas summers are brutal.
 

74_trisonic

Cadet
Joined
Sep 28, 2012
Messages
6
Re: 1973 Trisonic tri-hull custom resto: update 6-5

I will be parking a '74 (same model) in the garage tomorrow for my winter project. Let me know if you have any advice or pics of a finished boat. It need an interior job and I'm not sure if it is running right now.
 

starleen2

Cadet
Joined
May 16, 2012
Messages
24
Re: 1973 Trisonic tri-hull custom resto: update 6-5

I will be parking a '74 (same model) in the garage tomorrow for my winter project. Let me know if you have any advice or pics of a finished boat. It need an interior job and I'm not sure if it is running right now.

Thanks for replying -
right now the weather here in Texas is beginning to cool down a bit so I'm now just beginning to put the floor in - I'll be posting more pictures as I go along
 

74_trisonic

Cadet
Joined
Sep 28, 2012
Messages
6
Re: 1973 Trisonic tri-hull custom resto: update 6-5

Thanks for replying -
right now the weather here in Texas is beginning to cool down a bit so I'm now just beginning to put the floor in - I'll be posting more pictures as I go along

We finally got it here and got started today. I changed the plugs, points, condenser and rotor. Got spark now with starter fluid, no pressure from the fuel pump so I ordered one, it should be here tomorrow. I finally got the GIGANTIC bee hive out from under the front seat and the bees are now starting to disperse. All the carpet is removed and most of the interior. I have a couple soft spots in the floor board, but no obvious rot. Do you suggest removing the floorboard entirely?

The outdrive would not go down earlier. Now for some reason when we looked at it, it is down, but will not go back up. that will have to wait until after the fuel pump.

Bilge pump doesn't seem to be working. So I have a few up front challenges. The exterior looks great so I have something to look forward to.
 

starleen2

Cadet
Joined
May 16, 2012
Messages
24
Re: 1973 Trisonic tri-hull custom resto: update 6-5

We finally got it here and got started today. I changed the plugs, points, condenser and rotor. Got spark now with starter fluid, no pressure from the fuel pump so I ordered one, it should be here tomorrow. I finally got the GIGANTIC bee hive out from under the front seat and the bees are now starting to disperse. All the carpet is removed and most of the interior. I have a couple soft spots in the floor board, but no obvious rot. Do you suggest removing the floorboard entirely?

Dirt dobbers, bees and spiders seem to be the main culprits! Save Everything (even if you think you are going to replace it. Sometimes parts are hard to come by and you may need the part to take with you. I was able to take the carpet out and give it a good cleaning. I may put it back in or use it to cover the frame rest on the boat trailer to aid in padding (see if I threw it away - I'd have buy new for the frame rests).
You might want to do some core sampling to check. Mine had a few soft spots too - and ended up needing the entire floor and stringers to be replaced (along with flotation foam). You might also find that the flotation foam is water logged as well. I cut the entire floor out leaving about a two inch tab on each side so I could slip the new plywood underneath and have something to fiberglass to. I also Left some of the fiberglass channeling in place so I could place the stringers and fiberglass them into place. I should be able to resume work on the boat since the weather is cooling somewhat.
 

74_trisonic

Cadet
Joined
Sep 28, 2012
Messages
6
Re: 1973 Trisonic tri-hull custom resto: update 6-5

I cut the entire floor out leaving about a two inch tab on each side so I could slip the new plywood underneath and have something to fiberglass to. I also Left some of the fiberglass channeling in place so I could place the stringers and fiberglass them into place.
I got the motor running yesterday! There were some bad connections in the instrument panel causing it to die as soon as you released the key from start. Fixed that, now it starts imediately and sounds awesome! Next is trim / tilt and oil change, winterize and into the garage it goes for the rest. I think I will rip the floor out once it is there.
 

74_trisonic

Cadet
Joined
Sep 28, 2012
Messages
6
Re: 1973 Trisonic tri-hull custom resto: update 6-5

BTW, How did you locate the screws holding the deck down? I don't see any, but I am sure they must be there. I plan to start tearing the floor out this weekend.
 

Woodonglass

Supreme Mariner
Joined
Dec 29, 2009
Messages
25,924
Re: 1973 Trisonic tri-hull custom resto: update 6-5

You won't be able to find them IF they are there at all. They will be covered with resin and glass. Just cut it out in sections and rip it up.
 

starleen2

Cadet
Joined
May 16, 2012
Messages
24
Re: 1973 Trisonic tri-hull custom resto: update 12-20

Re: 1973 Trisonic tri-hull custom resto: update 12-20

One good thing about living in east Texas is bring blessed with tepid weather in December! The past few weeks it had been unseasonably warm and I took advantage of it to work on the boat. I finally got the electrical all sorted out. Wires that had run amuck are now labeled and neatly bundled . The engine electrical was one bundle with quick connects on each end attached to a circuit breaker. It was the easiest to reroute. Electrical lines that went to the light, blower, horn needed a bit more attention. Each line originally had an inline glass fuse so I replaced the lines and routed them to a modern fuse block. This should make chasing down a blown fuse MUCH easier. To give it a test, I put on the water muffs and cranked up the engine and tested everything ? A ? OK! Time to button her up and winterize the engine. I also took the time to grease the controls.

The next day it was still warm, so I turned my attention to the front bow seating area. There were many screw holes that used to hold the upholstery to fiberglass. I do not want to re ?install the back panels in the bow area. I kinda like the smooth look. So all holes were filled with fiberglass impregnated filler and sanded smooth. This area will be painted so I?m not too concerned about matching the gelcoat. Finished with an application of primer on the sanded areas. I thinking about shooting the top area of the boat with paint ? not much left after bow area ? so might as well to match. I have a few spider cracks that will need to be ground out then filled to ensure a good finish.
 

starleen2

Cadet
Joined
May 16, 2012
Messages
24
1973 Trisonic tri-hull custom resto: update 3-7

1973 Trisonic tri-hull custom resto: update 3-7

The weather is starting to be consistent - Spring time in Texas means milder temp for the next few months before summer arrives. Temps were in the upper 70's today. Finally can resume work on the boat. I put on the water muffs and gave the engine a quick start up - every thing went smoothly.

I turned my attention to the stringers and sub floor components. I was able to get most of the stringers cut and glued in place. I still have a bit more to do before posting pictures.

Also traced down some loose wires that went to the lighting, horn, bilge pump, and blower motor. The wiring for these will all be replaced with a fuse protected circuit panel.
 

starleen2

Cadet
Joined
May 16, 2012
Messages
24
Re: 1973 Trisonic tri-hull custom resto: update 3-7

Re: 1973 Trisonic tri-hull custom resto: update 3-7

The weather is starting to be consistent - Spring time in Texas means milder temp for the next few months before summer arrives. Temps were in the upper 70's today. Finally can resume work on the boat. I put on the water muffs and gave the engine a quick start up - every thing went smoothly.

I turned my attention to the stringers and sub floor components. I was able to get most of the stringers cut and glued in place. I still have a bit more to do before posting pictures.

Also traced down some loose wires that went to the lighting, horn, bilge pump, and blower motor. The wiring for these will all be replaced with a fuse protected circuit panel.

. . . and now the rain starts, time to put the cover on and wait until a dry day
 

Trisonic72

Recruit
Joined
Jul 2, 2013
Messages
5
Re: 1973 Trisonic tri-hull custom resto: update 6-5

I got the motor running yesterday! There were some bad connections in the instrument panel causing it to die as soon as you released the key from start. Fixed that, now it starts imediately and sounds awesome! Next is trim / tilt and oil change, winterize and into the garage it goes for the rest. I think I will rip the floor out once it is there.

Im trying to rebuild a trisonic also. How did you set up water to the boat while working on engine. intake is too big to put a fake a lake on. Do you have any suggestions? Anyone
 

starleen2

Cadet
Joined
May 16, 2012
Messages
24
1973 Trisonic tri-hull custom resto: update 7-2

1973 Trisonic tri-hull custom resto: update 7-2

Finally Back to work on the tri hull. The rear portion of the floor is done. Had fun with the foam - but since the area was small and confined - it made "learning" easy.
20130702_202336.jpg
I also turned attention to the front bow area.
Before:
IMG_2713.jpg

I filled in the holes and sanded smooth the area - did a bit of priming - and voila!

20130702_202530.jpg
 

starleen2

Cadet
Joined
May 16, 2012
Messages
24
Re: 1973 Trisonic tri-hull custom resto: update 6-5

Im trying to rebuild a trisonic also. How did you set up water to the boat while working on engine. intake is too big to put a fake a lake on. Do you have any suggestions? Anyone

Use A set Of water Muffs hooked to a water hose? That's what I used
 

starleen2

Cadet
Joined
May 16, 2012
Messages
24
1973 Trisonic tri-hull custom resto: 7-3

1973 Trisonic tri-hull custom resto: 7-3

Also traced down some loose wires that went to the lighting, horn, bilge pump, and blower motor. The wiring for these will all be replaced with a fuse protected circuit panel.

I was able to check this off the list today. I reconfigured the wiring with a new harness for each circuit wired into a modern blade style fuse panel. Lights come on with a pull of a switch. Blower and bilge pump are connected with a sequential switch. Horn Button works when pressed - just like it should.
 

74_trisonic

Cadet
Joined
Sep 28, 2012
Messages
6
Re: 1973 Trisonic tri-hull custom resto: update 6-5

Im trying to rebuild a trisonic also. How did you set up water to the boat while working on engine. intake is too big to put a fake a lake on. Do you have any suggestions? Anyone

You can go to Wal-Mart and buy a "Water Muffs", they are only about three dollars. They look like big ear muffs. You attach your garden hose to them and then put them on the base of the motor, down by the propeller. You will see 3 or 4 little holes where the water from the lake or ocean comes in to the motor. That is where the muffs will fit over it and the water from your garden hose will keep water going into the motor.

Realize that the water will be coming out of the prop and outdrive, so be prepared for that. That is what I use. I actually bought a galvanized feed/water trough big enough to catch all the water as it is expelled from the engine and it has a hose fitting near the bottom that I can connect another hose to. That way the motor is continuing to get fresh, cool water and the trough keeps draining through the other hose. I have the boat in my garage and can run it that way. Just make sure you have good ventilation as the exhaust gets pretty heavy.
 

74_trisonic

Cadet
Joined
Sep 28, 2012
Messages
6
Re: 1973 Trisonic tri-hull custom resto: 7-3

Re: 1973 Trisonic tri-hull custom resto: 7-3

I was able to check this off the list today. I reconfigured the wiring with a new harness for each circuit wired into a modern blade style fuse panel. Lights come on with a pull of a switch. Blower and bilge pump are connected with a sequential switch. Horn Button works when pressed - just like it should.

Did you happen to make any notes? :) I am going to replace all the electronics and wiring soon. Still haven't got that deck finished :(
What breaker panel did you use? did you replace the switches and what not in the driver panel?
 
Top