1973 Starcraft SuperSport 16ft. restoration questions

piperjoe

Chief Petty Officer
Joined
Jul 11, 2013
Messages
561
Located my camera and will get the battery recharged so I can take some photos again! Planned on getting some boat restoration time in yesterday and then I thought the Admiral and I should go to our favorite nursery and get the top dressing soil for her Iris bed first. Should not take too long...4 hours later we came home with the soil, a Japanese Stewartia tree, 3 hanging flower baskets and 2 Clematis plants. And all that fit in the back of the Ranger pickup! Albeit with some of the Admiral's new tree hanging out over the tailgate...LOL! And then I had to plant the tree for her, of course. 😃

All to say the Admiral was happy and will be having a nice Mother's Day weekend while I spend some time with the boat restoration. Hope all of you have a great Mother's Day, too!

Safe boating,
Joe
 

piperjoe

Chief Petty Officer
Joined
Jul 11, 2013
Messages
561
Removed the bottom part of the rivets that were still in the rub rail channels attached to the boat. There was a lot of them! Now I can have a bit easier time when the Admiral and I put the tarp on or remove the tarp...that tarp has some "jagged rivet rash"...not to mention my hands.

Safe boating,
Joe
 

piperjoe

Chief Petty Officer
Joined
Jul 11, 2013
Messages
561
Okay, got my Canon charged up and took a few photos last evening of the boat restoration to go with the above posts. Shows where I'm at up to this point. Let's see if I can get the photos posted.

I have some additional rivet "bottoms" to remove from a couple of the aluminum parts and should be able to get those out today, then vacuum the inside of the hull to remove the misc. rivet items from the boat before they get lodged in the rib drain openings. Once that is done I can get back to paint removal of the inside hull paint and removing paint from the parts. Nice warm weather coming up this next week (86 degrees on Thursday?!) so I'll be out there working on our boat...if the Admiral says I can...LOL!!

Safe boating,
Joe

Edit: Hooray!! It worked...
 

Attachments

  • 001.JPG
    001.JPG
    112.3 KB · Views: 22
  • 002.JPG
    002.JPG
    89 KB · Views: 22
  • 003.JPG
    003.JPG
    108 KB · Views: 21
  • 004.JPG
    004.JPG
    102.6 KB · Views: 21
  • 005.JPG
    005.JPG
    98.2 KB · Views: 22
Last edited:

Alecapone

Seaman Apprentice
Joined
May 8, 2021
Messages
42
I get the vinyl from Defender, they have the best prices out there that I've found.
I've had really good luck with the blinds and solids from Rivetsonline
Thanks! This thread, the questions and answers are most helpful! As are many others in this sub. Im right where Joe, and many others wheres at the beginning. I actually just picked up a 16 ss in simular condition. Im a bit intimidated by the rivets. Can't wait to get started!
 

piperjoe

Chief Petty Officer
Joined
Jul 11, 2013
Messages
561
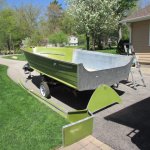
Welcome Alecapone to the forum and this thread! Lots of really nice folks here to assist you with your restoration project so don't hesitate to ask for help. I was embarrassed to ask for help but found out there was no need for that feeling. Glad to see you found a boat like mine as they are pretty neat! Be sure to Google the boat and check out the pictures to see what you can get with your restoration effort along with the great restorations contained on this forum.

Glad to see you are enjoying this thread! I had no experience with rivets prior to this boat restoration but am making good 😊 
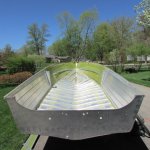
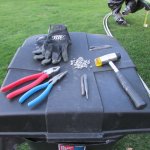
progress (at least for me LOL!). Grab your drill, put a good quality 3/16" drill bit into the drill and, holding the drill vertical with drill bit placed on the rivet flange hole, just drill until the rivet head spins loose and comes off the rivet. You might have to pull that little aluminum flange off the drill bit so wear some gloves. Repeat for all the pop rivets you want to remove (lots of them!). Go back and knock out the rivet shanks like I did in last posts. This leaves the rivet hole very close to original diameter for the new rivets you will be adding later. Check the forum builds if you want to see how others get the rivets out, too. This method has worked for me for all my rivet removal work.

One tip that I would like to offer: take lots of photos of your restoration work for use while putting your own boat back together because you probably will not be able to recall exactly where everything goes, and, be sure to label everything as to port or starboard side along with bow or stern end orientation. I also keep all small items including the nuts/bolts and screws in individual plastic zip lock plastic bags which have labeled sticky notes inside telling me where those items go on the boat. At my age I need all the help I can get! LOL 😂 Most of all have fun!

Safe boating,
Joe
 

piperjoe

Chief Petty Officer
Joined
Jul 11, 2013
Messages
561
Was out looking at my boat and questions came to me with regard to rivets: 1) I know stainless rivets are stronger then aluminum rivets...are they worth the price and time for this boat restoration? I am not interested in cheap here but instead want to find out what you folks think about using stainless riveting versus aluminum riveting. 2) pneumatic versus hand held riveting tools; I already have a pancake compressor. Thoughts on quality brands to consider?

Thank you for the time and thoughts concerning my questions.

Safe boating,
Joe
 

piperjoe

Chief Petty Officer
Joined
Jul 11, 2013
Messages
561
Okay then...

I will continue doing general paint removal duties and cleanup on the boat items and hull for awhile. Not much need for additional photos or updates during this work phase. If something comes along that I feel would be of interest I can post it then, otherwise, I will be back later on with an update.

Safe boating,
Joe
 

Watermann

Starmada Splash of the Year 2014
Joined
Jan 12, 2013
Messages
13,772
Was out looking at my boat and questions came to me with regard to rivets: 1) I know stainless rivets are stronger then aluminum rivets...are they worth the price and time for this boat restoration? I am not interested in cheap here but instead want to find out what you folks think about using stainless riveting versus aluminum riveting. 2) pneumatic versus hand held riveting tools; I already have a pancake compressor. Thoughts on quality brands to consider?

Thank you for the time and thoughts concerning my questions.

Safe boating,
Joe

Stainless blind rivets is what you're referring to I believe. Yes they are more expensive and they are stronger. Are they necessary, no probably not. The reason is blinds are not used in any vital structural components, that's where solid rivets are used. The gunnels, side panels, decking are structural and use blinds for attachment but they don't see the forces in a concentrated or focused point.

Another issue is you run the risk of dissimilar metals corrosion eating the Al under/around the SS blind making other mitigation steps necessary such as a barrier between the 2 metals.

SS blinds are nearly impossible to set with a hand rivet tool. I have a inexpensive pneumatic rivet tool that has set a 1000 blind rivets and still going strong.

To add strength just add more blinds, I did when I put my gunnels back, I nearly doubled the amount the factory used.
 

piperjoe

Chief Petty Officer
Joined
Jul 11, 2013
Messages
561
Thank you for the thoughts and information on added rivets to the boat. Dissimilar materials such as stainless and aluminum, and potential associated problems, was what I had in mind when asking for other boaters thoughts. Didn't seem like a good idea to me but I wanted an additional opinion. I will use aluminum rivets. A good friend has offered the use of his pneumatic riveter to me and as long as I already have the compressor I think I will give it a try.

Safe boating,
Joe
 

piperjoe

Chief Petty Officer
Joined
Jul 11, 2013
Messages
561
Question: as this is basically a one man paint removal operation...would it be okay to leave the boat hull on the trailer and remove the paint from the rub rail channel on the hull down to the water line and then remove the hull from the trailer, place it upside down on sawhorses, and then remove the remaining hull paint? Or is there a better method?

Safe boating,
Joe
 

Moserkr

Chief Officer + Starmada Splash Of The Year 2021
Joined
Nov 23, 2020
Messages
867
Both ways will work. I took mine off the trailer and flipped it over on the ground. It was a bit more difficult being so low. At a medium height, the saw horse idea sounds great so long as you can get to the top of the hull when flipped.
 

piperjoe

Chief Petty Officer
Joined
Jul 11, 2013
Messages
561
Both ways will work. I took mine off the trailer and flipped it over on the ground. It was a bit more difficult being so low. At a medium height, the saw horse idea sounds great so long as you can get to the top of the hull when flipped.
This is what I like about getting help on the restoration questions! I never thought about just taking the boat off the trailer and flipping it over on the ground!! Geez... lol 😂. I could even rest the hull on a few of those plastic milk carriers (the square ones) to get the boat about a foot off the ground and ensure a good rinse around hull edges. Yep 👍, sounds like a plan to me. Thank you for the reply!

Safe boating,
Joe
 

BWR1953

Admiral
Joined
Jan 23, 2009
Messages
6,081
Question: as this is basically a one man paint removal operation...would it be okay to leave the boat hull on the trailer and remove the paint from the rub rail channel on the hull down to the water line and then remove the hull from the trailer, place it upside down on sawhorses, and then remove the remaining hull paint? Or is there a better method?

Safe boating,
Joe
Here's how we did it with the Kingfisher.

4.jpg

5.jpg

8.jpg

9.jpg

11.jpg
 

piperjoe

Chief Petty Officer
Joined
Jul 11, 2013
Messages
561
Thank you for the photos, BWR1953! I will slide the boat off the trailer as you did although it will have to be on the grass next to the garage. Also, I will be using the power washer and lots of water so it will have to be done outside. No issues there. Your boat sure looks nice and clean in the photos and I would be a happy boater if mine cleans up like that.

Safe boating,
Joe
 

ShoestringMariner

Lieutenant Commander
Joined
Apr 18, 2015
Messages
1,593
I rolled mine off the trailer and rolled it over on the grass. Then I put it on a simple 2x4 dolly frame with large casters underneath. Perfect for doing the bottom. I left the sides for when it’s back on the trailer. Otherwise painting the sides this way would have been too low.
 

piperjoe

Chief Petty Officer
Joined
Jul 11, 2013
Messages
561
Thank you for sharing your method Shoestring Mariner...more good ideas/ways of doing the restoration work to help make the experience successful. I sure appreciate the useful information!

Safe boating,
Joe
 

piperjoe

Chief Petty Officer
Joined
Jul 11, 2013
Messages
561
Today was a nice day to be outdoors so I brought the shop vac up from the basement and vacuumed the inside of the hull. You know, to remove all those rivet bottoms and rivet round tops and aluminum curls, from drilling the rivet tops out with the 3/16" drill bit, that happened to fall out of my hand from time to time. All of the Bradford Pear tree blossom petals that landed in the boat went by the wayside too. I wanted to make sure none of those aluminum items made it into the drain openings at the center of the ribs or those openings at the end of the ribs. Wasn't much to vacuum off the hull bottom so I felt I did a good job getting the aluminum boat parts separated and out of the boat without making a mess of it. Now I can get back to paint removal and general cleanup of the boat items. The Admiral and Chief Sentry came out to watch the cleanout show...but that interest didn't last long at all! LOL

Safe boating,
Joe
 

Attachments

  • 001.JPG
    001.JPG
    106 KB · Views: 18
  • 004.JPG
    004.JPG
    82.4 KB · Views: 20
  • 007.JPG
    007.JPG
    135.5 KB · Views: 20
  • 010.JPG
    010.JPG
    111.7 KB · Views: 20
Top