1973 Starcraft SuperSport 16ft. restoration questions

piperjoe

Chief Petty Officer
Joined
Jul 11, 2013
Messages
561
That is for sure! It is still snowing though not hanging around and the wind chill is a balmy 23 degrees with the strong winds. Think I will go down to the basement hobby room and have some fun with a Monogram Green Hornet dragster model I have been assembling (think 1950's drag car called the Grasshopper).

Safe boating,
Joe
 

piperjoe

Chief Petty Officer
Joined
Jul 11, 2013
Messages
561
...and I said to the Admiral, "it's 36 degrees (wind chill 29), the fresh snow is melted off the roof and lawn and the sun ☀️ is shining! I am going to hook onto the boat and bring it up by the garage." And she said, "I will help you line up the hitch." How about that! She probably won't bale the water off the boat cover though...LOL

Safe boating,
Joe
 

piperjoe

Chief Petty Officer
Joined
Jul 11, 2013
Messages
561
She is that, my friend! 53 years and counting come May 3rd. The Admiral would not bale the water 💦 off the tarp...so I just went ahead and broke the ice off the top of the water and...well, anyway the water is off the tarp. Took a small amount of ice and water from immediately in front of the transom aluminum piece and the boat is now basking in the sunshine. I came into the house to warm up...

Safe boating,
Joe
 

piperjoe

Chief Petty Officer
Joined
Jul 11, 2013
Messages
561
Nice weather today...66 degrees and sunny. Brought out the other aluminum helm piece from the garage and have the stern top splash piece standing ready in the garage. Paint remover materials are ready, I am ready, the Admiral is ready...even the dog is ready! It is only supposed to reach outside temperatures in the 50's through Friday of next week with some rain so will see what can be accomplished.

Safe boating,
Joe
 

piperjoe

Chief Petty Officer
Joined
Jul 11, 2013
Messages
561
Hooray 😁! Just checked the weather report and now it shows temps getting into the 60's during the upcoming week... and that's Up North Michigan for you. I can work with that albeit longer "work times" for the paint remover to do it's "thing". Nevertheless, it looks as though we can finally get underway on the boat restoration again.

I probably will remove the four gunwal pieces from the boat and the top rub rails containing the long rubber inserts. The rub rails are held in place via long bolts and at the stern end via a rivet that looks like the same kind that is on the outside of the boat hull...not a pop rivet type...has the cap on the inside of the rub rails and the "small mashed end" showing inside the hull. How do you folks replace that rivet in the small space inside the rub rails? I don't have experience riveting anything so there's a need to ask for assistance from those who know what they are doing. So much to learn...😳

Safe boating,
Joe
 

piperjoe

Chief Petty Officer
Joined
Jul 11, 2013
Messages
561
The rub rails are held in place via long bolts and at the stern end via a rivet that looks like the same kind that is on the outside of the boat hull...not a pop rivet type...has the cap on the inside of the rub rails and the "small mashed end" showing inside the hull. How do you folks replace that rivet in the small space inside the rub rails? I don't have experience riveting anything so there's a need to ask for assistance from those who know what they are doing. So much to learn...😳

Safe boating,
Joe

Oops! 😧

I described the rub rail rivet orientation backwards in the above post! Have to remember to check the details FIRST before making a post...it's an old guy "thing" ya know...here's a few photos showing what I asked about.

Safe boating,
Joe
 

Attachments

  • IMG_1366.JPG
    IMG_1366.JPG
    668 KB · Views: 13
  • IMG_1368.JPG
    IMG_1368.JPG
    500.3 KB · Views: 13
  • IMG_1371.JPG
    IMG_1371.JPG
    508.4 KB · Views: 13

Watermann

Starmada Splash of the Year 2014
Joined
Jan 12, 2013
Messages
13,772
I reattached mine using altered large flange rivets since it's just the cover over the solid riveted structural channel and it covers the pile of gunnel rivets. As you can see some small area that got mauled using my pneumatic rivet gun but if you step back a pace or 2 you don't notice it. Think I went to my more narrow hand riveter for the rest of them after seeing that.

y4mD-P47ybwMufpZfIjiR8GW_0KeOQbj-tptBxHqIGQ4VjV_yRDEREhR9hXNOo29JEfqLj0MyQvxHrzD64qyDJ5doFbR_FeHwvfKHielV-HD5JfiivUG4e7MiGZSi-MPwaz26SNmrMJH-0omxwtnvawC9lRK2ccUex1lKMbeHHzxFlPSqFrg3pqdpN61vIIQ9tq
 

piperjoe

Chief Petty Officer
Joined
Jul 11, 2013
Messages
561
Thank you, Waterman. Your rivet idea is a good option if I don't use the original nut/bolt method (with some of the thread length cut off after securing the rub rails). I was actually more concerned about the two rivets (second photo) at the stern end of the rails but I think I can attach the rails with bolt/starwasher/nut combo and epoxy coating if I have trouble with those cap style riveted attachments.

Say, the paint on your boat sure looks really nice! What kind of paint and brand is that?

Safe boating,
Joe
 

Watermann

Starmada Splash of the Year 2014
Joined
Jan 12, 2013
Messages
13,772
It doesn't look like there were rivets in those 2 holes, if you look close there isn't a mark where a rivet head used to be.

I use all Van Sickle products, SE primer, regular primer, industrial enamel and catalyst hardener.
y4ma7sWZlxlaArZksuhT_rg2AzMvqTc64GVL3McvK5ks3aWBx26BKi5oa65FzkHH3G7De8T6RNjiwkYDyHeP6CKaHasGyMbiatBrVa41wTRBhkiNcedW1cBzbJ4zGK10d2AI0L-lBTsOrFM7_FvQoQK53YIERAVu8s9aO7cMo0ITWE5jBE4UgK7_ymJZ67HEyfW
 

piperjoe

Chief Petty Officer
Joined
Jul 11, 2013
Messages
561
Thank you for the heads up with regards to the paint products. I am going to look into that.

As for the rub rails and rivet question; I most likely didn't explain my concern too well. In the above photo 1: looking at the inside of the stern end of the rub rail, at the inside right surface, there are two rivet ends and the heads of the rivets are shown in photo 2 on the upright aluminum angle piece. Those are the rivets I am concerned about getting back into the rub rail space. Then again, perhaps those rivets do not have to be removed to take the rub rail off? What am I missing here?

Safe boating,
Joe
 

Watermann

Starmada Splash of the Year 2014
Joined
Jan 12, 2013
Messages
13,772
No that U channel does not need to come off, it's solid riveted on the hull and the gunnels / rub rail is attached to it.
Here it is on mine with the rubrails and gunnels removed.

y4mytCaXNkVxx2vQ7TEEINuszVymhtnbo1VxLNO54eFRVR9NQLFjeEMP2FbSB9YjzLH9OEK44HhIafrNN31IzEbRjZkKb2BbBoFVrhvbVoOBMaDKOGMVAyv3wUTg7R3uvwpkKC6rHHfreZFzlFlckqxnwB3rHbmOckcn9vbL2PbZYjEIRz3_K6VoSTvi6pZ9TYv
 

piperjoe

Chief Petty Officer
Joined
Jul 11, 2013
Messages
561
Thank you for the photo, Waterman!
Before I ate supper, I went out the boat and took off the tarp so I could have another close look at the stern end of the rub rail... and this time I put my glasses on! Sure enough I got a better idea of what was going on with the attachment. Had failed to see the one bolt on the inside right at the end of the rails which is why I couldn't figure out how to get the back end of the rail off the boat. Hate it when something happens like this but a lesson was learned. Took photos and if I have it figured out right now I remove the rivet from the stern end of the rubber piece, pull that rubber piece out and then remove rail from the boat. Then the gunwale pieces and finally the bow alumginum (want to replace the wood under the top bow piece). Hope I got the procedure right now.

Safe boating,
Joe
 

Attachments

  • IMG_1374.JPG
    IMG_1374.JPG
    595.8 KB · Views: 8
  • IMG_1377.JPG
    IMG_1377.JPG
    938.4 KB · Views: 8
  • IMG_1378.JPG
    IMG_1378.JPG
    751.7 KB · Views: 9
Last edited:

piperjoe

Chief Petty Officer
Joined
Jul 11, 2013
Messages
561
Thank you for the patience you have shown when helping this old landlubber restore our boat, Waterman! Your assistance is really appreciated by the Admiral and me. I hope to get back to working on the restoration today if the weather cooperates. Charging my drill batteries so as to be ready and I will also take along my "Can Do!" attitude, too. LOL


Safe boating,
Joe
 

piperjoe

Chief Petty Officer
Joined
Jul 11, 2013
Messages
561
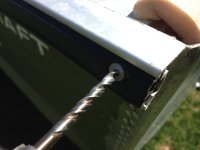
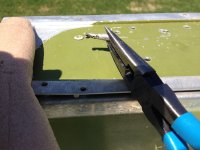
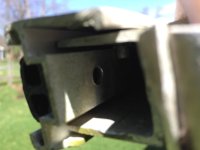
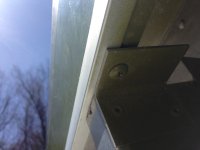
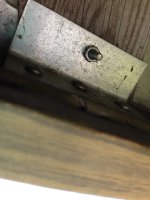
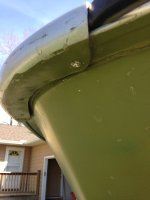
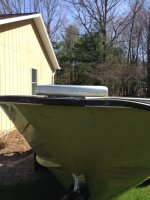
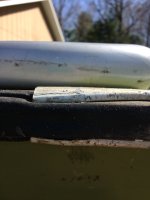
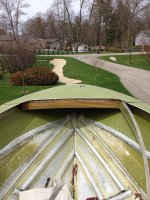
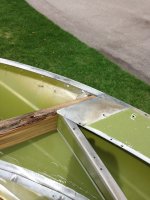
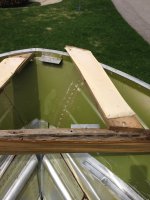
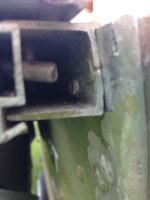
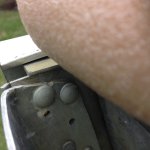
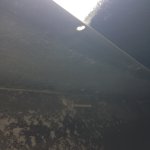
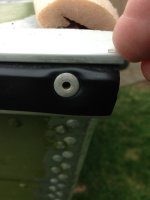
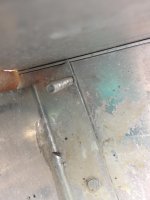
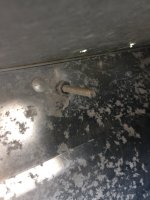
Beautiful day for boat restoration fun! Charged the batteries for the drill, got my tools out and my ladder (so I can climb into the boat) and after removing the stored sheets of foam and miscellaneous items I was standing on the boat hull again. Looked everything over to see where I left off last fall and decided to remove some bolts from the gunwales and from under the bow. Next I drilled out the stern rivets holding the rubber rub rail with a 3/16 dia. drill bit. I expected each rubber rail to just pull out from the aluminum as I pulled on the stern end. Not so. I thought the bow end of the rubber rail was just pushed into the aluminum bow nose cap along with the aluminum rail channel. Not so on that one either. The port side rubber rail was loose from the aluminum rail channel and both were hanging to the ground from that aluminum bow cap. Finally I realized that the bow cap had to come off (thought the rub rail assembly was caught up in there). Getting that aluminum bow cap off was a chore. I finally had to resort to using a chisel and hammer to cut the rivets off on the inside bottom of the cap in order to be able to move the cap...and it still would not come off. I had to use a pry bar to loosen and remove the aluminum cap and luckily there wasn't any damage though I sure spent some time on that task! Once the bow cap was off I could see that the aluminum rub rails were two separate pieces, a port and a starboard channel. The actual rubber rub rail was one long piece which was secured tightly under that aluminum bow cap. Well, the Admiral and I got the port side rub rail all off and the inside port gunwale piece removed from the boat. I put all of the port side bolts and nuts into a plastic baggie and labeled the contents. Then the rubber rail was cleaned, neatly rolled and secured, and stored for the time being in the garage.

Tomorrow I hope to remove the starboard aluminum rub rail channel and the rest of the gunwale pieces. Might get lucky and get the bow top sheet off, too.

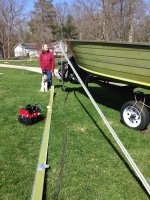
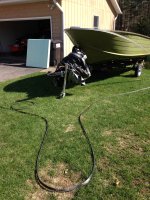
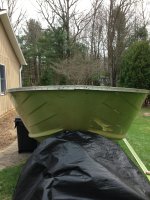
Included are a few photos of the days progress to go along with this post.

Safe boating,
Joe
 

Attachments

  • IMG_1380.JPG
    IMG_1380.JPG
    1.4 MB · Views: 16
  • IMG_1381.JPG
    IMG_1381.JPG
    1.2 MB · Views: 16
  • IMG_1385.JPG
    IMG_1385.JPG
    947.7 KB · Views: 16
  • IMG_1389.JPG
    IMG_1389.JPG
    565.8 KB · Views: 16
  • IMG_1392.JPG
    IMG_1392.JPG
    1.6 MB · Views: 16
  • IMG_1395.JPG
    IMG_1395.JPG
    1 MB · Views: 17
  • IMG_1397.JPG
    IMG_1397.JPG
    935.3 KB · Views: 19
  • IMG_1401.JPG
    IMG_1401.JPG
    2.4 MB · Views: 19
  • IMG_1405.JPG
    IMG_1405.JPG
    726.9 KB · Views: 19
  • IMG_1407.JPG
    IMG_1407.JPG
    993.4 KB · Views: 16
  • IMG_1408.JPG
    IMG_1408.JPG
    832.3 KB · Views: 16
  • IMG_1412.JPG
    IMG_1412.JPG
    2.3 MB · Views: 16

piperjoe

Chief Petty Officer
Joined
Jul 11, 2013
Messages
561
Worked on the boat today and removed the starboard rub rail channel, the port and starboard gunwale aluminum, the aluminum bow top piece and the wood bow support members. I am now down to the "naked" hull...I believe everything is off the boat and paint can continue to be removed and parts cleaned in preparation for paint later on. Will get the hull inside vacuumed again, make ready to install the transom, and work on getting the plywood flooring all cut to size. I plan on applying West Systems epoxy to the plywood flooring along with fiberglass mat. What thickness are you folks using for this application and where do you get the material from? Have used fiberglass and epoxy many times while building RC model aircraft but never with pieces of mat the size I will need for the flooring in the boat! LOL 😂

Safe boating,
Joe

Note: iPhone camera is full for now and I can't provide additional photos with it until I create some storage room. That will be an interesting experience for sure! I need to locate my real camera and use that instead. Hope to provide additional photos in a later post.
 

Attachments

  • IMG_1415.JPG
    IMG_1415.JPG
    1.4 MB · Views: 11
  • IMG_1416.JPG
    IMG_1416.JPG
    1.6 MB · Views: 10
  • IMG_1417.JPG
    IMG_1417.JPG
    1.1 MB · Views: 11
  • IMG_1419.JPG
    IMG_1419.JPG
    1.1 MB · Views: 11

Watermann

Starmada Splash of the Year 2014
Joined
Jan 12, 2013
Messages
13,772
No advice for you on the fiberglass stuff, all I use is spar and cover with deck vinyl.

y4m3Yv-0WQcUycoTf7GrTMKy_YFJrCkPkKqXgyYW8P3EaZ3mHi4fM_9oq8YK7JI6rYv13h76YJouVZz5K6ZIcNu0v19SFvRzJYU5RYKMHwteLQyQ5cZwf2necB5cIc9mb6LOx4B3vH7e525YKeCGe1wPEFeSFlxukbyctlWAbTiCEy-UH10CFKp61oEAIkckvap


y4m1cxRL6Job9rLy0gO3FUiQNuGdszMIjZ_7rEv9VSS-d_7WoZyVZpzmbM_fXoE48_Ikq_Yup7FrJnAszXyysQMM2N-OwEJLD-GfPLT9p76JGcnaqrO51jEOcDcTZZatRnIM5a16fZ-8KuVbfC7_c0dgQ-6-fISYv8cxkx5ijuMTvKwCMxBJuCfyDpP25ybIWDL
 

piperjoe

Chief Petty Officer
Joined
Jul 11, 2013
Messages
561
Thank you for the photos and additional advice, Watermann. Was considering the epoxy/fiberglass on the marine plywood flooring to add an extra margin of rigidity to the center floor area and adding additional water proofing to the underside of the flooring. That said, I like the idea of the spar varnish (say, 3 brushed on coats) and vinyl cover on the top surface of the flooring and the use of the West Systems epoxy to coat the plywood flooring underside and edges. Would not have to use fiberglass mat which would save me a probable mess in all likelihood LOL! I really like the neat and clean look of the vinyl covering in your photo. Where did you get this vinyl covering from?

Safe boating,
Joe

Edit: is there a special grade/type of pop rivet (marine grade) that is used to reattach the flooring and aluminum parts when putting the boat back together? No experience here so had to ask...
 
Last edited:
Top