1973 Evinrude 25hp wire harness plug repair.

clemsonfor

Lieutenant Junior Grade
Joined
Sep 19, 2005
Messages
1,011
So after hooking up the steering on this boat I finally got to something I had ignored till now. The dry rotted wires going into the engine. This is for the remote controls, starting and choke for the console. It's factory. The wires on the boat side of the plug are bad from the plug down 8-10"s or so. Nothing is available aftermarket, and nothing on eBay right now. Is there a way to get the pins out and splice in new wire to the good and put a pin back on and then insert that back into the plug? Or is this plug bonded to the wire?

I know the other option is to figure out some other direct connect or put in a new plug of some sort. Maybe even a secondary plug and leave the original to carry main power and ground wires.
 

F_R

Supreme Mariner
Joined
Jul 7, 2006
Messages
28,195
nymarine.ca makes reproduction wiring harnesses. Ain't cheap.
 

racerone

Supreme Mariner
Joined
Dec 28, 2013
Messages
36,454
The plug is a convenience feature.----If motor is permanently installed on the boat it is easy to hard wire it in.----Or use a terminal strip on the motor.
 

clemsonfor

Lieutenant Junior Grade
Joined
Sep 19, 2005
Messages
1,011
Ouch yea they are expensive! Just called him. I think I will keep the factory plug letting it make the high current connections and wire in spliced wires with direct hookups for the other ones and splicing into the main harness back where the wires are good.
 

clemsonfor

Lieutenant Junior Grade
Joined
Sep 19, 2005
Messages
1,011
The plug is a convenience feature.----If motor is permanently installed on the boat it is easy to hard wire it in.----Or use a terminal strip on the motor.
Yea going this way. And no it's permanent on this boat.
 

racerone

Supreme Mariner
Joined
Dec 28, 2013
Messages
36,454
The wiring plug made for a neat installation.-----No tools required to install the motor on the boat.-----No tools required to remove motor from the boat.----I am sure you can figure out an economical way forward.
 

clemsonfor

Lieutenant Junior Grade
Joined
Sep 19, 2005
Messages
1,011
The wiring plug made for a neat installation.-----No tools required to install the motor on the boat.-----No tools required to remove motor from the boat.----I am sure you can figure out an economical way forward.
Yes. I have come up with leaving the plug in place for the highway current positive and negative as those cables are intact and still ok. I will clip the small wires on the engine side of the plug, will splice in wire drill a new hole in the motor lower cowl install a grommet and shield the wire and run those wires to the boat side harness after I strip it back to find intact wire to splice back into. Then I will put it in wire loom and wrap the whole thing back up to protect them from chaffing and the sun.
 

Crosbyman

Vice Admiral
Joined
Nov 5, 2006
Messages
5,095
tons of multi wire plugs on Amazon... since you are keeping the main connector for the high current stuff the rest can be reconnected and depending on the actual amount of wires to re joined you can even use a typical trailler male-female connector set

just find the appropriate connector for your need


https://www.amazon.ca/s?k=multi+wire+connector+plugs&crid=QKG44P7S9TI6&sprefix=multi+wire+connector+plugs+,aps,97&ref=nb_sb_noss_2
 

clemsonfor

Lieutenant Junior Grade
Joined
Sep 19, 2005
Messages
1,011
tons of multi wire plugs on Amazon... since you are keeping the main connector for the high current stuff the rest can be reconnected and depending on the actual amount of wires to re joined you can even use a typical trailler male-female connector set

just find the appropriate connector for your need


https://www.amazon.ca/s?k=multi+wire+connector+plugs&crid=QKG44P7S9TI6&sprefix=multi+wire+connector+plugs+,aps,97&ref=nb_sb_noss_2
Yea that was my original plan was to make a plug under the hood for the other like 4 wires. I was going to use an automotive waterproof connection, then I thought. That's added time to make up, one more spot for a poor connection and even though not much one more cost to the project. This motor is not coming off unless it's replaced and then it won't be a big deal to replace the wire, the whole harness at that point will likely be replaced as well. Thanks for pointing that out as it may give someone ideas in the future who may come across this. Still not out of the question but I think I will make solid splices in the small wires vs a connection.

Actually the way that my father in law or his dad had this rigged up was that they had a wire around the plug to hold it aligned perfectly and it squeezed by the plug and under the hood and bent and captured under the screws that hold the plug under the hood down. So you couldn't just unplug it you had to take the screws out and un bend the wire and work the plug and wire out all at once.
 

Crosbyman

Vice Admiral
Joined
Nov 5, 2006
Messages
5,095
up to you... connector plugs are used all over the place and some are rated water proof ! . a touch of grease helps to !
 

clemsonfor

Lieutenant Junior Grade
Joined
Sep 19, 2005
Messages
1,011
up to you... connector plugs are used all over the place and some are rated water proof ! . a touch of grease helps to !
You right. I did even mention I was going to use automotive (and probably same on new motors I just don't have anything super new) style waterproof connectors, the kind with the silicone gasket on the plug and wire. I just decided against it.
 

clemsonfor

Lieutenant Junior Grade
Joined
Sep 19, 2005
Messages
1,011
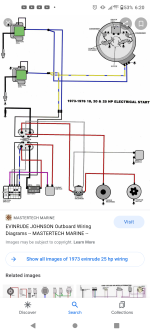
Ok , I'm about to cut the small wires from the plug under the motor cover so I can splice to them. I have been trying to think how I can figure out which black wire under hood goes where and vice versa to match them up. Looking at the wireing diagram they both power coils but one has a branch off of it so I didn't know if it mattered how there wired up. I took a volt meter and key on they both have same voltage as do both key held to start and in my head it shouldn't matter which Black wire from the boat side harness matches with what black wire under the hood. Am I thinking correctly here?
 

racerone

Supreme Mariner
Joined
Dec 28, 2013
Messages
36,454
I would be very , very careful with 12 volts around black wires.-----And 12 volts from the battery is only used to crank the motor over.-----And 12 volts from battery is not used to make spark.
 

clemsonfor

Lieutenant Junior Grade
Joined
Sep 19, 2005
Messages
1,011
I would be very , very careful with 12 volts around black wires.-----And 12 volts from the battery is only used to crank the motor over.-----And 12 volts from battery is not used to make spark.
Well they weren't 12v with key on, it was more like 10v but I just figured maybe it was from extra resistance? Haha.
 

clemsonfor

Lieutenant Junior Grade
Joined
Sep 19, 2005
Messages
1,011
This is the diagram I referred to.there two black wires that go to the coil from the switch. I assume there power wires since a coil grounds through the block.Screenshot_20220703-182046.png
 

clemsonfor

Lieutenant Junior Grade
Joined
Sep 19, 2005
Messages
1,011
Those 2 black wires have nothing to do with 12 volts or power !!!
I'm just saying what was on them. I wasn't putting power to them anywhere, just poking around with a DVM while having the key in various positions. This was a running motor as it was, I have done no wireing to it prior and just fixing the rotted wires. I am not arguing with you about what there supposed to have on them, just was posting my findings. The do have continuity between them when I have the plug disconnected from the engine, or connected .

Engine was running before , I started it up and ran it to test the lower unit. Looking at an original OMC diagram I found a pic of on eBay i see it better where there located and have them pinned out which black is which one. I'm just bypassing the plug for the small gauge wires and direct hooking them up and running them through a new grommet beside the high current starting wires that will still run through the original plug. They both will be re wrapped and then wrapped together for UV protection as well ac chaffing protection.
 
Top