1971 Starcraft Super Sport Floor Replacement and Such

turtle1173

Chief Petty Officer
Joined
Nov 29, 2001
Messages
437
Ok, so after I get this cleaned up a little more, what should I do next? Can I lay down some jb weld just right on top of that? Do I need to spray or coat it with something first to stop the corrosion? Then can I put gluvit over top of all that? Just need to have a plan.

Thanks!
 

Watermann

Starmada Splash of the Year 2014
Joined
Jan 12, 2013
Messages
13,753
Removing what is causing the corrosion and the cleaning it up should halt the process. You could skin the the pitting with JB but if it were me I would just gluvit the area since you have no holes just pitting.
 

bonz_d

Vice Admiral
Joined
Apr 22, 2008
Messages
5,276
Watching so many projects I've lost track so sorry if I missed this but did you fill it with water to check for leaks yet? I would do that next if you hadn't.
The power wash looks terrific. Before you know it you'll be putting it back together.
 

turtle1173

Chief Petty Officer
Joined
Nov 29, 2001
Messages
437
I filled up the boat again with water and simple green cleaner, after power washing it for a second time. Really filthy in there. I've got one more leak than I had before, a result of my scrubbing and scrapping of the previous gluvit or whatever it was. I think I'll be filling in some of these deeper pits with some JB weld before coating it all with gluvit.
 

bonz_d

Vice Admiral
Joined
Apr 22, 2008
Messages
5,276
Very good. Can you tell exactly where the leak is? Lose rivet that may be tightened up?
I might have to start watching CL for one of those power washers!
 

turtle1173

Chief Petty Officer
Joined
Nov 29, 2001
Messages
437
I've got several rivets I need to tighten up that are weeping. I've got some leaking at the keel, that I hope the gluvit will take care of. The newest leak is one of the pits in the section where all the previous gluvit had been spread. I'm going to fill the worst pits in with JB weld and then fill it in with gluvit. The boats in the garage with the heater on. Hopefully it will dry out soon and I can get started.
 

GoldDuster360

Petty Officer 2nd Class
Joined
Feb 2, 2015
Messages
110
What do you plan on doing for the floor? If you skip the flotation I think you have to use thicker plywood without the support it offered.
 

turtle1173

Chief Petty Officer
Joined
Nov 29, 2001
Messages
437
I'm pretty sure the flotation doesn't offer any support on this boat. I'm planning on going with the thick closed cell sheets from Lowe's for floatation. I'm using 3/4" BC plywood for the floor anyway though. I redid a starcraft several years ago with 1/2" and I was not happy with the results. The motor I'm putting on is 10HP higher than my previous motor, so hopefully that will offset the added weight.
 

Tnstratofam

Commander
Joined
Aug 18, 2013
Messages
2,679
Yep the flotation foam on most of these Starcrafts isn't structural. The deck on out SS is 1/2 inch and though it isn't very old ( Replaced by a former po ) I wish it were a bit thicker. When I strip her down for a repaint in a season or two I'll probably replace it with 3/4.
 

Woodonglass

Supreme Mariner
Joined
Dec 29, 2009
Messages
25,924
Hmm, I'm NOT a Tinner but...Wouldn't the Pour in foam or even the Pink or Blue slab foam if cut to the correct height offer support to the deck across the span of the aluminum stringers just like it does in a Fiberglass Boat??? Isn't that what's being implied and NOT structural support to the hull?:confused:
 

Tnstratofam

Commander
Joined
Aug 18, 2013
Messages
2,679
Yes the pour in foam or the pink or blue would offer support for the deck if it were cut so that it met the deck height. However most of the older Starcrafts had the old "beer cooler" foam installed in various places for flotation. That type of foam doesn't seem to offer any real support. I could be wrong, but I know the flotation foam on mine isn't structural and it's an 82. Of course you can certainly add the foam as a structural element of any resto, and It's definitely an added bonus. The pour in probably is structural I would think. Again I could be completely wrong on that.
 

Tnstratofam

Commander
Joined
Aug 18, 2013
Messages
2,679
Now that I think about it I would add or I should say will be adding the blue or pink foam to mine when I redo the deck to add not only flotation but also support to the deck. That seems like a good idea since we all seem to be trying to rebuild our boats to better than factory specs.
 

GoldDuster360

Petty Officer 2nd Class
Joined
Feb 2, 2015
Messages
110
I am not an expert on plywood but the little bit I have read up on in anticipation of redoing my floor leads me to believe thicker is not always stronger. There are some very strong marine grade plywoods, they can have more layers than BCX plywood of the same thickness and will be stronger because they have fewer voids in the middle layers that you cannot see. The floor is the one area I would pony up on the material cost because of all the work it is to replace and there looks to be a weight penalty by going on the cheap not to mention all the original parts won't fit right with a 1/4" thicker floor. I know it doesn't matter if you are changing the layout of the boat. A 9 layer 1/2" thick high quality marine plywood might be more rigid than a 3/4" 5 or 7 ply BCX and it will weigh significantly less too.
 
Last edited:

turtle1173

Chief Petty Officer
Joined
Nov 29, 2001
Messages
437
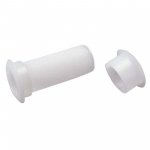
Sorry for the lack of updates lately. It's nice having a heated garage to work in. Well, we've tightened up a few rivets, put JB Weld on some of the pitting and then coated every rivet with Gluvit. Aside from that, I've got the transom epoxied. I put it in yesterday, marked and drilled the holes, then removed it. I drilled the splashwell holes larger and then epoxied them in today. I got new splashwell tubes to install at the right time.

I'm looking forward to putting this phase behind me and begin getting started on the floor!
 

jbcurt00

Moderator
Staff member
Joined
Oct 25, 2011
Messages
24,876
Do you have the Moeller flanging tool for the thru hull drains? There's a DIY tool diagram floating around here somewhere, if you need it, I'll run down a copy and post it.
 

Tnstratofam

Commander
Joined
Aug 18, 2013
Messages
2,679
Those thru hull drains can be tricky. I messed up 2 before I got them right. The key is to work slow and steady.
 

turtle1173

Chief Petty Officer
Joined
Nov 29, 2001
Messages
437
No Title

I guess I'm wimping out on trying the brass technique. I bought the nylon drain by sea dog.


There are grooves on the piece and it snaps into the smaller part. Coupling that with my epoxied holes and some 5200, I think that will work out nicely. It won't look quite as nice as the brass but, in my thinking, that's one less thing I don't have to worry about!
 

Attachments

  • photo216090.JPG
    photo216090.JPG
    36.5 KB · Views: 0

jbcurt00

Moderator
Staff member
Joined
Oct 25, 2011
Messages
24,876
Several have used similar plastic thru hulls, lots of livewell and bilge pump fittings are plastic too, you should be good. Ezmobee used the plastic and recommends them...

Still seal and bed the tubes, but having them in an epoxy plug, IMO, is a great idea.
 
Top