1971 25R71 Ignition rewire

cocotower

Seaman Apprentice
Joined
Feb 20, 2012
Messages
35
Hello all, before posting I've been reading days of 1971 25 hp Johnson posts on the web only to find nothing that describes the strange electrical wires extending out of my motor front plug.

Keep in mind that this motor cranked and ran just fine prior to me trying to rewire the ignition (new terminals, new lanyard switch, new panel). The old panel was wood and rotting and the wires were crumbly in some places. I wasn't about to get on the water like that. Now it just turns over and I can smell fuel as if I'm flooding the thing trying to crank it. The plugs are wet when I check.

The first cable (black) coming from the motor contains a white wire that I haven't gotten to read any voltage from at any point. I'm not sure what prong it's connected to or what it's for, but halfway down this black cable is a black wire inside the cable (next to the white wire)... the black wire is connected to the battery positive, so on the ignition switch side the same black wire is the 12v source for the B terminal on the switch, just so you'll know my 12v is coming from for the ignition switch. I'm not sure but if I had to guess why the black cable containing both a black and white wire doesn't have the inner black wire connected inside the motor itself to a 12v connection, is that there aren't enough prongs on the harness to use for custom purpose, so the person tapped into this black cable near the battery. Either way, 12v is connected to the ignition switch B terminal.

The second cable coming from the motor harness port (grayish) is strange because it starts with an inner green wire and white wire (both connected to pins on the port) but on the ignition switch side there are only 6 white thinner wires, all numbered. For the life of me I can't figure out how this can be. I've been in electronics since I was a kid (43 now) and I am baffled. I've followed the cable, and it goes from green + white thick wires to 6 white thin wires on the other end. I've even cut away and restripped the ignition side quite a bit.

I'm going to call this 2-to-6 cable the Mystery Signal Cable. Already proving that the white ingition side wires 6 and 7 will turn the engine over when connected to 12v, I have wired them to the S terminal on the switch. Turning the key turns the motor over, but no run.

Going into the motor is of course the battery cables, on either side of the harness port opening. Do they not make a plug that fits this port so I can just hook my wires to that so I can disconnect the motor and take it to a repair shop when needed? I find this very odd that all of the wires are hardwired to the motor when there is a port right there on the front for this purpose.

My questions for now are basic... where on earth is a diagram of the harness pins for the 25R71 1971 Johnson outboard so I can unplug those silly cables and reduce everything to one cable if possible that contains 12v, ground (battery), starter wire, and kill switch wire. I just want the darn motor to crank and have a saftey kill switch.

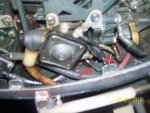
I am posting some pics I took but the camera was a little too close so they are a little blurry. Maybe you can tell what the deal is with the harness wires that are directly connected to the pins.
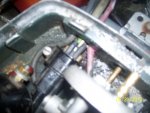
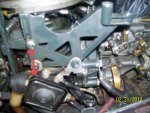
harness socket.JPG

whatsthis.jpg
what's this?

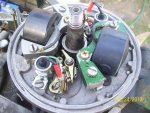
twoblackwires.jpg
what's these two wires for going underneath the flywheel? they look rather new.
 

AlTn

Commander
Joined
Mar 9, 2010
Messages
2,813
Re: 1971 25R71 Ignition rewire

can't be of much help...the ? mark pic is your starter solenoid...the 2 wires coming from under the flywheel are ground wires for the points < grounded together they cut the ignition >...at the beginning of the forum is a sticky Free Wiring Diagrams For Many Years Johnson/Evinrude...the '73 18/25 is slightly different ignition wise ,but it may be close enough to help..also there's a universal OMC wire color chart given that may help
 

will62

Petty Officer 2nd Class
Joined
Nov 25, 2011
Messages
103
Re: 1971 25R71 Ignition rewire

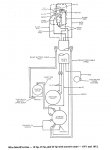
Here's a diagram for the '71 25hp:

wiring 18 20 25 1971 1972.jpg
 

cocotower

Seaman Apprentice
Joined
Feb 20, 2012
Messages
35
Re: 1971 25R71 Ignition rewire

Thanks. Part of me learning this motor is talking about it with you guys. Maybe I'll reveal some things that may help others rewire their boat easier.

When you say "ground" the two kill wires together to kill the engine, does this mean connect both wires to ground, or just connect the two wires together. There's a electrical difference.

I unplugged one of the black wires coming from underneath the flywheel and the engine still doesn't spark. I can smell gasoline as usual when I'm trying to crank her. Pretty scary.

It appears that the prongs for the harness plug have been reused, but the 2 bigger prongs on the left and right are not used. This leaves 3 prongs which definitely says a lot about what can be present at the ignition side of the cables connected to the prongs.

Knowing that there are 3 "wires" coming from the motor I have to assume that one is ground, one is kill switch, one is the starter. What other than the kill wire would connect to the raised M terminal on the ignition switch? With ground connected to the other M, and the starter to S, the engine should turn over, and if running, should kill when the key is turned back off.

A black cable containing a white wire and black wire (black is not coming from the engine, though, but from the battery +), which leaves the white wire in the black cable for Something.

The gray cable has 6 inner thin white wires, apparently 1-4 are the same and 5-6 are the starter, so I'm assuming that 1-4 are either ground or the kill wire, and that the white wire in the black cable is either ground or the kill wire. :) In that case, would it even matter since the two M terminals on the ignition switch would connect Kill to Ground in either case?

I hope I didn't blow anything in the motor trying to crank it out of water. Prior to the rewire attempt, I have cranked it about 4 times but only let it run for 5 to 10 seconds each time. Would this have fried the motor? Now I have it in a barrel of water about halfway up the shaft.
 

tx1961whaler

Vice Admiral
Joined
May 31, 2008
Messages
5,197
Re: 1971 25R71 Ignition rewire

Connect the two black wires together to kill the motor. Connecting them both to the motor block (negative battery return) at the same time would effectively be the same thing, but would require a double pole kill switch. Not practical.
Each black kill wire (one from each set of points) from the magneto hooks to an "M" terminal on the ignition switch. The M terminals are shorted when the key is in the off position and open when in the run or start position.
 

AlTn

Commander
Joined
Mar 9, 2010
Messages
2,813
Re: 1971 25R71 Ignition rewire

didn't harm the motor for that brief period, but you certainly didn't help the waterpump impeller as it requires water for its lubricant. It's best to replace the impeller on a "new to you motor anyway".
 

cocotower

Seaman Apprentice
Joined
Feb 20, 2012
Messages
35
Re: 1971 25R71 Ignition rewire

didn't harm the motor for that brief period, but you certainly didn't help the waterpump impeller as it requires water for its lubricant. It's best to replace the impeller on a "new to you motor anyway".

Ok, update: I have 6 harness prongs instead of 5 as I said earlier. The diagram for the 72-73 Johnsons seems to be the same as the 71 in my case.

I have concluded that the mystery white wire hooked to a switch on my panel was for the electric choke which the prior owner removed. I can see the red power wire dangling next to the space the e-choke goes. So this leaves 6 wires which are actually used in pairs for a total of 3 wires present at the ignition switch. The cable is using a black, green, and white set of wires but in each wire is a pair of white wires. 6 and 7 are the White wire on the harness prong side of the cable and are for the ignition.

This can only hope that the green and black wires which ARE connected in the top two prong positions are for the Kill switch. On the ignition side, I don't have those wires connected to anything at this time. So... the "kill switch" isn't even used right now.

But this is strange... the 2 black wires coming from underneath the flywheel are testing TRUE for continuity between each other when the motor is sitting dead. This either means that they serve the same purpose (which is silly), or that I melted something the other day when playing around with the ignition wires. If the black wires are close to each other under the flywheel I bet they are shorted now.

Flywheel puller here we come. Any tips on that? The Harbor Freight puller kit with all the bolts looks tempting if it doesn't break like most of their other stuff. :)
 

tx1961whaler

Vice Admiral
Joined
May 31, 2008
Messages
5,197
Re: 1971 25R71 Ignition rewire

But this is strange... the 2 black wires coming from underneath the flywheel are testing TRUE for continuity between each other when the motor is sitting dead. This either means that they serve the same purpose (which is silly), or that I melted something the other day when playing around with the ignition wires. If the black wires are close to each other under the flywheel I bet they are shorted now.
If both sets of points happen to be closed, it will show as as short.
cajuncook's post pretty well details everything:
http://forums.iboats.com/showthread.php?t=531940
 

AlTn

Commander
Joined
Mar 9, 2010
Messages
2,813
Re: 1971 25R71 Ignition rewire

HB harmonic balancer puller is what I've used to pull 6hp-25hp flywheels < ~ 45ft/lbs of torque for the flywheel nut >..advise to use grade 8 bolts , 1/4x20, and grade 8 washers as well. You can use an impact gun to remove the nut, or any means to hold the flywheel while you remove the nut < I use a strap wrench >. Expect the flywheel to be tight.
 

cocotower

Seaman Apprentice
Joined
Feb 20, 2012
Messages
35
Re: 1971 25R71 Ignition rewire

Update: to make a long story shorter, I bought a puller from Harbor Freight but used 3 slimmer bolts from my own collection to remove the flywheel. One coil was blown apart a little. I went to a marine store and bought a tune up kit and one coil. They only had one coil. The tune up kit was 2 condensers and the points. Changing everything out was fairly easy but it took some time because I cleaned the grime off of stuff as I went along.

Attempting to crank the motor first resulted in what appeared to be friction or drag on the flywheel. The battery drained down because of this. No crank, but she was turning over until the battery died. I have since reseated the coils and will be trying to crank her as soon as the battery comes back up.

So this as gone from an ignition switch rewire to getting inside the motor and changing out the points, condenser, and coil(s).

I will post some Before and After pictures shortly of my progress I made today.
 

cocotower

Seaman Apprentice
Joined
Feb 20, 2012
Messages
35
Re: 1971 25R71 Ignition rewire

She's running! New points, condensers, and one new coil, fired right up and she's purring like a kitten. I'm impressed.

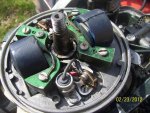
after.jpg

before.jpg

Next on the list... put an electric choke back in then wire everything back up and try her out on the lake sometime next week, hopefully.

Does this motor have an alternator hidden somewhere?
 

cocotower

Seaman Apprentice
Joined
Feb 20, 2012
Messages
35
Re: 1971 25R71 Ignition rewire

I know I started a new thread about a choke solenoid, but I'll ask here as well: where can I find one? The previous owner had 2 fried ones thrown in the boat which makes me believe something causes them to go bad easily, or that they were already used and were due. Either way, hooking them to power shorts out the battery. These things really need fuses or something would burn up quick if one goes bad?
 

cocotower

Seaman Apprentice
Joined
Feb 20, 2012
Messages
35
Re: 1971 25R71 Ignition rewire

Update: key switch is wired up finally. Kill switch is working by turning the key to off.

After cranking the boat about 5 times in one minute, no more cranks... I went to test the solenoid and there was no continuity between the two large side terminals (from battery 12v, to starter 12v) when the key was turned. After a few days of doing other things to the boat waiting on a trip to town to buy a new solenoid, I determined that maybe the starter was going bad and was causing the solenoid to stick or burn up, so I might as well learn how to rebuild the starter in the mean time.

Today I took the starter off and disassembled it. It was real gunky inside. Just nasty. Ashy-oily residue was on almost everything. The copper/gold looking contacts at the bottom were blackish. It took me half the day to clean that baby up. I took my drill and a round wire brush and went right down the middle of the starter between the magnets and cleaned them real good, briefly until they looked clean. I sprayed a whole $3 can of brake parts cleaner on everything until most of the gunk blew off of the copper windings and so forth. After it dried I took light sandpaper to the some of the other surfaces until they shined up like almost new condition. Putting the contact points back in place and those springs was a ***** but I lined everything back up and slide those long bolts back in and screwed it all down tight finally. Whew.

(I still need to grease the starter)

Anyway, I put the starter back in the motor, turned the key, and she cranked up pretty quick! The solenoid is now "working". I say this because maybe the starter caused it to stick the other day and it "could" go bad again I suppose. She fires up a lot quicker. I cranked her once just by hitting the key but mostly it takes 3 or 4 turns of the flywheel.
 
Top