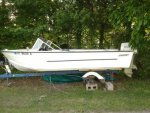
1970 Starcraft Jupiter project

Dave in VT

Cadet
Joined
Jul 14, 2012
Messages
13
Hi Everyone,
I recently bought my neighbor's 1970 Starcraft Jupiter with a 60 HP Evinrude. He hadn't used it since 2005 and just wanted it out of his yard, so he only asked $100 for the whole thing, including the trailer.

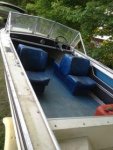
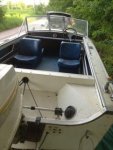
It seemed in great shape, but I can now see just how much more work this old beauty needs before we can play... and this is my first boat, so I'm just trying to figure it all out. I've spent some time exploring this web site and it's clear that this is the place I need to be!

I have the trailer in good shape: I replaced the wheel bearings, tires, tail light bulbs and the hitch (which was in rough shape). I also bought some 1" steel cable to replace the tow rope, but haven't yet replaced the old rope (I have a second piece of rope attached to the bow just in case the old one gives out).
I also managed to get the motor off the transom by using a block and tackle attached to the ceiling of my in-laws garage :rolleyes:

Now I need to replace the transom and floor (and have a look at the bilge pump and whatever else might be down there).

So here are my questions:
I was thinking of using marine grade plywood and coating it in epoxy for the transom and the floor. I see that many folks have used exterior grade ply throughout and then glassed over everything. I am hoping that Marine grade coated in epoxy might be enough, and would save me the trouble of glassing, which I figure to be messy and time-consuming. What do you think? I have no doubt that glassing will last longer, but by how much? And how hard is it to glass? What tools would I need to spread the epoxy and roll out the glass?

Also, I've been reading about gluvit. Once I get all the floor and foam out, should I coat the bottom in gluvit? do I use a brush? Do I need to check for holes first? I read about someone who filled the empty hull with water to check for holes. Is that a good idea?

Next, what's the best thing for covering the new floor? Someone suggested boat vinyl. Where's the best place to find that stuff? And does it require a special glue?

For the transom, I guess I'll get some 5200 and coat the inside of all holes with that before installing the bolts and drains. I noticed that the splashwell drains are flared on both sides of the transom. I will grind out the wood side and then work them out the back. Do you recommend replacing those with aluminum drains again (I read about a trick to flare them with a lock nut and 3/4" bolt) or should I just use the plastic things that snap together?

Any thoughts on the best way to laminate 2 pieces of ply together in order to get the thickness I need for the transom? I am afraid of screwing them together because that will mean more holes, right? I was thinking of using epoxy resin between them and then setting a weight on top to press out any air pockets.

Should I paint the transom wood after installing, or can I wait to paint that when I paint the whole boat (probably next summer because i want to use it this summer!)? Or do i even need to paint the part of the transom that is under the splashwell?

What kind of paint should I use to paint it all? Do I need something different to paint the aluminum than the wood on the transom?

Also, when I took off the motor, the bolts holding it on appeared to be steel bolts with aluminum nuts (the nuts are definitely aluminum, but the bolts are about as heavy as I'd expect from steel), which I thought that was a no-no... any thoughts on replacement nuts/bolts?

Finally, one of the window frames is broken right at a corner. I was thinking of simply finding a small l-bracket and riveting that to keep the corner together. Is the frame made of aluminum or steel (in other words, should I get a stainless l-bracket, or an aluminum one)?

Thanks in advance!!
 

Dave in VT

Cadet
Joined
Jul 14, 2012
Messages
13
Re: 1970 Starcraft Jupiter project

Oh yeah, here are some pics of the boat when I got it... so psyched to get it looking good and out on the lake!

480FAB76-BB34-4DCE-B54D-3C8894556D5B.jpg

20D80430-D2D6-4375-B525-C14E7EA10710.jpg

27AA80AE-BFE8-4155-BF88-65197C0B3B7D.jpg

F62F0ED9-19D6-408B-8017-3433D50E0C08.jpg
 

Captmills

Petty Officer 1st Class
Joined
Aug 22, 2009
Messages
374
Re: 1970 Starcraft Jupiter project

Great boat for $100. Exterior grade ply 3/4 two pieces w/ gorilla glue is good for the transom. epoxy would be good, several coats and real good on the edges. I used 5/8 on the floor and sealed both sides, top and bottom. my engine was bolted on with aluminum bolts. I did not paint my wood on the transom, left it natural, and the dash as well. painted the boat with rustolium and put marine grade carpet on the floor...today:) oh and by the way, Welcome to the insanity that is Starcraft!
 

North Beach

Commander
Joined
Sep 29, 2008
Messages
2,022
Re: 1970 Starcraft Jupiter project

I was thinking of using marine grade plywood and coating it in epoxy for the transom and the floor. I see that many folks have used exterior grade ply throughout and then glassed over everything. I am hoping that Marine grade coated in epoxy might be enough, and would save me the trouble of glassing, which I figure to be messy and time-consuming. What do you think? I have no doubt that glassing will last longer, but by how much? And how hard is it to glass? What tools would I need to spread the epoxy and roll out the glass?

----Take a few minutes and read thru my restore thread. It's not the only way to do things but it will give you answers to many of your questions.

----I used the marine ply and glassed mine in (didn't have to do my transom) and it worked out great. 1/2" for the deck glassed w/epoxy over new foam is all the floor you need (I go 260 and have carried 10 people in the Liquid Limo. All you need is the materials, brush, roller, and some of those plastic squeegees like decal people use and the epoxy folks carry them. I had no experience and it went great.

Also, I've been reading about gluvit. Once I get all the floor and foam out, should I coat the bottom in gluvit? do I use a brush? Do I need to check for holes first? I read about someone who filled the empty hull with water to check for holes. Is that a good idea?

----Plug the drain hole, put a few inches of water in the boat and mark all the leaking rivets. Re-buck the rivets using two sledge hammers and one of your buddies. Fill and check again. Repeat until the leaks are gone. Then wire wheel the inside (if needed) and apply gluvit by brush to all the rivets (again look at my resto to see how I did this).

Next, what's the best thing for covering the new floor? Someone suggested boat vinyl. Where's the best place to find that stuff? And does it require a special glue?

----I bought my vinyl from a guy on ebay and the marine glue sold by cabelas.

For the transom, I guess I'll get some 5200 and coat the inside of all holes with that before installing the bolts and drains. I noticed that the splashwell drains are flared on both sides of the transom. I will grind out the wood side and then work them out the back. Do you recommend replacing those with aluminum drains again (I read about a trick to flare them with a lock nut and 3/4" bolt) or should I just use the plastic things that snap together?

Any thoughts on the best way to laminate 2 pieces of ply together in order to get the thickness I need for the transom? I am afraid of screwing them together because that will mean more holes, right? I was thinking of using epoxy resin between them and then setting a weight on top to press out any air pockets.

Should I paint the transom wood after installing, or can I wait to paint that when I paint the whole boat (probably next summer because i want to use it this summer!)? Or do i even need to paint the part of the transom that is under the splashwell?

----I'll let someone else answer the transom questions since I've never done one and I'm not gonna offer an opinion.

What kind of paint should I use to paint it all? Do I need something different to paint the aluminum than the wood on the transom?

----The sky's the limit on paint. I used Petit Easypoxy and it worked out great. Some others have not had a good experience with it I'm not sure why. I think for every brand there are guys that love it and guys that hate it. Also you'll need zinc chromate for any bare spots of aluminum. (again covered in great detail in my resto thread).

Also, when I took off the motor, the bolts holding it on appeared to be steel bolts with aluminum nuts (the nuts are definitely aluminum, but the bolts are about as heavy as I'd expect from steel), which I thought that was a no-no... any thoughts on replacement nuts/bolts?

----I'm an I/O guy but I would think Stainless Steel would be the way you want to go. Someone else should answer that one.

Finally, one of the window frames is broken right at a corner. I was thinking of simply finding a small l-bracket and riveting that to keep the corner together. Is the frame made of aluminum or steel (in other words, should I get a stainless l-bracket, or an aluminum one)?

----It should be aluminum.

----Hope I was at least a little helpful? And welcome to iBoats and The Starmada....
 

starcrafter65

Chief Petty Officer
Joined
Jun 9, 2009
Messages
645
Re: 1970 Starcraft Jupiter project

Those Jupitors are nice sizes!!

Resist the urge to strip the to bare aluminum!!

Unless you want to go naked!!
 

bananaboater

Ensign
Joined
Jul 27, 2009
Messages
932
Re: 1970 Starcraft Jupiter project

A hundred bucks????? I have some pics of how I covered my decking with DecoDot vinyl. Good product and great glue! I had to peel some back and had a helluva time. Cut the glue with water to a thin honey consistency. Roll out all air bubbles. It does have to be rolled over the edge and stapled otherwise the edge will curl. Looking forward to seeing progress. Welcome to the club or cult!
 

Dave in VT

Cadet
Joined
Jul 14, 2012
Messages
13
Re: 1970 Starcraft Jupiter project

Thanks to all for the responses!
Still haven't decided whether or not I'll la in some fabric when I epoxy over the transom and floor cutouts...

Have gone back and forth over marine carpet vs vinyl, too.

Mostly have to find the time to get cracking on this!

Will post pictures as I get stuff done.

Cheers,
-Dave
 

barato2

Commander
Joined
Dec 7, 2010
Messages
2,956
Re: 1970 Starcraft Jupiter project

welcome to the mob. what a buy! NB covered most of your Qs nicely.

epoxy works well for transom halves. remember that your original floor was uncoated plywood, probably not even marine, so anything you do will be an improvement. actual glass cloth on the floor is overkill in most cases. stainless on the motor bolts, alum on window channel. you'll need to coat exposed portion of transom in something to protect wood from water intrusion and epoxy from UV damage.
 

North Beach

Commander
Joined
Sep 29, 2008
Messages
2,022
Re: 1970 Starcraft Jupiter project

welcome to the mob. what a buy! NB covered most of your Qs nicely.

epoxy works well for transom halves. remember that your original floor was uncoated plywood, probably not even marine, so anything you do will be an improvement. actual glass cloth on the floor is overkill in most cases. stainless on the motor bolts, alum on window channel. you'll need to coat exposed portion of transom in something to protect wood from water intrusion and epoxy from UV damage.

Yea just remember that MOST of the boats we are restoring here have, at a minimum, rotted floors. I'd like to see what Old Overkill NB's deck looks like in 20 years. That one thin ply of glass adds a whole lot of strength to a deck.

I'm not sayin you have to glass. I won't even be rude enough to call it underkill. I think it's your decision. I just tried to answer the difficulty question. I'm just one of those guys that figures heck, while I have it all torn apart......

We just have some folks here who got up one day and decided that decks didn't need to be marine plywood, and they didn't need to be glassed and now they're even gonna start callin it overkill.
 

barato2

Commander
Joined
Dec 7, 2010
Messages
2,956
Re: 1970 Starcraft Jupiter project

hey NB---

didn't mean to raise any hackles there. i think we're already seeing a difference between the build needed for small-lake boats and ones for Great Lakes or ocean duty, and that's what i was referring to.

i respectfully doubt that your 1/2" + resin-n-cloth floors will have significant difference from most people's 3/4" + epoxy resin-with-no-cloth floors in terms of longevity or flex. just 2 ways to get to same point. you went with floor material 1/8 or 1/4" thinner than what the factory used in either of my boats....i would have added a layer or 2 of cloth too. Old Overkill's deck will look great in 20 years. but so will most of the others, esp if the end grain has been well saturated with epoxy. in fairness, the original deck probably looked pretty decent when it was ONLY 20 yrs old unless it had been left outside uncovered. we;re just trying to make abuse-proof, idiot-proof, age-proof floors.

the folks who got up one day and decided the floor didn't need to be marine ply ain't here, they're in Goshen, IN. quoting from a Starcraft brochure: "Most of our floors are made from 3/4" exterior-grade plywood which provides plenty of strength." (emphasis added). in this same page they make multiple references to "marine" grade carpeting and in another one i have they talk about the reason they use 5052 aluminum as being corrosion resistance in a marine environment(true, it's the most corrosion-resistant common AL alloy), so i think they know the difference between "marine" and "exterior". pretty sure if they were spending the considerable extra $ for marine ply instead of exterior, they would have trumpeted the fact.

for the record, i'm not saying NOt to use marine ply. if you can get it locally, it's better than the Arauco or other exterior grade, just in terms of less voids. you can tell it's noticeably heavier than the plain stuff. BUT......it's not locally available where many Madans live and it's not an unreasonable resto decision to go with exterior or Arauco or oak instead of dropping the big bux to buy AND ship4x8 sheets of marine. remember that bottom feeder part?
 

North Beach

Commander
Joined
Sep 29, 2008
Messages
2,022
Re: 1970 Starcraft Jupiter project

Dave sorry for the hijack!! B2 it's all good bud. I takes and I gives. I just don't wanna hear that my glassed in floor was overkill. Now maybe all the fancy wood interior could be another story. Just remember the folks who offer products to the general public would love and actually need to sell you another one in a few years. In the 60's the decks were all 1/2" and that blurb you are quoting came in what brochure? Like 80's or something.

I still hold love for all my friends here. I guess I just like a little debate every once in a while. Remember, Once I thought I was wrong, but I was mistaken....

And do I think you have to glass in your deck, Heck no. But I glassed in mine.
 

GA_Boater

Honorary Moderator Emeritus
Joined
May 24, 2011
Messages
49,038
Re: 1970 Starcraft Jupiter project

Dave - See how we give and take. Sometimes we get sent to bed with no supper. That's hard on a growing Tin Head. LOL You do have plenty of choices and believe this - None of them are wrong. About the only bad thing is using pressure treated wood cuz it kills a tin boat fast. The other thing is each builder has a different set of goals and/or budget. So we end up with many ways to get the end result- A Starcraft On The Water.

And North Beach - You didn't over-build. You built to a different standard, is all. Some of us build Yugos, some build Chevies, some build Caddies, You built the Liquid Limo - a class unto itself.
 

barato2

Commander
Joined
Dec 7, 2010
Messages
2,956
Re: 1970 Starcraft Jupiter project

NB, hope you realize that you now have me thinking of adding some cloth to mine......i realized when i was looking at bracing the stringers how much the floors contribute to the overall stiffness of the structure, tying the stringers to ribs and tying whole mess together longitudinally. could be significant effect for running west coast river bars or on Grt Lakes. and i'm hardly able to say anything about fancy wood interiors, since i'll be installing the flamed maple trim on the dash this week

i think the brochure was from early 80s judging by pic of Mariner but i'm far from an expert. but i'm sure that the floors i pulled out of my 1964 and 1965 boats were 5/8" rather than 1/2".

Dave---sorry abt hijack. the main thing to remember is that what kills these boats and causes us to be able to buy em for so cheap is leavin em outside uncovered.....this is why we're all having to develop some expertise on floor and transom replacement. skimp where you need to, just not on safety or on a good cover (unless you have indoor storage for your boat)
 

North Beach

Commander
Joined
Sep 29, 2008
Messages
2,022
Re: 1970 Starcraft Jupiter project

I agree I've been able to keep mine inside so far.And mine was straight up 1/2 inch. Did you keep and use the flat metal at the plywood seams?
 

North Beach

Commander
Joined
Sep 29, 2008
Messages
2,022
Re: 1970 Starcraft Jupiter project

Dave - See how we give and take. Sometimes we get sent to bed with no supper. That's hard on a growing Tin Head. LOL You do have plenty of choices and believe this - None of them are wrong. About the only bad thing is using pressure treated wood cuz it kills a tin boat fast. The other thing is each builder has a different set of goals and/or budget. So we end up with many ways to get the end result- A Starcraft On The Water.

And North Beach - You didn't over-build. You built to a different standard, is all. Some of us build Yugos, some build Chevies, some build Caddies, You built the Liquid Limo - a class unto itself.

Yea just wished I'd went with the V8....
 

Captmills

Petty Officer 1st Class
Joined
Aug 22, 2009
Messages
374
Re: 1970 Starcraft Jupiter project

My 65 had 1/2 inch and I replaced with 5/8 and used bisquits on the seams and then glassed the seams...on the other hand the floors I took out were 44 years old, exterior grade plywood from a salt water enviroment so what exactly is overkill? anything above factory?
 

barato2

Commander
Joined
Dec 7, 2010
Messages
2,956
Re: 1970 Starcraft Jupiter project

NB--

now you got me curious. i'm going to re-measure the old stuff and see if i was wrong. my wife tells me it's happened before.

i still have the alum joiner strips but am going to use scrap plywood instead....the folks who have done it (GA Boater, among others) say it makes the floor super rigid. by the time i complete that and the reinf under where the console and seat box will go, i may have a mostly-1.5" floor! did someone say "overkill"? :redface:

Dave, have you figured out yet that you've stumbled into the Tin Lunatic Asylum? boat resto with Dr. Tarr and Prof. Fether......:eek:
 

North Beach

Commander
Joined
Sep 29, 2008
Messages
2,022
Re: 1970 Starcraft Jupiter project

OK now I'm confused. If the joiner strip lays on the end of the starboard to port stringer and lays on the long bow to stern stringer and the void is filled with rigid insulation then how can you go wrong? You fasten thru the plywood decking, into the flat seam joiner, and into the stringers and everything becomes one. Why are people replacing the metal with plywood strips??? and doesn't that jack up the deck height? Then you have to shave your side panels (if applicable) just like when you convert from 1/2" to 3/4" because you've raised everything and didn't have to. Not to mention adding more wood into that hot bilge area to absorb more water and fail later. I had no idea people were doing this. Not arguing here just wondering why reinvent the wheel?
 

jbcurt00

Moderator
Staff member
Joined
Oct 25, 2011
Messages
25,046
Re: 1970 Starcraft Jupiter project

In my case, I wont have the metal joiner strip, its missing from previous floor repairs. But I will have plenty of extra ply. I think several threads have also commented on having swiss cheese joiner strips. Those of us in less active boating areas, then the Great Lakes & other high traffic SC havens:), may have limited access to some materials others can get from several different places w In 10min of home.

The ply joiner usually stops at the stringers, it does not across them, so no excess height.

In fact, I'm missing all the stringers in both tinny's too:mad:

I suspect that there are options online to order metal, but many just don't because of time & cost when the ply is already here & in use for the deck. Compared to how the decks were built originally, not much water intrusion protection, if any, sealing the ply joiners w/ the same process as the deck, in my mind, puts us ahead.
 
Last edited:

GA_Boater

Honorary Moderator Emeritus
Joined
May 24, 2011
Messages
49,038
Re: 1970 Starcraft Jupiter project

Same as JB. I only had one swiss cheese strip. And the joiner is on either side on the stringer. Close, but not over so the height of the floor is the same except for the 5/8" instead of the original 1/2". And I made new side panels so it was adjusted during the cut. I couldn't find AL strips that were even close to the original.

Sorry, Dave. We're still being DB Cooper and hijacking. :facepalm:
 
Top