1968 StarCraft Holiday restoration

jdvasher

Petty Officer 1st Class
Joined
Jul 10, 2019
Messages
366
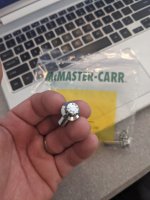
Also wanted to share something. If you are looking for ARP Bolts but need just one or some random number, Mcmaster-Carr sells them. They don't list the brand but every time I have ordered the high strength 12pt SS bolts, they show up with the ARP stamp.
 

Attachments

  • PXL_20210702_205221638.jpg
    PXL_20210702_205221638.jpg
    1.5 MB · Views: 10

jdvasher

Petty Officer 1st Class
Joined
Jul 10, 2019
Messages
366
I had most of the parts laying around for this so spent some time putting together this control box for running the engine outside of the boat. I want to to the full break in and verify the cam is ok before putting back in the boat this time. I really do not want to go through this whole process again, plus its getting harder and harder to find some of these parts.
 

Attachments

  • PXL_20210704_210010542.jpg
    PXL_20210704_210010542.jpg
    2 MB · Views: 5

jdvasher

Petty Officer 1st Class
Joined
Jul 10, 2019
Messages
366
Checked and rechecked all the specs and put the rotating assembly together today. The pistons were still good so they were just cleaned and fitted with new rings. checked everything with plastigage. I'm still waiting on some parts but should have everything this week.
 

Attachments

  • PXL_20210706_004608455.jpg
    PXL_20210706_004608455.jpg
    4 MB · Views: 7
  • PXL_20210706_004624745.jpg
    PXL_20210706_004624745.jpg
    4.6 MB · Views: 7

jdvasher

Petty Officer 1st Class
Joined
Jul 10, 2019
Messages
366
So I'm not sure how I didn't catch this before but it appears that someone before me had switched out the mercruiser crank gear with an off the shelf GM 151 gear. Apparently GM clocked the crank gear +3.75 Dungarees for the mercruiser engine. The gears are identical other than that. I will be an expert on this engine by the time I am finished with it haha.
 

Watermann

Starmada Splash of the Year 2014
Joined
Jan 12, 2013
Messages
13,753
Dang man that's a bunch of nerve racking work you're doing, at least for me it would be as wondered if I'm doing it all right.
 

jdvasher

Petty Officer 1st Class
Joined
Jul 10, 2019
Messages
366
Dang man that's a bunch of nerve racking work you're doing, at least for me it would be as wondered if I'm doing it all right.
It is for me as well. Cross referencing part numbers and on the phone all morning. New gear is on the way, just sucks because I'll have to pull the crank to replace it since the old style gears have no threaded holes to work with a regular puller.
 

Watermann

Starmada Splash of the Year 2014
Joined
Jan 12, 2013
Messages
13,753
If you're not going to use that gear again is it possible to tack weld the all thread on and pull it?
 

jdvasher

Petty Officer 1st Class
Joined
Jul 10, 2019
Messages
366
If you're not going to use that gear again is it possible to tack weld the all thread on and pull it?

That would be a great idea if I still had a welder. that said I might see if I can borrow one. it would definitely save a bunch of time.
 

jdvasher

Petty Officer 1st Class
Joined
Jul 10, 2019
Messages
366
If you look close you might be able to see the difference. its only a few degrees. I think i will pick up a cheep degree wheel kit so I can reference everything against the specs on the cam and verify the timing is right. will give me some extra piece of mind. The picture on the right is the correct mercruiser gear
 

Attachments

  • PXL_20210706_024314522.jpg
    PXL_20210706_024314522.jpg
    298 KB · Views: 13
  • s-l225.jpg
    s-l225.jpg
    11.6 KB · Views: 13

jdvasher

Petty Officer 1st Class
Joined
Jul 10, 2019
Messages
366
I wasn't sure if I would be able to drill this or not but the cobalt bit cut better than I expected. Only took about 10 minutes to drill and tap these two holes and pulled the gear right off. I used the stainless sheet as added protection from the drill going through the gear.
 

Attachments

  • PXL_20210707_210429110.jpg
    PXL_20210707_210429110.jpg
    3.1 MB · Views: 7
  • PXL_20210707_210248559.jpg
    PXL_20210707_210248559.jpg
    3.2 MB · Views: 6
  • PXL_20210707_205219741.jpg
    PXL_20210707_205219741.jpg
    1.8 MB · Views: 7
  • PXL_20210707_204526762.jpg
    PXL_20210707_204526762.jpg
    2.8 MB · Views: 7

jdvasher

Petty Officer 1st Class
Joined
Jul 10, 2019
Messages
366
Head is back on, cleaned the head bolts on the wire wheel, coated with permatex aviation sealant and torqued to 93pounds. I took the oil pump apart for inspection and the gears were a little chewed up so I have a new one on the way. Right now it looks like the crank gear is the big holdup as it wont be here until Monday.
 

Attachments

  • PXL_20210709_020109259.jpg
    PXL_20210709_020109259.jpg
    3.8 MB · Views: 2
  • PXL_20210709_020115297.jpg
    PXL_20210709_020115297.jpg
    4.1 MB · Views: 2

jdvasher

Petty Officer 1st Class
Joined
Jul 10, 2019
Messages
366
Just finished checking cam lift to the Melling cam spec's and the existing gear retards the cam timing by 2 degrees.
 

Attachments

  • PXL_20210710_140447418.jpg
    PXL_20210710_140447418.jpg
    2.3 MB · Views: 6

jdvasher

Petty Officer 1st Class
Joined
Jul 10, 2019
Messages
366
Worked on installing the new JL head unit and making modifications to the dash. I'm still not sure how I want to do this part, I guess I'll think on it for a bit before riveting anything in place. I also need to play around with speaker placement. If anyone has any input on this I would love to hear it.
 

Attachments

  • PXL_20210710_195111317.jpg
    PXL_20210710_195111317.jpg
    4.2 MB · Views: 13

jdvasher

Petty Officer 1st Class
Joined
Jul 10, 2019
Messages
366
Installed the oil pressure bypass valve then did some work on the intake. removed the carb studs and used a stone to smooth the surface. There was some corrosion and it was quite deeper than I thought. added sealant to the studs then reinstalled. I was going to start on the carb but I ran out of time for the day. I ordered a kit from mikes carbs and it looks to be much better quality than the one I got last time.
 

Attachments

  • PXL_20210711_024441923.jpg
    PXL_20210711_024441923.jpg
    3.5 MB · Views: 6

Watermann

Starmada Splash of the Year 2014
Joined
Jan 12, 2013
Messages
13,753
Man I can't wait to hear that motor purr like a kitten and scoot over some waves. 😃
 

jdvasher

Petty Officer 1st Class
Joined
Jul 10, 2019
Messages
366
Man I can't wait to hear that motor purr like a kitten and scoot over some waves. 😃
Man I really hope to hear that soon as well. The motor problem by itself is not that bad but the amount of time it took waiting on the machine shop and delivery of parts was painful. Every time I turn around there is another part, gasket, or seal that I need and that adds another week of waiting.

That said, I think it will be ready for break-in by the weekend. I installed the lifters and valvetrain last night along with the oil pan and primed the system (which I didn't do last time :( 
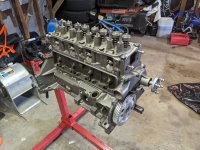
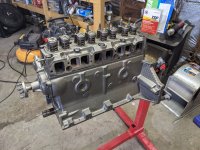
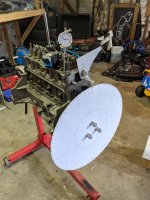
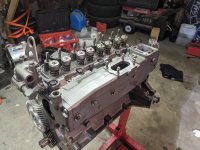
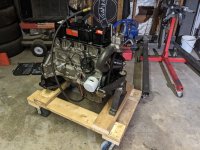
) Just need to set the valve lash and button up the remaining accessories and it will be ready to start.
 

jdvasher

Petty Officer 1st Class
Joined
Jul 10, 2019
Messages
366
I guess the one bright side to all of this down time is I was able to focus on getting the engine cleaned up and coated the way I originally planned. Even if it don't run, it will look purdy.. lol
 

jdvasher

Petty Officer 1st Class
Joined
Jul 10, 2019
Messages
366
New temporary home. I cut up and repurposed the parts from the boat dolly to make an engine test stand.
 

Attachments

  • PXL_20210716_025200267.jpg
    PXL_20210716_025200267.jpg
    3.9 MB · Views: 18

jdvasher

Petty Officer 1st Class
Joined
Jul 10, 2019
Messages
366
I ordered the paint today. probably wont paint until the end of the season but I wanted to have it here just in case. I going to do Interlux Flag Blue and the Hatteress off white stripe down the middle. Similar scheme to this boat I found on the interwebs.
 

Attachments

  • XK19-Shoot-Out (1).jpg
    XK19-Shoot-Out (1).jpg
    62.4 KB · Views: 19
Top