1968 Starcraft Chieftain 21

OldAlewife

Cadet
Joined
Aug 11, 2023
Messages
6
Hello all!
New member here. Unless I glanced over it, I didn’t notice a member intro section to post in. Forgive me if this is in the wrong spot.
I’ve stalked around for a while working on my older outboards. My name is Matt, I live in Michigan and do a LOT of fishing and adventuring around the Great Lakes.
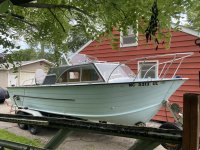
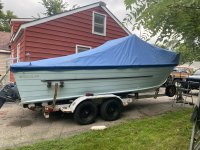
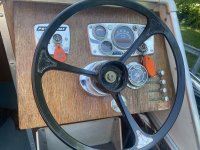
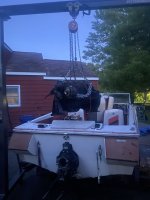
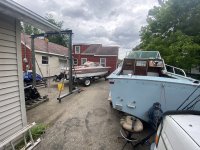
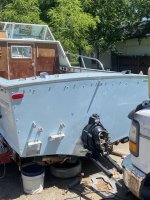
Recently picked up a boat I’ve dreamed about since I was very young -a classic Starcraft Chieftain. Seems to be mostly original, and to my naive eyes, looks to be in great shape.

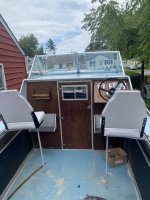
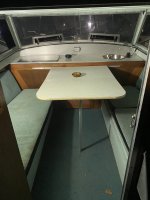
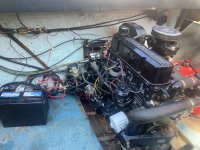
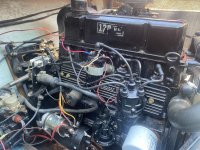
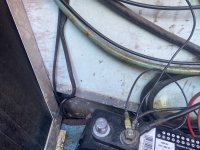
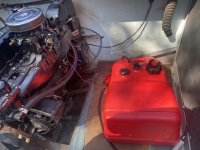
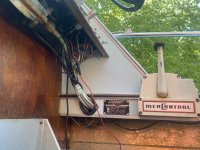
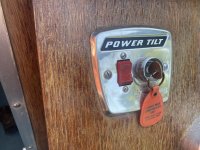
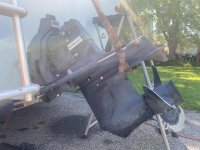
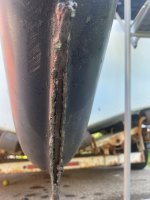
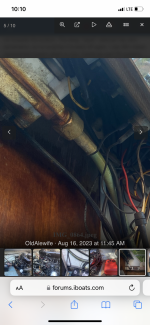
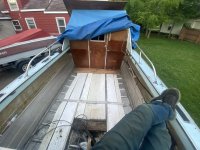
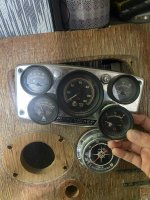
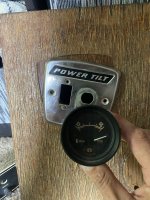
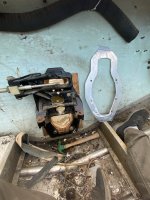
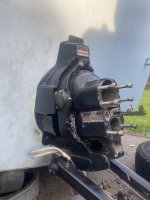
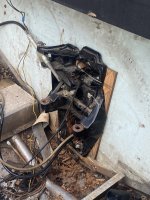
All the lights work, the glass is in tact, the floor and wood overall is nice (could use a refinish in spots) no scrapes or dings in the hull. Engine is the 120 mercruiser. The engine looks clean, but the guy couldn’t get it to fire up on fuel or spray. Claims the carb has been rebuilt. Definitely isn’t sparking. Has the pertronix installed with the flame thrower coil. Outdrive needs the most help, with a busted off skeg and a poor attempt at a repair, plus what seems to be non functioning power tilt. Rubber boots inside look and feel great, and someone has already drilled access holes in for the hose clamps.

Before I type out an entire novel with all the details I’ve discovered since hauling it home (a 200 mile journey) here’s some pics of its current condition (hopefully these upload fine. Been a long time since I was active on a forum)

I bought it fully expecting to completely rebuild the engine and outdrive, as I plan on using it for multi night trips around the Great Lakes. Mostly Huron and Superior. I’d like a reliable adventure machine. Right now I venture quite a ways out from shore in my little 14’ mirrocraft, trolling for salmon and walleye. Can’t wait to be in a bigger craft with somewhere to escape the rain & overnight in.
I have rebuilt old motorcycle and old trucks from the frame up and taken them all over the continent, so I’m hoping with some help from you guys I can do the same over water. Look forward to keeping this thread updated as I progress 🍻
 

Attachments

  • 71372117886__0F0E861A-B295-43FC-A92C-7B84A3A13C9F.jpeg
    71372117886__0F0E861A-B295-43FC-A92C-7B84A3A13C9F.jpeg
    3.5 MB · Views: 18
  • 71372119403__19786F8E-E7F6-4516-8E5F-388B32687DC4.jpeg
    71372119403__19786F8E-E7F6-4516-8E5F-388B32687DC4.jpeg
    1.9 MB · Views: 17
  • IMG_0737.jpeg
    IMG_0737.jpeg
    3.4 MB · Views: 17
  • IMG_0714.jpeg
    IMG_0714.jpeg
    2 MB · Views: 16

OldAlewife

Cadet
Joined
Aug 11, 2023
Messages
6
Here’s some more pictures of the important/ugly stuff.
Wiring looked like a mess at first glance, but it’s fairly easy to trace each one. Steering seems to be hydraulic? Moves very smooth and easy. Transom looks very solid, not even any dry rot towards the bottom. The skeg “repair” attempt has zero penetration, so no surprise it busted off again. I see SEI makes replacement lowers which is nice. Outdrives and Tilt systems are completely foreign to me. Thank god for the university of YouTube.
 

Attachments

  • IMG_0860.jpeg
    IMG_0860.jpeg
    2.9 MB · Views: 14
  • IMG_0861.jpeg
    IMG_0861.jpeg
    2.7 MB · Views: 12
  • IMG_0862.jpeg
    IMG_0862.jpeg
    2.7 MB · Views: 12
  • IMG_0863.jpeg
    IMG_0863.jpeg
    2.4 MB · Views: 14
  • IMG_0864.jpeg
    IMG_0864.jpeg
    2.6 MB · Views: 14
  • IMG_0865.jpeg
    IMG_0865.jpeg
    2.7 MB · Views: 14
  • IMG_0866.jpeg
    IMG_0866.jpeg
    2.9 MB · Views: 13
  • IMG_0867.jpeg
    IMG_0867.jpeg
    2.7 MB · Views: 13
  • IMG_0868.jpeg
    IMG_0868.jpeg
    2.1 MB · Views: 13
  • IMG_0869.jpeg
    IMG_0869.jpeg
    1.4 MB · Views: 13

OldAlewife

Cadet
Joined
Aug 11, 2023
Messages
6
not hydraulic steering. its cable steering. welcome aboard the chieftain adventures. lol.
Is this just a sheath for the cables that keeps lube in? Some liquid residue around the gearbox and thick line.
Our current woe is trying to figure out why we don’t have spark at the plugs when every other ignition component is getting power/sending signals. More details I’ll type out in a dedicated post.
 

Attachments

  • IMG_0879.png
    IMG_0879.png
    4 MB · Views: 4

1975oday22

Chief Petty Officer
Joined
Sep 2, 2022
Messages
596
yes thats cable steering. liquid or thick residue is usually oil or grease used in the cable to keep it lubricated....and working as it should. if it was hydraulic you would have a helm that had 2 barbs on the back of it being hydraulic pump. and 2 hoses running to back of stern to the engine with a piston there for steering. picture for hydraulic reference
 

Attachments

  • us_YYDJHK6400A-3TJ22V0_goods_img_big-v6_hydraulic-boat-steering-kit-m100-1.2.jpg
    us_YYDJHK6400A-3TJ22V0_goods_img_big-v6_hydraulic-boat-steering-kit-m100-1.2.jpg
    156.6 KB · Views: 2

OldAlewife

Cadet
Joined
Aug 11, 2023
Messages
6
Alright time for an update!
Lot of words here, and then a couple questions at the very end.

Almost a year in now. The amateur boater in me quickly learned all those hard lessons about these projects taking time and lots of money. The more I got into this, the more I learned I need to replace. Buy once cry once, as they say. No sense in rushing or cutting corners now. I’m fully committed.

Discovered I had…probably a first year MC-1. Single line rams, wiring that didn’t match up to diagrams. The pertronix someone put in was fried, got it back on points but still could not get it to fire. Cyl 3 and 4 had 75 lbs no matter how much we tried to oil them back to life. Cylinder walls on 3-4 are zorched.

I ended up coming across a very nice 1986 120 w/ outdrive for a song on Facebook market. But between my ancient trim system, and the fact that modifications would be needed to get it all to work on my older transom assembly, I opted to find a nice donor boat with alpha 1 components to do a complete swap (hindsight, I should have gone gen 2, but I’ll take what I got)

Found a cheap Larson with everything I needed, hauled it home and stripped it down (picked up a gantry as well, great investment) Got the SC all stripped down. Tried to see if it had its original tank, which it does not. Appears as though someone re did the floor at some point, as I saw sharpee marks where the floor rivets needed to go,

Where I’m at now: Both boats are stripped. Wiring is all labeled on the new harness (the gauges) Finishing up my template to re drill my transom to match those upper alpha one mounting bolts & keyhole cut out. Made one out of a sheet of aluminum I had. Trying to stay focused on getting the engine and drive back in place. Getting distracted by easy/“fun” projects like the new dash, the flooring, fishing accessories. My driveway is now FULL.

I need to source a fuel tank that will fit below deck, midship. Dimensions are 50” long, 24” wide and NO more than 8” deep (including fittings) the tank from the Larson donor is a couple inches high with the fittings. I’m pretty set on trying to stick with a below deck tank. I need as little crowding up the deck as possible. I’ve picked through all the plastic and aluminum options available online. It’s not totally out of the question to fabricate one, but I’d love to find something that fits.

Also need to figure out the best/right options for those lower transom bolts that have the anode on them. I’m seeing mixed opinions on here about switching to stainless carriage or replacing with alum ones.
Once I source the correct hardware, I’ll get this new alpha one transom assembly bolted up, and then I can start throwing all these parts together.

Here’s a few random pics of progress over the year.
 

Attachments

  • IMG_8331.jpeg
    IMG_8331.jpeg
    2.7 MB · Views: 11
  • IMG_8358.jpeg
    IMG_8358.jpeg
    2 MB · Views: 12
  • IMG_8658.jpeg
    IMG_8658.jpeg
    2.4 MB · Views: 10
  • IMG_8261.jpeg
    IMG_8261.jpeg
    3 MB · Views: 12

matt167

Rear Admiral
Joined
Sep 27, 2012
Messages
4,102
I just did the alpha gen 1 conversion to my ‘71 StarCraft. You will also need the wiring from the Larson. You may or may not be able to get the original gauges to work. You will also need new control cables as the newer motors take longer cables..

When I did mine, I used the fiberglass skin from the donor boat for the cutout
 

OldAlewife

Cadet
Joined
Aug 11, 2023
Messages
6
I just did the alpha gen 1 conversion to my ‘71 StarCraft. You will also need the wiring from the Larson. You may or may not be able to get the original gauges to work. You will also need new control cables as the newer motors take longer cables..

When I did mine, I used the fiberglass skin from the donor boat for the cutout
Wiring all came off in tact luckily. I have the Larson gauges hooked up in the old chieftains dash/helm now. They slipped right into the old openings very well. I’ll be hole sawing the old 68 “power tilt” faceplate to get the larson’s trim gauge to fit in there. Also have the controls from the Larson out and they’re the correct length for my chief. That’s why I’m glad I opted to pickup a whole boat and not piece crap together.
I also verified that the gauges worked by plugging that 9 pin connector into my new 86 engine and running it on a stand. I thought my chief’s plug would work, but didn’t realize the older ones are 8 pin. ALMOST
 

Attachments

  • IMG_8575.jpeg
    IMG_8575.jpeg
    2.4 MB · Views: 2
  • IMG_8576.jpeg
    IMG_8576.jpeg
    2.3 MB · Views: 2

TripleJGraffis

Chief Petty Officer
Joined
Jan 18, 2024
Messages
408
Almost a year in now. The amateur boater in me quickly learned all those hard lessons about these projects taking time and lots of money. The more I got into this, the more I learned I need to replace. Buy once cry once, as they say. No sense in rushing or cutting corners now. I’m fully committed.
As long as you keep at it, that's all that matters!
 

matt167

Rear Admiral
Joined
Sep 27, 2012
Messages
4,102
Wiring all came off in tact luckily. I have the Larson gauges hooked up in the old chieftains dash/helm now. They slipped right into the old openings very well. I’ll be hole sawing the old 68 “power tilt” faceplate to get the larson’s trim gauge to fit in there. Also have the controls from the Larson out and they’re the correct length for my chief. That’s why I’m glad I opted to pickup a whole boat and not piece crap together.
I also verified that the gauges worked by plugging that 9 pin connector into my new 86 engine and running it on a stand. I thought my chief’s plug would work, but didn’t realize the older ones are 8 pin. ALMOST
I wouldn’t even worry about the tilt gauge. Most of the senders don’t work after a year or 2
 

OldAlewife

Cadet
Joined
Aug 11, 2023
Messages
6
Alpha 1 cutout and hole modification finished up today. Made a template off my donor boat for the pattern and keyhole opening.
Was a little scared to dive in without that expensive jig merc sells, but I took my time with the tools I had and it worked out. I filled the old mc-1 upper holes with 1/2” dowel and wood glue. Maybe unnecessary/possibly better options, but I felt good about it.

For now, I just had it mocked up to make sure everything would work out. I’d like to replace the hardware. The aluminum carriage bolts off the mc-1 are still in good shape, the anode ones off the A1 were toast.

Question I had: I’ve read conflicting opinions about the longevity of those rubber seals between gimbal housing and transom. The transom off the donor boat I pulled the A1 stuff from was ROACHED. The transom on my chief is perfect
Now that seal did not look -bad- to my eye, but would it hurt me to run a thin dabble of 4200 along this seal? It seems like something that I’d mess up and have to order again if I tried to replace.
Feels like I’m finally getting close to “bolt it all together” time (aka I am naive)
 

Attachments

  • IMG_8713.jpeg
    IMG_8713.jpeg
    2 MB · Views: 3
  • IMG_8776.jpeg
    IMG_8776.jpeg
    1.9 MB · Views: 3
  • IMG_8785.jpeg
    IMG_8785.jpeg
    1.4 MB · Views: 3
  • IMG_8786.jpeg
    IMG_8786.jpeg
    1.8 MB · Views: 3
Top