1964 Starcraft Jet Star Renovation

Status
Not open for further replies.

lakelover

Rear Admiral
Joined
Mar 26, 2003
Messages
4,386
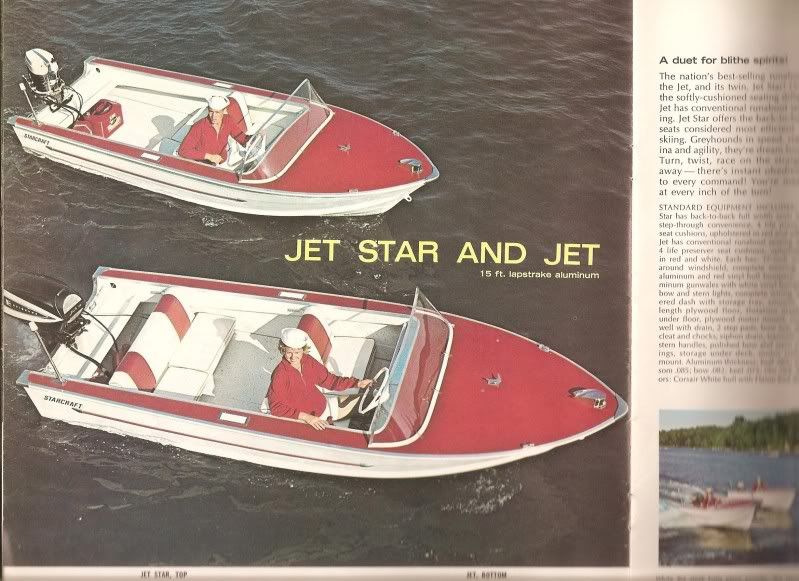
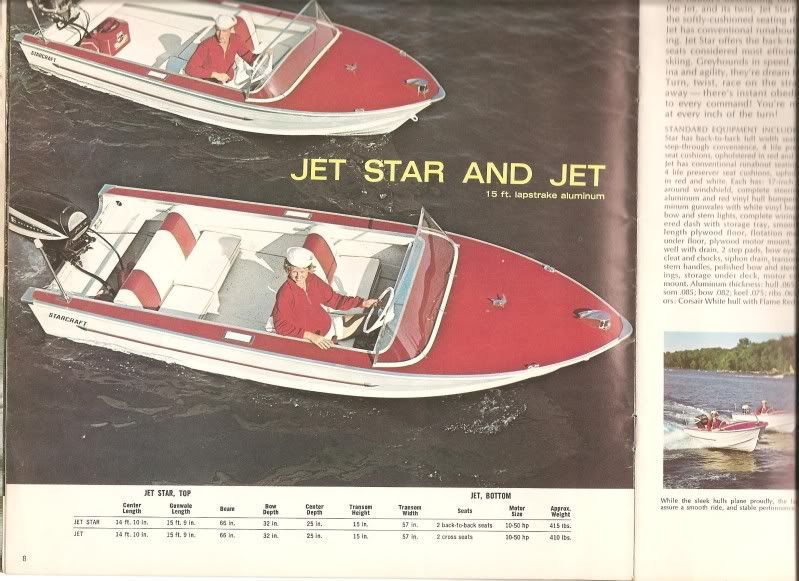
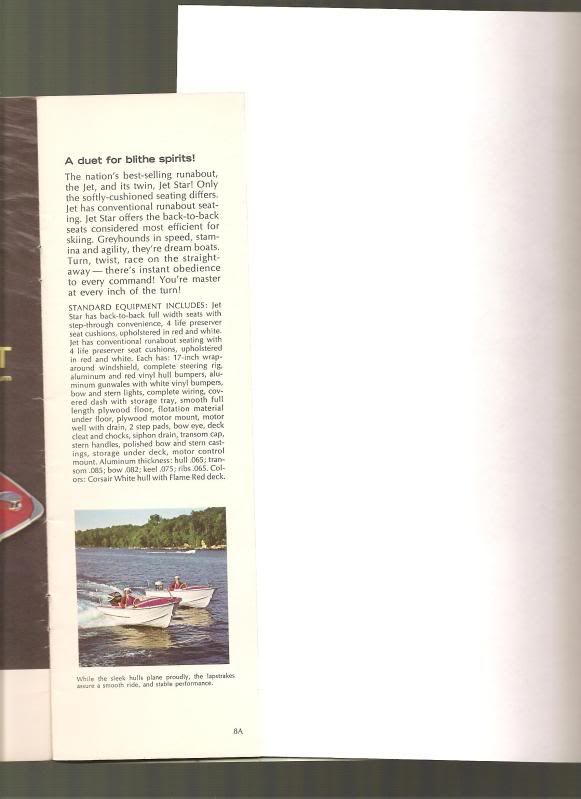
I came across this aluminum Stracraft on Craigslist. The price seemed right at $750 (got it for $700) and basically the hull and transom are in good solid condition. The outboard I'm not too thrilled about and will most likely be looking for something else around 40-45hp, max listed on the capacity plate is 45.

Classic Ugly:
w-DSC_1631-1.jpg


Port & starboard (the speckling is mud splatters):
w-DSC_1657.jpg


w-DSC_1655.jpg


Front deck is real grungy, more so than the rest of it as it has been exposed to the elements because of a short tarp. It's been repainted and would look nice if I can get it cleaned up. It's a sort of metal flake burgundy.
w-DSC_1654.jpg


Stern with 50hp 1964 West Bend power. I know it runs but I haven't started it myself yet.
w-DSC_1641-1.jpg


Helm: I envision a new wood dashboard & plan to ditch the compass (points south!), speedometer & depth finder. New controls and steering when I change the outboard. Current steering is pulley & cable.
w-DSC_1649.jpg
 
Last edited:

lakelover

Rear Admiral
Joined
Mar 26, 2003
Messages
4,386
Re: 1964 15' Starcraft Aluminum Runabout Project more pics

Re: 1964 15' Starcraft Aluminum Runabout Project more pics

The entire interior needs to be gutted. The floor is so rotten I can break it out by hand, and don't know if I'll be able to save it in pieces big enough to use for templates.
w-DSC_1651.jpg


w-DSC_1647.jpg


I'll probably go with classic back-to-back lounge seats:
w-DSC_1650.jpg


w-DSC_1637.jpg


w-DSC_1633.jpg


w-DSC_1634.jpg
 

lakelover

Rear Admiral
Joined
Mar 26, 2003
Messages
4,386
Re: 1964 15' Starcraft Aluminum Runabout Project & more pics

Re: 1964 15' Starcraft Aluminum Runabout Project & more pics

A couple more:
w-DSC_1636.jpg


w-DSC_1644.jpg
 

lakelover

Rear Admiral
Joined
Mar 26, 2003
Messages
4,386
Re: 1964 15' Starcraft Aluminum Runabout Project

Re: 1964 15' Starcraft Aluminum Runabout Project

Here's the new power for the craft. I've been trying to sell the 50 West Bend on craigslist, ebay and another website, with some interest, but have a prospect now that looks like it might fly. The "new" Johnson is a 2003 that's waiting it's turn in the shed. It has oil injection, no pre-mixing of oil & gas.

w-DSC_1934ab.jpg
 
Last edited:

North Beach

Commander
Joined
Sep 29, 2008
Messages
2,022
Re: 1964 15' Starcraft Aluminum Runabout Project

Re: 1964 15' Starcraft Aluminum Runabout Project

Here you go. This is out of the 64 brochure. Jet or Jetstar are identical except for the seats.

002.jpg


001-2.jpg


003.jpg


Sorry I had to do it in pieces-the page was too big for my scanner.

BTW, I might be convinced to take that steering wheel set up off your hands if you decide to let it go:D
 

lakelover

Rear Admiral
Joined
Mar 26, 2003
Messages
4,386
Re: 1964 15' Starcraft Aluminum Runabout Project

Re: 1964 15' Starcraft Aluminum Runabout Project

Here you go. This is out of the 64 brochure. Jet or Jetstar are identical except for the seats.

Man, it's amazing the info you can find on these boards! Thanks, North Beach.

I managed to sell the West Bend a couple days ago, so now I'm ready with a plan.
 
Last edited:

lakelover

Rear Admiral
Joined
Mar 26, 2003
Messages
4,386
Re: 1964 15' Starcraft Aluminum Runabout Project

Re: 1964 15' Starcraft Aluminum Runabout Project

Here's a shot of the transom wood at the knee braces. I don't know how the original looked, this is a replacement board.

w-DSC_2057kneebraces.jpg


Here's a shot of the exterior of the transom. It looks as though I'll be able to go straight across without much modification, just replacing the cap with a straight one, in order to accomodate the long shaft Johnson. I might have to cut a notch out of the corner caps, but don't know because I haven't done my detailed measurements yet.

w-DSC_2047transomext.jpg


After cleaning out the rotten floor and water-soaked styrofoam, the inside of the hull was cleaned out. I used brake cleaner spray to remove the stubborn oil/gas, and did lots of scrubbing with an all-purpose cleaner and a wire brush, and periodically hosing it down and letting the slurry drain out the drain tube.
 
Last edited:

lakelover

Rear Admiral
Joined
Mar 26, 2003
Messages
4,386
Re: 1964 15' Starcraft Aluminum Runabout Project

Re: 1964 15' Starcraft Aluminum Runabout Project

I anticipate my use being 2-4 people just cruising around, don't plan to fish or ski or tube.

Thinking about seats, I was originally wanting to go with lounge seats, but hit on a mounting idea using the original design of the boards and original brackets. It saves me raising to a flat floor to mount the lounges. I didn't want to be sitting that high. Once you get up to level you lose 5-6", and another 10" base height plus cushion. The new plan will keep the center of gravity lower too. I want to feel like I'm sitting in the boat, not on top of it.
 
Last edited:

lakelover

Rear Admiral
Joined
Mar 26, 2003
Messages
4,386
Re: 1964 15' Starcraft Aluminum Runabout Project

Re: 1964 15' Starcraft Aluminum Runabout Project

I started removing the transom, removing the original style nails. Some came out easily that I could grip with the hammer claw. The others are going to be less fun.

w-DSC_2086transomcapnails.jpg
 
Last edited:

lakelover

Rear Admiral
Joined
Mar 26, 2003
Messages
4,386
Re: 1964 15' Starcraft Aluminum Runabout Project

Re: 1964 15' Starcraft Aluminum Runabout Project

Next phase: trying to remove the transom wood.

My plan was to get the current wood out in one piece so I could use it for a template while transforming it from a 16" transom height into a 20" for my motor. I got all the trim & bolts removed and the zillions of screws attaching the back of the splashwell, that was all relatively easy. Removing the wood is not so easy, it's stuck in there really tight.

I thought I had a good plan to put screw eyes in the current wood, which it turns out is quite solid, and rigging up a car jack to try to pull it out. But that didn't work out because as I had anticipated it might do, all it did was lift the boat off the trailer.

w-DSC_2167.jpg


w-DSCN1900.jpg


w-DSC_2171.jpg


In the process I discovered that the curved corner pieces the PO had put in when he replaced the wood weren't even fastened in, they were just sitting on top of the 2x10 underneath it. The 2x10 itself is actually in pretty good shape.

I need to adapt my transom for the 20" shaft Johnson. When I was motor shopping, I was having a heck of a time finding a short shaft 48-50hp. With a 20" transom, the cavitation plate above the prop should be even (within 1") of the bottom of the boat.

I'm pretty hopeful on the performance with the 50 hp. The capacity plate rates the hull for 45 hp, and the 1964 brochure says 50. Motors were heavier then; using the USCG guide, with a 20" transom, that formula estimates about 60 or 65, but I would never go that high on this hull. I'm sure the 50 will be more than sufficient for my wants.

What's left of my plate, more like a sticker:

wDSC_4244.jpg
 
Last edited:

lakelover

Rear Admiral
Joined
Mar 26, 2003
Messages
4,386
Re: 1964 15' Starcraft Aluminum Runabout Project

Re: 1964 15' Starcraft Aluminum Runabout Project

New seats arrived today!

I picked these up new on ebay for $170 including shipping after exhaustive research basically trying to compare apples to oranges. They were well packaged. I unpacked them and gave them a good going over to make sure all was well. They are comfortable, if not just a bit harder than I expected, but that's better than sitting and squashing the foam down to the base. Overall quality looks very good, sturdy & well constructed etc. This was labeled as "Wise Deluxe" model, I but haven't been able to find any identical ones anywhere else.

With my color plan for a red exterior and gray interior, I think they'll look pretty good in the boat.

w-DSC_2296.jpg
 
Last edited:

lakelover

Rear Admiral
Joined
Mar 26, 2003
Messages
4,386
Re: 1964 15' Starcraft Aluminum Runabout Project

Re: 1964 15' Starcraft Aluminum Runabout Project

After winter passed, I got the transom wood out in about 10 minutes by pounding on the bottom of it with a hammer. Before, I had fought for hours with it and it wouldn't budge, but I guess sitting dry under a tarp all winter shrunk it a little.

w-DSC_2461.jpg


So I can go on with my plan of replacing the transom.
 
Last edited:

lakelover

Rear Admiral
Joined
Mar 26, 2003
Messages
4,386
Re: 1964 15' Starcraft Aluminum Runabout Project

Re: 1964 15' Starcraft Aluminum Runabout Project

I traced my new transom board onto 3/4 exterior plywood using the template I made from the old piece, and adding 4" to the height; cut the pieces out and glued them together with Gorilla glue & clamped and screwed together with 1 1/4" SS screws. This was the first time I used gorilla glue and I was a little surprised at how little it foamed out around the edges while it cured. I wondered if I'd applied enough, but the bottle says to use about 1/2 ounce per square foot and that's just about what I used, maybe a slight bit less.

Dry fit before gluing... a perfect fit:
w-DSC_2482.jpg


ACX exterior from Lowe's, Gorilla glue & SS screws:
w-DSC_2483.jpg


Another check after gluing:
w-DSC_2484.jpg


w-DSC_2485.jpg


I removed the dashboard tray and filled the holes in the dashboard with pieces of dowel glued in with carpenter's glue. For the bigger speedometer hole, I screwed a small backer board to the back of the dashboard and then glued in a piece of plywood I cut out with a jig saw (I later had to undo this one for mounting the tachometer). All the pieces are countersunk almost 1/8" and I'll level it up with plastic wood filler. I had originally planned to replace the dashboard, but it turned out that removing the original was more involved than I wanted to go. All I plan to put in the dashboard are switches for the lights & a bilge pump, and a 12v power outlet for a hand held spotlight.

w-DSC_2486.jpg
 
Last edited:

lakelover

Rear Admiral
Joined
Mar 26, 2003
Messages
4,386
Re: 1964 15' Starcraft Aluminum Runabout Project

Re: 1964 15' Starcraft Aluminum Runabout Project

I got all the bolt holes & drain tube holes drilled, did another trial fit and all lined up perfectly. It helped that I drilled the holes on a drill press so that kept everything perpendicular. That's JB Weld over the countersunk SS screw heads.

w-DSC_2509.jpg


I also got a bunch of contact cement residue off the dashboard tray using paint stripper & polished it up with steel wool. It's pretty beat up so I plan to cover it with vinyl. Ordered an orbital sander from Harbor Freight for $20 in anticipation of painting prep.

I've also been thinking about what it will take to rig up the Johnson, so I can collect what I need. When I bought it, all it came with was the steering link that the steering cable hooks to, but no oil tank, controls, harness etc.
 
Last edited:

lakelover

Rear Admiral
Joined
Mar 26, 2003
Messages
4,386
Re: 1964 15' Starcraft Aluminum Runabout Project

Re: 1964 15' Starcraft Aluminum Runabout Project

After a fair amount of research I decided to go with rack & pinion steering. The steering rack & cable are going to fit, but with the dash tray, that I was hoping to reinstall and keep to use, there's not going to be enough clearance for the steering wheel. I'd need about 2" more on the shaft length.

I could go without the tray and it wouldn't be that big a deal, but it would be nice to have somewhere handy to set soda, beer, sunglasses and misc. pocket stuff.

wDSC_2539.jpg


I had the same problem. I ordered the teleflex wedge kit to angle the helm up higher which solved it for me.

I mocked up a couple 10 & 20 degree triangles out of cardboard to check what that would give me for clearance & went ahead and ordered the kit.
 
Last edited:

lakelover

Rear Admiral
Joined
Mar 26, 2003
Messages
4,386
Re: 1964 15' Starcraft Aluminum Runabout Project

Re: 1964 15' Starcraft Aluminum Runabout Project

Lots of holes in the deck - there was a poorly attached bimini top, a flag holder, extra step pads and who knows what else...also a horn and center cleat I'm not replacing it but plan to add one new cleat on each side. I started out my patchwork by sanding and filling holes with JB Weld. I used very thin aluminum sheeting (old press plates actually) with a dab of JB on it, stuck it on from behind, then applied more JB to the top, smoothed with a putty knife and sanded.

wDSC_2521a.jpg


The hull has the original factory primer & paint, then primer, then a layer of sprayed on top coat paint.

w2-oldpaint_2185.jpg


The paint's pretty thick and a lot of it is sound, so I decided not to strip the whole thing, just remove the unsound areas by sanding and/or stripper, and scuffing what's left and painting.

wDSC_2527a.jpg


I took off the windshield, put the old seat boards back in for measuring and fitting for the new seats. Lots of measuring and note taking. From the front...

wDSC_2535.jpg


From the back...

wDSC_2532.jpg


I ordered some aluminum angle stock for new seat board setup.
 
Last edited:

lakelover

Rear Admiral
Joined
Mar 26, 2003
Messages
4,386
Re: 1964 15' Starcraft Aluminum Runabout Project

Re: 1964 15' Starcraft Aluminum Runabout Project

They are individual and not back-to-back it looks like...do the seats touch at the back?

It seems like if people were leaning back in the seats they would push each other around.

They won't touch when I make the new bench supports and get them placed. That's what a lot of my time-consuming measuring was about. It would be a nasty ride with both waves and being bumped around by the seat behind you. I have to be careful about that dimension.

My plan is to have both benches go all the way across, with a vertical support underneath in the middle. I'm looking for the fewest number of joints and potential water entry points into the wood and floor as possible.
 
Last edited:

lakelover

Rear Admiral
Joined
Mar 26, 2003
Messages
4,386
Re: 1964 15' Starcraft Aluminum Runabout Project

Re: 1964 15' Starcraft Aluminum Runabout Project

I had some old "environmentally friendly" paint stripper on hand so I gave it a try.

wDSC_2543.jpg


This stuff is kind of a PIA, very slow working and you really do have to mask like the directions say because the overspray dries into crusty white spots that gets on everything, esp. if there's a little wind. I let it sit an hour or more, then scraping was still very tough work, then had to use a wet rag to wipe up all the white spatters caused by the light breeze.

I need to try something else.

Anyway, a little progress.

wDSC_2540.jpg


wDSC_2545.jpg
 
Last edited:

lakelover

Rear Admiral
Joined
Mar 26, 2003
Messages
4,386
Re: 1964 15' Starcraft Aluminum Runabout Project

Re: 1964 15' Starcraft Aluminum Runabout Project

I wanted to remove the bow cap to make painting easier. How does it come off? I drilled out the 2 rivets underneath and got it to move forward less than 1/8". (My objective is to get out the rub rail vinyl. I took out the screw in the back and pulled and it stretched, but it must have another screw in the front under the cap.)

Anyway, I don't want to force it too much.

w-DSC_2559.jpg


w-DSC_2561.jpg
 
Last edited:

lakelover

Rear Admiral
Joined
Mar 26, 2003
Messages
4,386
Re: 1964 15' Starcraft Aluminum Runabout Project

Re: 1964 15' Starcraft Aluminum Runabout Project

Lakelover,

Could not see any sign of a lip. Is it on the top or bottom? I remember others describing getting it off and they describe using screw drivers to wedge open the bow cap.

Albert

The lip is on top, like the cap has been slid on from the front and it snaps onto the top rub rail aluminum. It's not very big, maybe 3/32". I will carefully try it.

w-bowcaplip-2571.jpg


As it turned out, for fear of breaking it, I ended up not removing it.
 
Last edited:
Status
Not open for further replies.
Top