






This is just a quick write up on a recent project I took on, and to detail the steps in case anyone else is wanting to know how to do it or what experiences I had --
I acquired a 1961 Johnson 10HP QD22 a couple weeks back. At first glance, it looked good. It was said it ran two years prior. Long story short, there was a lot wrong with it. Only 2 out of 4 bolts holding the stern bracket on the pivot tube, lower mounts in clamshell were destroyed, and one acorn missing (aftermarket solution was deployed), throttle linkage was non functioning requiring a new throttle gear and plastic tab for the metal arm that comes down through the case and interfaces with the gear, throttle cam on armature plate was bent and required replacement + link and sync, carb rebuild, low speed mixture screw snookered on the end and bushing with set screws installed requiring needle replacement and acquisition of a low speed knob, gear oil washers were of the old fiber kind and multiple washers stacked (not sealing), and a few other minor problems. All of that has been repaired. It has been a long process.
My intent was a "vacation project" to keep me busy with a lack of other things to do. Ultimately, I wanted to eliminate the points and go with an electronic option. I know most of the diehards say the points system worked well for many years and it did, but finding OEM quality tune up kits is getting harder and harder and I have a particular disdain for points.
In short, I stripped the movable arm of the points off the armature plate, as well as the condensers. I fashioned two aluminum brackets (one on each side of the motor) to mount the BM11 modules to, and added another ground wire from one of these brackets to the armature plate to ensure a good ground for the modules and the coils. I cut the wires off the stop switch and wired one of them to one module, the other to another module, and at each module, added an extra wire to reconnect the stop switch. I also ended up replacing the stop wires in the armature plate with new 16ga wire, but that is only because one of the stop wires stranded wire was very black when I stripped it. I used the other side of the points as an insulated mounting point, so I didn't have to cut the green primary wire on the coil and could easily connect the coil to the modules. It also allows easy coil swaps if you need.
Modules work great, engine runs great, and stop button function is retained the same way it originally worked. No points, no condensers. The split wire from module 1 and module 2 connect to both sides of the factory stop switch. The factory stop switch just shorted one set of points to each other, which caused the spark to die (grounds the circuit). This set up does the same, without the points coming into play. Its the same theory/operation as the factory set up, without points.
All in all, I spent a lot of time on this project and had someone who had done it before guiding me along the way as questions arose. It was worth it. No idea how long the modules will last, but I'll bet they last longer than the Nova 2 chips that everyone has tried and constantly burn out.
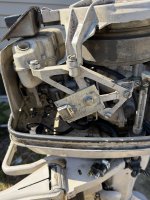
I referenced the BM11 modules prior -- these are the modules I used, and are a Kawasaki/John Deer part. They're available all over Amazon and eBay for cheap. I paid less than $30 for both of them. They are in plentiful supply. If anyone has any questions, let me know. A picture is attached of how I mounted them. The modules ground through what they're mounted to, so its imperative you mount them to some metal.
I acquired a 1961 Johnson 10HP QD22 a couple weeks back. At first glance, it looked good. It was said it ran two years prior. Long story short, there was a lot wrong with it. Only 2 out of 4 bolts holding the stern bracket on the pivot tube, lower mounts in clamshell were destroyed, and one acorn missing (aftermarket solution was deployed), throttle linkage was non functioning requiring a new throttle gear and plastic tab for the metal arm that comes down through the case and interfaces with the gear, throttle cam on armature plate was bent and required replacement + link and sync, carb rebuild, low speed mixture screw snookered on the end and bushing with set screws installed requiring needle replacement and acquisition of a low speed knob, gear oil washers were of the old fiber kind and multiple washers stacked (not sealing), and a few other minor problems. All of that has been repaired. It has been a long process.
My intent was a "vacation project" to keep me busy with a lack of other things to do. Ultimately, I wanted to eliminate the points and go with an electronic option. I know most of the diehards say the points system worked well for many years and it did, but finding OEM quality tune up kits is getting harder and harder and I have a particular disdain for points.
In short, I stripped the movable arm of the points off the armature plate, as well as the condensers. I fashioned two aluminum brackets (one on each side of the motor) to mount the BM11 modules to, and added another ground wire from one of these brackets to the armature plate to ensure a good ground for the modules and the coils. I cut the wires off the stop switch and wired one of them to one module, the other to another module, and at each module, added an extra wire to reconnect the stop switch. I also ended up replacing the stop wires in the armature plate with new 16ga wire, but that is only because one of the stop wires stranded wire was very black when I stripped it. I used the other side of the points as an insulated mounting point, so I didn't have to cut the green primary wire on the coil and could easily connect the coil to the modules. It also allows easy coil swaps if you need.
Modules work great, engine runs great, and stop button function is retained the same way it originally worked. No points, no condensers. The split wire from module 1 and module 2 connect to both sides of the factory stop switch. The factory stop switch just shorted one set of points to each other, which caused the spark to die (grounds the circuit). This set up does the same, without the points coming into play. Its the same theory/operation as the factory set up, without points.
All in all, I spent a lot of time on this project and had someone who had done it before guiding me along the way as questions arose. It was worth it. No idea how long the modules will last, but I'll bet they last longer than the Nova 2 chips that everyone has tried and constantly burn out.
I referenced the BM11 modules prior -- these are the modules I used, and are a Kawasaki/John Deer part. They're available all over Amazon and eBay for cheap. I paid less than $30 for both of them. They are in plentiful supply. If anyone has any questions, let me know. A picture is attached of how I mounted them. The modules ground through what they're mounted to, so its imperative you mount them to some metal.
Attachments
Last edited:

