16ft Starcraft Center Console Build Help

Cadavis01

Cadet
Joined
Dec 30, 2020
Messages
7
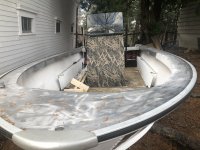
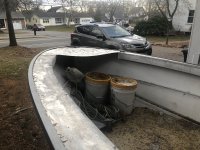
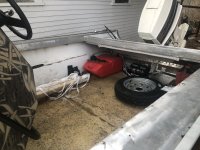
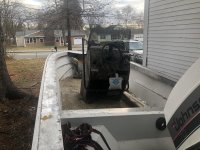
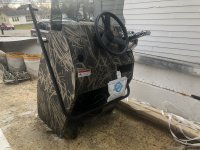
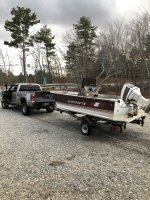
Hello, My name is Camden and I have just purchased a 1987 StarCraft. The boat is 16ft long and all aluminum. My current plans with the boat are as follows

*Strip out floor, replace with new floor
*Reinstall CC and add switch's to control everything
*Install Rod holders, Led lights, Bilge pump, Radio+Speakers, Nav lights

Most of this project is to just keep me busy for the spring, as for where I live I wont be able to start this project until the snow melts. I currently am coming on here for help and ideas. I know i need to replace the floor as for its all warped and falling apart. But my current problem is what should I do to protect the plywood flooring. Reading and doing some research leads me to believe for my saltwater adventures i should go with Marine Plywood, instead of just exterior grade. With the wood chosen i currently cant figure out how i should treat the plywood, some say marine epoxy it then coat in fiberglass. As others say just use a paint and primer, and then you can also just epoxy it and paint it. I do not mind fiber glassing the boat floor but I would like to keep a tight budget on the boat. Also would fiber glassing the floor make it to heavy for my little 16' aluminum?

Besides the flooring issue and not knowing where to go with that, I have a problem with wiring rocker switches. I would like to run everything to a fuse panel as well as a battery switch but how would i wire rocker switches to a fuse panel. I guess i could get a panel that has push breakers but would it be worth it or is a separate fuse box better. If someone could help explain how i would wire this together that would be great.
 

Attachments

  • IMG-1639.jpg
    IMG-1639.jpg
    2.2 MB · Views: 14
  • IMG-1640.jpg
    IMG-1640.jpg
    2.5 MB · Views: 13
  • IMG-1641.jpg
    IMG-1641.jpg
    3.1 MB · Views: 13
  • IMG-1642.jpg
    IMG-1642.jpg
    2.1 MB · Views: 12
  • IMG-1643.jpg
    IMG-1643.jpg
    2.4 MB · Views: 13
  • IMG-1645.jpg
    IMG-1645.jpg
    2.2 MB · Views: 13
  • IMG-1684.jpg
    IMG-1684.jpg
    3 MB · Views: 14

roscoe

Supreme Mariner
Joined
Oct 30, 2002
Messages
21,739
Welcome to iboats.
I have a 1981 Starcraft Mariner 18'.
I used 3 coats of SPAR varnish on the floor, more coats on the edges.
Then glued nautolex vinyl flooring over it.
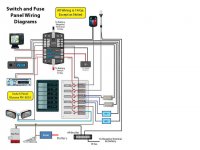
Here is a boat wiring diagram courtesy of another iboats member.

Battery disconnect near battery.
Fused power from the hot side of the disconnect, to bilge pump.

10 gauge power feed to fuse block under center console. I prefer the small automotive blade type fuses, and a block with at least 12 fuses.


From fuse block to accessories.
And fuse block to switch panel.
All negatives tied to a negative buss, included on many fuse blocks.
Then run a 10 gauge from the buss back to the battery negative terminal.

You will end up with 3 wires connected to the negative terminal of the battery, one from the neg buss, one from the bilge pump, and one from the engine.

You will have only one wire connected to the positive terminal, to the battery disconnect switch.
Keeps the battery connections neat .

Buy marine grade tinned wire, more expensive, but will last much longer, even near salt. 16 and 18 gauge wire as needed. genuine dealz dot com has everything you need.


wiring diagram.jpg
 

Cadavis01

Cadet
Joined
Dec 30, 2020
Messages
7
Welcome to iboats.
I have a 1981 Starcraft Mariner 18'.
I used 3 coats of SPAR varnish on the floor, more coats on the edges.
Then glued nautolex vinyl flooring over it.
Here is a boat wiring diagram courtesy of another iboats member.

Battery disconnect near battery.
Fused power from the hot side of the disconnect, to bilge pump.

10 gauge power feed to fuse block under center console. I prefer the small automotive blade type fuses, and a block with at least 12 fuses.


From fuse block to accessories.
And fuse block to switch panel.
All negatives tied to a negative buss, included on many fuse blocks.
Then run a 10 gauge from the buss back to the battery negative terminal.

You will end up with 3 wires connected to the negative terminal of the battery, one from the neg buss, one from the bilge pump, and one from the engine.

You will have only one wire connected to the positive terminal, to the battery disconnect switch.
Keeps the battery connections neat .

Buy marine grade tinned wire, more expensive, but will last much longer, even near salt. 16 and 18 gauge wire as needed. genuine dealz dot com has everything you need.


View attachment 331052
Good tips for the wiring, diagram definitely helps. I have a vinyl flooring for the boat but I'm unsure of its durability. The boat is going to be used heavily for fishing and lobster fishing. I originally planned on install snaps so i can remove it if needed. Do you know if after using the varnish you weather or not you can paint it to add texture? I was told to seal the wood then paint.
 

Attachments

  • IMG-1799.jpg
    IMG-1799.jpg
    3.4 MB · Views: 4
  • IMG-1801.PNG
    IMG-1801.PNG
    8 MB · Views: 5

roscoe

Supreme Mariner
Joined
Oct 30, 2002
Messages
21,739
Well the spar varnish is oil and solvent based, it will soak into the wood.
I would suggest that if you paint it, to use an oil based paint for adhesion.
Not a paint expert so don't know if an acrylic or a latex would stick.

Not sure paint will add enough texture to be slip resistant. Hopefully others will chime in with their experienced advice.

Don't know of any vinyl that would hold up as a removable item.
There are several synthetic / vinyl flooring materials on the market now.
KIWIGrip is a paint on, not sure if it will stick to spar varnish.

Some will cost you $250, others will cost $1200.
SeaDek is great, cost you about $600
Some are very durable while others are not ( deco-dot )

If at all possible, run all your wiring and steering cable under the floor before you fasten the floor down.


Here is a link to the Starcraft forum page.

And a link to the Starcraft restorations forum page.

That ought to keep you busy reading up on how other guys did it.

:)
 

Cadavis01

Cadet
Joined
Dec 30, 2020
Messages
7
Well the spar varnish is oil and solvent based, it will soak into the wood.
I would suggest that if you paint it, to use an oil based paint for adhesion.
Not a paint expert so don't know if an acrylic or a latex would stick.

Not sure paint will add enough texture to be slip resistant. Hopefully others will chime in with their experienced advice.

Don't know of any vinyl that would hold up as a removable item.
There are several synthetic / vinyl flooring materials on the market now.
KIWIGrip is a paint on, not sure if it will stick to spar varnish.

Some will cost you $250, others will cost $1200.
SeaDek is great, cost you about $600
Some are very durable while others are not ( deco-dot )

If at all possible, run all your wiring and steering cable under the floor before you fasten the floor down.


Here is a link to the Starcraft forum page.

And a link to the Starcraft restorations forum page.

That ought to keep you busy reading up on how other guys did it.

:)
Thanks for the help appreciate it!
 

Cadavis01

Cadet
Joined
Dec 30, 2020
Messages
7
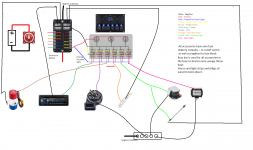
I just made a quick mock up of the wiring for my boat. Its not to scale but it gives myself a general idea of what to do when it comes time to piece it together. To my knowledge this is all the accessories im going to be using for myself that needs power. I might add a Live well later on.
 

Attachments

  • Wiring Diagram for Boat.png
    Wiring Diagram for Boat.png
    358 KB · Views: 13
Top