68 Offshore restoration

Sharpie223

Petty Officer 2nd Class
Joined
May 24, 2021
Messages
156
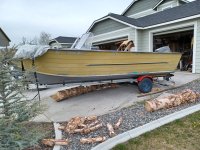
The prescribed method for flattening when using it as the intended lawn edging is to lay it out in the sun. I plan to speed things up with a heat gun. It should be as stable as any hdpe or uhmw that we use elsewhere on our boats.
 

Moserkr

Chief Officer + Starmada Splash Of The Year 2021
Joined
Nov 23, 2020
Messages
836
The prescribed method for flattening when using it as the intended lawn edging is to lay it out in the sun. I plan to speed things up with a heat gun. It should be as stable as any hdpe or uhmw that we use elsewhere on our boats.
Thats a pretty cool use for that material. Will be interested to see how it works out.

My kayak is made with hdpe, and the newer formulas can pretty much be reused indefinitely. I fixed a hole in my kayak by "welding" it with melted hdpe plastic, sanded smooth, and shined it back up with the heat gun. So that stuff is also indestructible. Awesome what you did with it, thinking outside the box.
 

Sharpie223

Petty Officer 2nd Class
Joined
May 24, 2021
Messages
156
It's probably more work than patching with epoxy and aluminum on the underside. I think it will be easier to look good, though. Also, my thought is that the plastic should be less likely to burn skin in the summer.
 

Sharpie223

Petty Officer 2nd Class
Joined
May 24, 2021
Messages
156
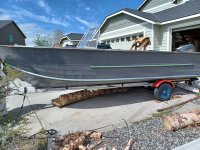
Using this weekend to try and paint the sides. Removed the registration stickers, adhesive remnants, sanded and tacked today.
20240405_141957.jpg

The registration numbers were easiest with a heat gun and scraper, but my mind wasn't in the zone initially, so I ended up making a mess on one side with a wire wheel and acetone before thinking of it.

For tacking, I tried acetone but that turned the dust into a smeared mess, xylene worked well to clean the surface but not melt it. Alcohol would play nicer with the breathing space but I didn't have any on hand right now.

Tomorrow I will mask and then prime with u-pol epoxy primer. Focus will be bare spots, but I have enough to cover quite a bit. I would have preferred to prime today immediately following sanding the bare spots, but time constraints prevented that. I think it should still be a suitable surface tomorrow. Sunday I will roll on a 2k polyurethane gloss black base, then spray a sky blue metallic flake streak, and silver Starcraft lettering.
 

Sharpie223

Petty Officer 2nd Class
Joined
May 24, 2021
Messages
156
When I paint, it often doesn't go as planned. Today was no exception. The constant breeze made masking a bit of a paint, since I was using cardboard to cover large spans. I should have pre planned masking plastic. The base black layer painted fine, though it was taking longer to harden to the touch than I'm used to. I needed to get it done today or it wouldn't get done so I forged ahead with masking for the starcraft logo. That mostly went fine but I think it would have been better to paint the letter color first and then mask off the letters that the other way around. The way I did it the stencil had a few structural issues while applying. Then I masked for a flake stripe. I had to move cardboard up for this. Middle of the flake job it started to drop and I got a bit of overspray where I wanted plain black. I have enough touchup black to fix that, but not if I kept painting, so I had to stop with an uneven flake coating. I don't love it, but I'll live with it. The picture looks worse than in the sun in real life. Still way better than faded pale yellow. Now I have masking sticking to the base black and causing marring when it does lift. I'll have to touch up that as well.

20240407_194651.jpg
 

SHSU

Lieutenant Junior+Starmada Splash Of The Year 2019
Joined
Mar 8, 2017
Messages
1,668
We all are our own biggest critics. No body but you will notice. Looks like good progress from here.

SHSU
 

Sharpie223

Petty Officer 2nd Class
Joined
May 24, 2021
Messages
156
The uneven flake looks less noticible in sunlight, but the overspray where I had masking failure will need to be fixed. I would have sprayed a heavier layer of flake to even it out if the masking hadn't failed. My masking on the black did leave some impressions and pulled paint in several spots. Apparently I should have done the black a day in advance so it was more cured. I'll be touching up any spots that masking removed, flake overspray, and hopefully masking impressions. Then it will look a lot better. I may even consider a layer of clear coat to help even out any surface texture differences. Worst case, I get tired of it later on and add another layer of paint like so many other boats out there.

There is a good reason why I did the boat first and not my car.
 

Sharpie223

Petty Officer 2nd Class
Joined
May 24, 2021
Messages
156
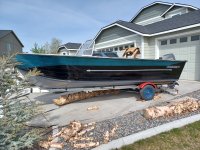
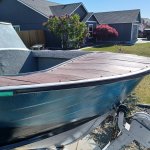
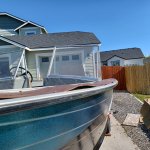
After working to remove the last of the masking, I touched up by the light of an electric lantern last night. Here's how it looks now. Some brush marks up close, but looks good (enough) from a distance. I was going to go with red flake for the longest time, but driving around over Easter weekend, I saw a lot of boats with that scheme and decided it was over done. This was Didspade brand. 008" sky blue. I think it looks more aqua/teal, I think I generally like it better than red anyway. Now I need to change my fender colors.

20240411_104415.jpg
 

Sharpie223

Petty Officer 2nd Class
Joined
May 24, 2021
Messages
156
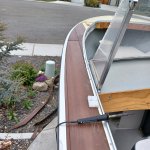
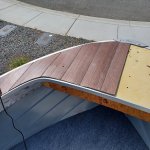
Got slightly more planking done today. Hopefully the opposite side is symmetrical enough that I can use the first as a template.

20240412_132150.jpg
 

Sharpie223

Petty Officer 2nd Class
Joined
May 24, 2021
Messages
156
Finished one half. I wanted to use it as a template for the other side, but my boat just isn't that symmetrical. The edges aren't the most accurate with the guess, hack, and check, so I'm thinking about if there's any kind of viable trim to cover it. Otherwise I will paint the aluminum first so the difference is less noticible.

20240413_113154.jpg
 

SHSU

Lieutenant Junior+Starmada Splash Of The Year 2019
Joined
Mar 8, 2017
Messages
1,668
I vote for painting with a little brown paint and calling it good. If we tried to hide every imperfection we would never finish our boats.

SHSU
 

Sharpie223

Petty Officer 2nd Class
Joined
May 24, 2021
Messages
156
I think I will need to go a different way than the hdpe. Last night I finished cutting and put the temporary screws in place. It looked great then and I was able to pull it all flat. This morning it is very warped, wrinkled really. The aluminum is just going to expand/contract too much for it to stay flat. At this point I'll likely just countersink the unwanted holes a little and patch with an appropriate epoxy putty, then paint the top. It looks much worse in real life than the pictures show. I was going to trim the top edge of the open bow this way, but now I will probably recreate the original vinyl trim, maybe without the upholstery foam.

20240418_094027.jpg

20240418_094126.jpg
 

Moserkr

Chief Officer + Starmada Splash Of The Year 2021
Joined
Nov 23, 2020
Messages
836
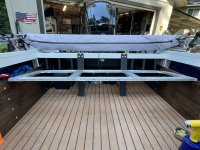
May I suggest looking into hydroturf? It could be held down nicely under the trim pieces, and its glued down to the gunnel top as well. Very durable, sharp looking, not overly expensive. Would cover up any holes too. I used it for the flooring of my boat instead of a vinyl or carpet. Was going to do the gunnels but the Admiral shot it down. Lots of colors and patterns to choose from too. I get the off brand type from the online jungle store.
IMG_4851.jpeg
 

Moserkr

Chief Officer + Starmada Splash Of The Year 2021
Joined
Nov 23, 2020
Messages
836
I hadn't thought about that. Its just EVA foam, right? I'll see what that will cost.
Yup closed cell eva foam. I got the teak color, its kinda golden with black stripes. Should cost you around $120 to do it is my guess. If guys can use it in duck boats, its gotta be durable. Love walking on it, super comfortable. Does not get hot.
 

Sharpie223

Petty Officer 2nd Class
Joined
May 24, 2021
Messages
156
Yeah, so the stuff made specifically for boats is a little spendy, but then I remembered that harbor freight has an EVA anti fatigue mat, grey, with a diamond plate pattern. $11 for a 6'x2' chunk it looks like, vs $60 for an 8x4 roll of the flooring, so maybe half the price. I think I'll go get 3 mats to do this. The foam should be cooler to the touch when baking in the sun than aluminum or hdpe. I'll probably use this for trimming the bow opening as well.
 

Sharpie223

Petty Officer 2nd Class
Joined
May 24, 2021
Messages
156
I bought 3 rolls of eva anti fatigue mat. It's thicker than I want but should be a good non slip surface if needed, and stay cooler than other materials. Lowes had some vinyl grey diamon plate made for garages, only 1/16 thick, but I've been on boats where you can't touch the edges in the summer, so decided against it. I also got a tach/hour/cylinder head temp gauge and gps speedometer on order. All that said, #3 came this last weekend so progress is on pause for awhile.
 

SHSU

Lieutenant Junior+Starmada Splash Of The Year 2019
Joined
Mar 8, 2017
Messages
1,668
I bought 3 rolls of eva anti fatigue mat. It's thicker than I want but should be a good non slip surface if needed, and stay cooler than other materials. Lowes had some vinyl grey diamon plate made for garages, only 1/16 thick, but I've been on boats where you can't touch the edges in the summer, so decided against it. I also got a tach/hour/cylinder head temp gauge and gps speedometer on order. All that said, #3 came this last weekend so progress is on pause for awhile.

If I read that last part correct,

Congrats!!!! A new Admiral in the family just bumps up the need to finish the project to spend time as a family. Nicely done sir

SHSU
 
Top