1986 Johnson 30hp - Vacuum lines and throttle control rod

Joined
Aug 27, 2026
Messages
10
Hi everyone. New to outboards, but not afraid to wrench around, used to race stock cars about 20 years ago around local short tracks and was pretty much my own mechanic.

I've got an inherited 1986 Johnson 30hp (J30TELCDM) and I'm trying to chase down why I've got a rough idle at just below midpoint, and it dies if I go any lower. I've got a list of things I've done carb/fuel pump/fuel filter/link&sync-wise, so now I'm looking at other possibilities.

Two questions:
1. Are the vacuum lines coming off the choke/primer and going into the T to the carb/engine supposed to look like this, and be without tie strap clamps on them? I've sprayed carb cleaner around them, especially around the one that connects to the choke/primer and it kills the engine immediately. Makes me think they're leaky and possibly causing my problem?
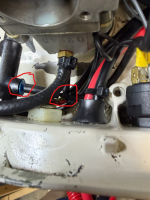
Screenshot 2026-09-02 190001.png Screenshot 2026-09-02 190034.png

2. The instructions in the Clymers for my engine for throttle control rod adjustment - I don't think I'm doing it right.

"With the shift lever in forward gear, the throttle lever should touch it's stop" - what do they mean by that? I don't see anything move or stop when I shift to forward, aside from the shifter. Nothing moves around the throttle that I see. What should I be seeing?
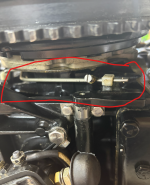

Screenshot 2026-09-02 190104.png

It tells me to loosen the collar on this rod then "push the rod to a full open position. position collar in contact with nylon pivot block and tighten."

I've tried to mess with this adjustment, but it seems to cause a lot more issues with the cam roller being shoved too far out from the cam and that doesn't seem right. I just adjusted it back to where the roller is just touching the cam between the dog ears like it should be. But then I'm pretty sure I'm not doing this right.


See below for what I did for #2.

Thank you!
 
Last edited:
Joined
Aug 27, 2026
Messages
10
For #2, poked around the internet more, found that I needed to adjust that collar/rod that I have circled so the roller is touching the cam between the dogears. Got it. Then readjust the cam/screw to the left of the carb so that the butterfly is closed between the dogears.

The "stop" is the long bolt with a rubber tip. Shifted in forward, twisted the throttle to WOT and just adjusted the bolt so that the butterfly valve is straight and level.

Will run it again tomorrow and see if I can figure out why this thing runs so rich.
 

saltchuckmatt

Captain
Joined
Jul 19, 2019
Messages
3,350
Okay....have lots of those motors and there fairly simple. No vacuum lines, Race is correct. Fuel enrichment lines and they are pressurized when you prime the motor. (Pulling knob not squeezing the ball) That eliminates the choke.

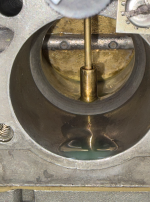
I'm guessing your idle circuit is still dirty. When the carb is in your hand, looking down the throat on top...open the butterfly valve. See the little holes? The best way is to remove the small metallic cap (welch plug) to gain access to them. Clean them with tiny welding torch cleaners or whatever. It can be done without removing the caps but only if it's not to messed up. Small brown gasket is critical as well as the bowl gasket. Did you make sure the float is set correctly? I test the float before I put the carb back on. As for the rod, that's to complete the link and sync for full speed. Read up on that because the interwebs has lots-o-info on that.
 

saltchuckmatt

Captain
Joined
Jul 19, 2019
Messages
3,350
Btw, all lines should have ties. Zip ties should have round bottoms not just any ties.

OEM parts only and others will disagree...they have told me repeatedly lately. Factor parts are widely available and mostly affordable. Not sure why people would use anything else. Good luck.
 
Joined
Aug 27, 2026
Messages
10
I'm guessing your idle circuit is still dirty. When the carb is in your hand, looking down the throat on top...open the butterfly valve. See the little holes? The best way is to remove the small metallic cap (welch plug) to gain access to them. Clean them with tiny welding torch cleaners or whatever. It can be done without removing the caps but only if it's not to messed up. Small brown gasket is critical as well as the bowl gasket. Did you make sure the float is set correctly? I test the float before I put the carb back on. As for the rod, that's to complete the link and sync for full speed. Read up on that because the interwebs has lots-o-info on that.

I've used OEM for my carb rebuild kit, replacement fuel pump (connector on bottom of assembly was broken).

I thought the same (about low idle circuit) and did all the cleaning. Pulled the welch plug, cleaned out the holes and carefully put the new one on with a thin coat of Permatex Aviation Gasket Sealant No 3.

Set the float correct, it's level and made sure it opens correctly. Needle seats correctly.

When I rebuilt the carb, I soaked it for 20 min in Berryman dip.

Despite all that, it's still running rich, so I was looking at the less obvious possibilities - if those primer lines are sucking air in...

I'll make sure those little lines are all tied good and try again. I just checked the schematic at crowleymarine.com and saw they were supposed to be there.

Thanks!
 

saltchuckmatt

Captain
Joined
Jul 19, 2019
Messages
3,350
I've used OEM for my carb rebuild kit, replacement fuel pump (connector on bottom of assembly was broken).

I thought the same (about low idle circuit) and did all the cleaning. Pulled the welch plug, cleaned out the holes and carefully put the new one on with a thin coat of Permatex Aviation Gasket Sealant No 3.

Set the float correct, it's level and made sure it opens correctly. Needle seats correctly.

When I rebuilt the carb, I soaked it for 20 min in Berryman dip.

Despite all that, it's still running rich, so I was looking at the less obvious possibilities - if those primer lines are sucking air in...

I'll make sure those little lines are all tied good and try again. I just checked the schematic at crowleymarine.com and saw they were supposed to be there.

Thanks!
Assuming your knob is all the way pushed back in before you try to accelerate... Plug the line going to your primer and see how it runs. Primer is only used for cold start.

Sounds like your doing everything correctly.
 

jimmbo

Supreme Mariner
Joined
May 24, 2004
Messages
14,646
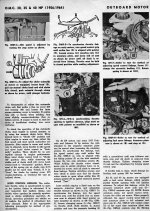
That collar on the Linkage is the Fuel Saver. It allows full Advance of the timing, along with almost completely closed Throttle Valve. OMC has used that linkage since the late 1950s, and the adjustment procedure hasn't changed
img698.jpgimg701.jpg
 

racerone

Supreme Mariner
Joined
Dec 28, 2013
Messages
39,914
The bolt with the rubber tip controls maximum spark advance.-----It should NOT be adjusted.----May result in $$$$$ repairs.-----Have you installed a new water pump impeller?----And post the actual compression values here.
 
Last edited:

tphoyt

Commander
Joined
Jun 10, 2010
Messages
2,317
It could be an internal leak. You could try pulling the line that goes to the intake cap
It and run it and see if it makes any difference.
There are o rings in the primer that can leak and allow a little fuel the pass. Not saying this it it but something to check out.
 
Joined
Aug 27, 2026
Messages
10
It could be an internal leak. You could try pulling the line that goes to the intake cap
It and run it and see if it makes any difference.
There are o rings in the primer that can leak and allow a little fuel the pass. Not saying this it it but something to check out.
OKie dokie. I'm not as familiar with priming system - the intake cap is the line going to the intake manifold?
 
Joined
Aug 27, 2026
Messages
10
Well, I'm stumped.

Clamping off/capping the primer system didn't change anything. It's the same symptoms. Starts up like a champ, revs nicely above mid-point in the throttle, but once the roller goes past the right dogear down into low idle, it dies. About 30 seconds later, I've got a small pool of gas in the throat and a wet looking valve.

Screenshot 2026-09-03 124723.png

No matter what I've done to the carb, the symptoms have been consistent so either I'm missing something in the carb or the problem is elsewhere.

Here's a list of what I've done:
- Rebuilt the carburetor with an OEM rebuild kit
-- I soaked the carburetor in Berryman dip.
-- I've pulled the carb back off and reverified the float is correct.
-- That second time, I also pulled off the welch cap and ensure the low idle holes were all clean/clear.
-- Float is set level and needle fully seats
- Replaced the fuel pump assembly and diaphragm with an OEM part
- Replaced the fuel lines going from fuel pump to carburetor
- Ensured that the link/sync is correct for my model engine (D4 according to Seloc)
- Ensured the throttle valve is closed at that point as well.
- Set the throttle rod collar screw correctly per the Clymers.
- Ensured I have good compression and spark for both cylinders. (about 122 for both)
- I have fresh gas at 50:1 mix.

Other items I've made sure of:
- The fuel bulb is tight when I pump it upright.
- I prime a little bit but set the choke back in when it warms up.
- I do let it warm up at mid throttle.
- I'm in a garbage can full of water, about 4 to 5" above the joint between lower unit and exhaust housing.
- I have water out the tell-tale.
- I don't see fuel leaks.
 

racerone

Supreme Mariner
Joined
Dec 28, 2013
Messages
39,914
Perhaps an issue with reed valves and / or crankcase compression??----Sorry, I can not see or touch your motor.---Just adding some things to check.
 
Top