1990 Bayliner 2651 resto

Drivewayboater2

Petty Officer 1st Class
Joined
Aug 21, 2019
Messages
266
To begin I’d like to thank everyone on this site. Reading and learning about what NOT to do 😂has helped me greatly. The knowledgeable folks on here is amazing. This post is a bit backwards since I’m trying to recreate the last 5-6 years and sharing my project. Which is still in progress!
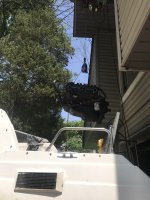
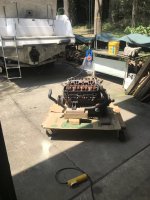
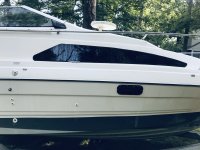
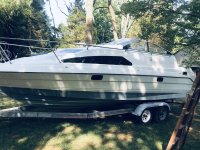
I bought my first boat in 1993. A new 16ft Bayliner Classic with a 70hp Force outboard. Still have it today! BUT always wanted a cruiser. Soooo the search was on. It took me a couple years and some convincing the admiral, and I finally found something affordable. This is what I was able to pickup. The previous owner let it go for 2k. I was thinking the trailer alone was worth that much.
 

Attachments

  • 08B2375D-A0FF-40C0-B048-CDA4CBDE722C.png
    08B2375D-A0FF-40C0-B048-CDA4CBDE722C.png
    3.5 MB · Views: 48

Drivewayboater2

Petty Officer 1st Class
Joined
Aug 21, 2019
Messages
266
The day I brought it home was a bit scary. Didn’t have far to tow but this was waaaaay different than towing a little bow rider. Nonetheless we made it
 

Attachments

  • 900EFAB7-BA44-48AF-81DF-ADE6E5F19F30.jpeg
    900EFAB7-BA44-48AF-81DF-ADE6E5F19F30.jpeg
    4.2 MB · Views: 29

Drivewayboater2

Petty Officer 1st Class
Joined
Aug 21, 2019
Messages
266
Being new to I/O I figured I would start with the outdrive and start pulling things apart… As parts came off the boat. I assessed each part. Replaced seals, bearing carrier, rebuilt trim cylinders and repainted parts of the outdrive. Unfortunately didn’t take many before pics but have taken the after pics.
 

Attachments

  • C37653A0-1155-441C-93F5-23269081C19D.jpeg
    C37653A0-1155-441C-93F5-23269081C19D.jpeg
    2 MB · Views: 23
  • 588E8164-E1B4-4CA5-8DAB-882710339DA7.jpeg
    588E8164-E1B4-4CA5-8DAB-882710339DA7.jpeg
    1 MB · Views: 21
  • 740523B0-A297-4B0C-9A1B-F3F100ABEF81.jpeg
    740523B0-A297-4B0C-9A1B-F3F100ABEF81.jpeg
    1 MB · Views: 21
  • 25648C90-142A-4200-B499-65E23AABC349.jpeg
    25648C90-142A-4200-B499-65E23AABC349.jpeg
    1.1 MB · Views: 21
  • 3CC8355F-DEC6-4E4A-93F7-B206FF7E709B.jpeg
    3CC8355F-DEC6-4E4A-93F7-B206FF7E709B.jpeg
    1.1 MB · Views: 21
  • 11EF95A6-A668-4C1F-A245-17D95C527E67.jpeg
    11EF95A6-A668-4C1F-A245-17D95C527E67.jpeg
    1.1 MB · Views: 21
  • 15D6604C-254E-43D6-A860-3979C8FA55E6.jpeg
    15D6604C-254E-43D6-A860-3979C8FA55E6.jpeg
    1.1 MB · Views: 21
  • A555B810-74A8-43A3-B15E-C90FFC1EF17C.jpeg
    A555B810-74A8-43A3-B15E-C90FFC1EF17C.jpeg
    1.1 MB · Views: 21
  • 0620B498-0FC7-4DA6-A6CA-B623BABDA38D.jpeg
    0620B498-0FC7-4DA6-A6CA-B623BABDA38D.jpeg
    963.9 KB · Views: 21

Drivewayboater2

Petty Officer 1st Class
Joined
Aug 21, 2019
Messages
266
The most useful part of this rebuild.
 

Attachments

  • 910573FE-542C-4C4E-B40B-D36EC88FF590.jpeg
    910573FE-542C-4C4E-B40B-D36EC88FF590.jpeg
    1.1 MB · Views: 2

Drivewayboater2

Petty Officer 1st Class
Joined
Aug 21, 2019
Messages
266
Next up was the inside of the engine bay. Started at the top of the engine and worked my way down. First was to rebuilt quadrajet carb. It was a mess. But learned a lot from people on the forum.
 

Attachments

  • B6FBB454-61B9-4772-BE41-79786159A10D.jpeg
    B6FBB454-61B9-4772-BE41-79786159A10D.jpeg
    1.4 MB · Views: 11
  • D86B590F-1A75-4C7B-88E4-E50E195999A7.jpeg
    D86B590F-1A75-4C7B-88E4-E50E195999A7.jpeg
    919.8 KB · Views: 12
  • 8C580AA7-74A7-439E-BC09-3F74BB569640.jpeg
    8C580AA7-74A7-439E-BC09-3F74BB569640.jpeg
    2 MB · Views: 12
  • 1CB7BB49-DBA3-4EBF-A08C-45AED4A4D7F3.jpeg
    1CB7BB49-DBA3-4EBF-A08C-45AED4A4D7F3.jpeg
    1.9 MB · Views: 12
  • E048E3F8-CF43-4215-B872-896893E8A752.jpeg
    E048E3F8-CF43-4215-B872-896893E8A752.jpeg
    1.1 MB · Views: 11
  • 60D1086B-2740-4758-B3F1-43501BA9FE4F.jpeg
    60D1086B-2740-4758-B3F1-43501BA9FE4F.jpeg
    1.1 MB · Views: 11
  • 532C5978-FDB6-48DE-96D3-FFE37EE887D0.jpeg
    532C5978-FDB6-48DE-96D3-FFE37EE887D0.jpeg
    1.1 MB · Views: 11

Drivewayboater2

Petty Officer 1st Class
Joined
Aug 21, 2019
Messages
266
Worked my way through the intake manifold. It was a mess on the block. Removed Risers and exhaust( cleaned with muratic acid) and painted.
 

Attachments

  • 732D4647-1933-4049-810B-CEC5334034C1.jpeg
    732D4647-1933-4049-810B-CEC5334034C1.jpeg
    1.2 MB · Views: 14
  • B60D5303-3AFB-49CE-96F5-F39B7F364E73.jpeg
    B60D5303-3AFB-49CE-96F5-F39B7F364E73.jpeg
    1.2 MB · Views: 13
  • 608601E7-678F-4488-AEC2-515668D31B1F.jpeg
    608601E7-678F-4488-AEC2-515668D31B1F.jpeg
    1.3 MB · Views: 14
  • FA9B8DFA-3BA3-4661-8BC9-FAD50A99E40D.jpeg
    FA9B8DFA-3BA3-4661-8BC9-FAD50A99E40D.jpeg
    2.7 MB · Views: 14

Drivewayboater2

Petty Officer 1st Class
Joined
Aug 21, 2019
Messages
266
Distributor was rebuilt. New bushings were installed since there was slop on the rod. The fuel pump and power steering were both rebuilt and painted.
 

Attachments

  • 2108554D-C99E-477C-A7A5-BAF561BFAB1D.jpeg
    2108554D-C99E-477C-A7A5-BAF561BFAB1D.jpeg
    1.2 MB · Views: 10
  • 50DF0C01-A872-4329-88D8-FD68BC304782.jpeg
    50DF0C01-A872-4329-88D8-FD68BC304782.jpeg
    1.1 MB · Views: 11
  • 206FCEC4-6792-43BF-B2FD-10B76BE12E20.jpeg
    206FCEC4-6792-43BF-B2FD-10B76BE12E20.jpeg
    1.6 MB · Views: 11
  • 495BF01F-D988-4AF2-8AEA-DC62D9EE8303.jpeg
    495BF01F-D988-4AF2-8AEA-DC62D9EE8303.jpeg
    1.9 MB · Views: 11
  • 98BD110B-24E6-458B-9023-473007B9E051.jpeg
    98BD110B-24E6-458B-9023-473007B9E051.jpeg
    1.3 MB · Views: 11
  • C58B6B8E-12C2-43BA-9B46-532698A1E4C1.jpeg
    C58B6B8E-12C2-43BA-9B46-532698A1E4C1.jpeg
    1.2 MB · Views: 11
  • 7C35F14A-4FFA-415F-8E95-67399EC6891C.jpeg
    7C35F14A-4FFA-415F-8E95-67399EC6891C.jpeg
    1.1 MB · Views: 11
  • F584CD63-F05F-489D-AD74-85FCB47BB5A7.jpeg
    F584CD63-F05F-489D-AD74-85FCB47BB5A7.jpeg
    988.7 KB · Views: 11
  • 94ABC88B-4DC3-4430-8635-CFC3A3EE1955.jpeg
    94ABC88B-4DC3-4430-8635-CFC3A3EE1955.jpeg
    1 MB · Views: 10

Drivewayboater2

Petty Officer 1st Class
Joined
Aug 21, 2019
Messages
266
My intention is to replace the long block and transfer all usable parts. The old engine came out pretty easy.
 

Attachments

  • EC74FF3D-426D-4A04-AC4A-7810EA502487.jpeg
    EC74FF3D-426D-4A04-AC4A-7810EA502487.jpeg
    1.8 MB · Views: 33
  • 975EFF1B-C618-481F-925C-8768C27A1EA5.jpeg
    975EFF1B-C618-481F-925C-8768C27A1EA5.jpeg
    1.9 MB · Views: 31
  • A8DCECF2-761C-4D17-90D6-CDF8AC2A3E1C.jpeg
    A8DCECF2-761C-4D17-90D6-CDF8AC2A3E1C.jpeg
    1.8 MB · Views: 30
  • 2751A42A-28EB-4329-A786-6CD70F83113D.jpeg
    2751A42A-28EB-4329-A786-6CD70F83113D.jpeg
    1.8 MB · Views: 31

Drivewayboater2

Petty Officer 1st Class
Joined
Aug 21, 2019
Messages
266
The next step was to replace the side windows since they were cracked and leaking. Made a stencil and traced the windows before removing the old plexiglas. Stress cracks were addressed when old windows were removed. The top hatch was repaired since that leaked as well. Window was removed and re bedded. The top windows got the same treatment since the previous owner just kept adding more silly cone. All windows were done with 3M double sided tape and Dow 795 caulk. FYI shelf life after opening this stuff isn’t long. Be prepared to use it quickly and have all things that need caulking ready to go.
 

Attachments

  • 82229D05-8C4F-4343-B8D9-B2FA71F4195A.jpeg
    82229D05-8C4F-4343-B8D9-B2FA71F4195A.jpeg
    1.8 MB · Views: 24
  • B9DC2927-25D0-4FB0-B62A-23A122B6DABD.jpeg
    B9DC2927-25D0-4FB0-B62A-23A122B6DABD.jpeg
    659.1 KB · Views: 23
  • 664B3E19-357B-4C2B-B1B2-7D490F8F5E01.jpeg
    664B3E19-357B-4C2B-B1B2-7D490F8F5E01.jpeg
    2.8 MB · Views: 24
  • C52A08DB-6DB6-49FE-9C37-C598D1DA6152.jpeg
    C52A08DB-6DB6-49FE-9C37-C598D1DA6152.jpeg
    1.1 MB · Views: 24
  • 639F1D98-0E00-4103-93AA-80CA3E3FE2FB.jpeg
    639F1D98-0E00-4103-93AA-80CA3E3FE2FB.jpeg
    970.9 KB · Views: 23
  • A0D86632-8EDB-40BF-B8FA-080ED01FE44D.jpeg
    A0D86632-8EDB-40BF-B8FA-080ED01FE44D.jpeg
    1.1 MB · Views: 23
  • 94193196-FD18-42A0-BF7B-F7D8AEC071A1.jpeg
    94193196-FD18-42A0-BF7B-F7D8AEC071A1.jpeg
    1.5 MB · Views: 23

Drivewayboater2

Petty Officer 1st Class
Joined
Aug 21, 2019
Messages
266
All decals and pin striping have been removed. Much wet sanding and compounding will be up next. Did a test spot and I figure it’s gonna take 15 hours to do the whole boat. I like the way it looks without the decals and striping.
 

Attachments

  • 1A115D7D-2833-4823-BF00-A1AFDCF0B3D6.jpeg
    1A115D7D-2833-4823-BF00-A1AFDCF0B3D6.jpeg
    4.2 MB · Views: 17

Drivewayboater2

Petty Officer 1st Class
Joined
Aug 21, 2019
Messages
266
Other projects included redoing the exterior seats. Challenging but doable if you take your time. Each piece of vinyl was carefully removed so templates could be made. Here’s the bench seat. Sewing was done on a regular surger and a number 19 needle.
 

Attachments

  • 84A718E6-4B15-43AE-BA25-F5B8B0FAA9ED.jpeg
    84A718E6-4B15-43AE-BA25-F5B8B0FAA9ED.jpeg
    1.6 MB · Views: 19
  • 38BC06AC-48BC-4F94-80A9-56D457098DB7.jpeg
    38BC06AC-48BC-4F94-80A9-56D457098DB7.jpeg
    1.7 MB · Views: 15
  • D0B996E0-7D3C-4860-BA31-E9BF79BE2C93.jpeg
    D0B996E0-7D3C-4860-BA31-E9BF79BE2C93.jpeg
    1.4 MB · Views: 13
  • 1093B2AD-1F07-4FDF-9C37-E2F80ECDA83E.jpeg
    1093B2AD-1F07-4FDF-9C37-E2F80ECDA83E.jpeg
    2.4 MB · Views: 15
  • 39F68269-21E8-4745-A4C9-3801F20E7F6F.jpeg
    39F68269-21E8-4745-A4C9-3801F20E7F6F.jpeg
    1 MB · Views: 16
  • 5EA4563B-2EF5-4A3F-81A1-FE8D5CBD299D.jpeg
    5EA4563B-2EF5-4A3F-81A1-FE8D5CBD299D.jpeg
    1 MB · Views: 16
  • 6288A8F8-E60A-41B3-BDA6-395B4928F5EE.jpeg
    6288A8F8-E60A-41B3-BDA6-395B4928F5EE.jpeg
    1.2 MB · Views: 17
  • 74094FFD-F748-46FD-9D9F-144AD4CC0F34.jpeg
    74094FFD-F748-46FD-9D9F-144AD4CC0F34.jpeg
    1.2 MB · Views: 19
  • DCD993B3-9943-41D6-A1C1-237D18E15C8D.jpeg
    DCD993B3-9943-41D6-A1C1-237D18E15C8D.jpeg
    1.4 MB · Views: 19

Drivewayboater2

Petty Officer 1st Class
Joined
Aug 21, 2019
Messages
266
Another project was to redo the aft cabin window( much like the front hatch) and repaint the small access hatch next to that window.
 

Attachments

  • 74F030D6-C39B-410B-AEC9-229110D42D7D.jpeg
    74F030D6-C39B-410B-AEC9-229110D42D7D.jpeg
    1 MB · Views: 17
  • B2B0C2B6-8AB5-478B-96AA-4586BAAE0BAB.jpeg
    B2B0C2B6-8AB5-478B-96AA-4586BAAE0BAB.jpeg
    2.2 MB · Views: 17
  • 11DF0AFC-5E1F-4BAD-83F9-B03938F713B4.jpeg
    11DF0AFC-5E1F-4BAD-83F9-B03938F713B4.jpeg
    1.9 MB · Views: 17

Drivewayboater2

Petty Officer 1st Class
Joined
Aug 21, 2019
Messages
266
Also redid the gunnel on the starboard side
 

Attachments

  • BBCA8243-541A-4DB9-BE3A-28F972BA394A.jpeg
    BBCA8243-541A-4DB9-BE3A-28F972BA394A.jpeg
    1.2 MB · Views: 8
  • 74328686-03FC-4332-8C70-7F0FAA5715DD.jpeg
    74328686-03FC-4332-8C70-7F0FAA5715DD.jpeg
    1.4 MB · Views: 8

Drivewayboater2

Petty Officer 1st Class
Joined
Aug 21, 2019
Messages
266
Trim pump was gone over and bench tested. A good cleaning and paint on the bracket that holds it down.
Trim tabs also needed tlc. Previous owner had them covered with bottom paint??? Is this a common practice?
 

Attachments

  • E6AC7DC6-27C3-41F5-AB6E-E554C9D11B1C.jpeg
    E6AC7DC6-27C3-41F5-AB6E-E554C9D11B1C.jpeg
    1 MB · Views: 14
  • AD1F59E0-1E38-4DF1-A6F9-F9A74AD2B5AA.jpeg
    AD1F59E0-1E38-4DF1-A6F9-F9A74AD2B5AA.jpeg
    1.9 MB · Views: 14
  • 54DC2454-C1E2-4D49-8C2A-E2830AE0D48F.jpeg
    54DC2454-C1E2-4D49-8C2A-E2830AE0D48F.jpeg
    1.6 MB · Views: 14

Drivewayboater2

Petty Officer 1st Class
Joined
Aug 21, 2019
Messages
266
The dashboard needed attention. All gauges where bench tested. Light bulbs replaced. I used headlight lens cleaner to clear up the cloudy lenses. sanded down the outer plastic and gave them 5/6 coates of paint. Light sanding between each coat. All other toggle switches got the same paint As well as the entire dash panel.
 

Attachments

  • 203E4FEB-28F1-4F8D-A360-AC76C2440349.jpeg
    203E4FEB-28F1-4F8D-A360-AC76C2440349.jpeg
    1.2 MB · Views: 17
  • B9AAA285-E137-46AA-8E2F-7994A3F02FF0.jpeg
    B9AAA285-E137-46AA-8E2F-7994A3F02FF0.jpeg
    1.1 MB · Views: 17
  • 2585D4F6-51B4-485D-9AC0-479249EFF508.jpeg
    2585D4F6-51B4-485D-9AC0-479249EFF508.jpeg
    1.2 MB · Views: 17
  • A8B32401-16E2-4E24-A137-2F39C2237C45.jpeg
    A8B32401-16E2-4E24-A137-2F39C2237C45.jpeg
    1.8 MB · Views: 17
  • B2A244FC-8CF9-4D65-A3EC-51A6BDD50A27.jpeg
    B2A244FC-8CF9-4D65-A3EC-51A6BDD50A27.jpeg
    1.3 MB · Views: 17

Drivewayboater2

Petty Officer 1st Class
Joined
Aug 21, 2019
Messages
266
I have now removed the inner transom ring along with the balance of the outdrive. Not sure if the inner ring is good or not( see pic). Some corrosion is noticeable on the bottom. Is this part still serviceable???
 

Attachments

  • 99F4D1B0-8150-4B66-8B29-577608B0C602.jpeg
    99F4D1B0-8150-4B66-8B29-577608B0C602.jpeg
    1.4 MB · Views: 20
  • E1AF5DFD-7147-4F25-894D-22251E81860B.jpeg
    E1AF5DFD-7147-4F25-894D-22251E81860B.jpeg
    1.3 MB · Views: 20

Drivewayboater2

Petty Officer 1st Class
Joined
Aug 21, 2019
Messages
266
Now that the engine, Y pipe and inner transom ring have been removed it gave me full access to the transom. Taking core samples seems that the bottom third is suspect. To be expected on a boat of her age. I anticipated this would be a candidate for replacing. Looking at other transom replacement’s on this forum they show having to replace the entire section of the transom. On this boat it seems like the center transom section is the only 2” thick part of the transom that would need replacing. It’s roughly 3ft wide by 3 ft tall. OR does the entire transom need to be replaced.
 

eggs712

Petty Officer 1st Class
Joined
May 8, 2012
Messages
334
Now that the engine, Y pipe and inner transom ring have been removed it gave me full access to the transom. Taking core samples seems that the bottom third is suspect. To be expected on a boat of her age. I anticipated this would be a candidate for replacing. Looking at other transom replacement’s on this forum they show having to replace the entire section of the transom. On this boat it seems like the center transom section is the only 2” thick part of the transom that would need replacing. It’s roughly 3ft wide by 3 ft tall. OR does the entire transom need to be replaced.
It's hard to say without pictures. Once you start cutting out the rot, you should be able to see more of what you're really dealing with.
 
Top