Time to re-upholster - Formula 330 SS

tpenfield

Moderator
Staff member
Joined
Jul 18, 2011
Messages
17,706
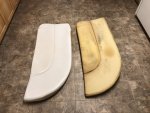
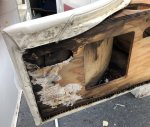
I noticed towards the end of the season that the vinyl seating in the cockpit of my Formula 330 SS is starting to dry up and crack. . .

A few places now, but these things only get worse.
Click image for larger version  Name:	IMG_3164B.jpg Views:	1 Size:	116.0 KB ID:	10805343

So, I am planning on re-doing the seats this winter. I plan on keeping the boat a few more years, and if I just let the seats go as they are, they will probably be a mess in 3 years. Probably best to do it now and get a few years of use and then no have to worry about it when selling.

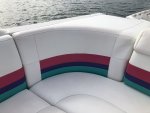
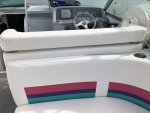
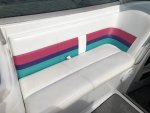
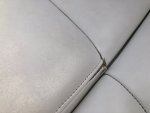
The seats are mostly white, but do have a 3-band color scheme, as you can see below.

Click image for larger version  Name:	IMG_3152B.jpg Views:	1 Size:	106.5 KB ID:	10805342

I sort of like design #5 so far, with the banded section in the middle of each piece. I was thinking about a diamond quilt for the center section, but that may be too busy. I also searched some substitute colors of Nautolex (actually Boltaflex).

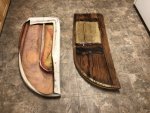
Here is a close-up of the existing colors

Click image for larger version  Name:	1996-Formula-330-Vinyl-ColorsB.jpg Views:	1 Size:	100.8 KB ID:	10805345

Anyway, I've got a bunch of sample swatches on order to see how the colors and texture look in real life.

Then I got to get an industrial sewing machine (see my other thread on the topic). I tried making seat covers for my previous boat using a household machine and it was extremely difficult. I plan on getting a 'walking foot' 'needle/compound' feed machine, which should do quite nicely.

I still have to do some measuring and estimating for material. I'll update as I proceed :)
 

Attachments

  • IMG_3165B.jpg
    IMG_3165B.jpg
    57.4 KB · Views: 0
  • IMG_3166B.jpg
    IMG_3166B.jpg
    110.1 KB · Views: 0
  • IMG_3158B.jpg
    IMG_3158B.jpg
    109.6 KB · Views: 0
  • IMG_3152B.jpg
    IMG_3152B.jpg
    106.5 KB · Views: 0
  • IMG_3164B.jpg
    IMG_3164B.jpg
    116 KB · Views: 0
  • 1996-Formula-330-Vinyl-ColorsB.jpg
    1996-Formula-330-Vinyl-ColorsB.jpg
    100.8 KB · Views: 0
  • 523027_Boltaflex_Color_Mix_2B.jpg
    523027_Boltaflex_Color_Mix_2B.jpg
    52.6 KB · Views: 0
Last edited:

alldodge

Moderator
Staff member
Joined
Mar 8, 2009
Messages
40,746
Had part of the captains chair redone by a fella in Tenn, and did a nice job. Mine has 3 colors and he matched them and the texture very well. Should have had the whole seat done, but might do it this winter our self

Mine is Teal, rose and a lighter Blue
 

Lowlysubaruguy

Chief Petty Officer
Joined
Dec 3, 2012
Messages
514
See if Perfect Fit McDonald Douglass has an on line color chart for the vinyls they carry they ship and are very affordable.
 

Lowlysubaruguy

Chief Petty Officer
Joined
Dec 3, 2012
Messages
514
The curves and the multi sections are mid to upper level skill set. Practice with a few things that have similar traits first, Ive sewn a couple seats very similar to this and they do require a little more than one might imagine or your lines will be wavy. best advice would be sewing a bunch of 2” pieces together with a gentle curve thennn entreated the curve as you get a hand on it stretch them out over a piece of foam and see how well your seams lay out. Another option would be to do away with the multi colors and make them all one color you could add a welt cord or something and make it out of two pieces or where it requires more than one piece to conform.

Your pieces are also large on top of your machine purchase you will need to build or butt your machines top to a workbench or possibly a cheap dining room table from craigslist this will not only make the job easier but it will also make your seams straighter long curves in multiple pieces are a lot more complex than you might think. I’m kind of spoiled my table is 7’x12’

Three things i would want on a machine if I knew then what I know know Servo motor 1” edge binding tool and a top stitch seam guide foot. Mind you not all machines can be fitted with a top stitch seam guide you can put a servo motor and edge binder attachment on most machines though.
 

tpenfield

Moderator
Staff member
Joined
Jul 18, 2011
Messages
17,706
Thanks Lowlysubaruguy now that you mention it, I can see how Formula addressed the curves with some extra paneling. It looks like the large white piece of the curves fans out a bit at the top.

Screen Shot 2019-10-02 at 5.27.00 AM.png

Screen Shot 2019-10-02 at 5.27.23 AM.png

I'll have to keep that in mind as I make the patterns, etc.
 

southkogs

Moderator
Staff member
Joined
Jul 7, 2010
Messages
14,795
I like the quilting/diamond concept in 2 & 4, but I like the color scheme of the white (#5) better. Not sure if the diamond is worth all of the extra effort, but it's kinda' high end feelin'.
 

tpenfield

Moderator
Staff member
Joined
Jul 18, 2011
Messages
17,706
I like the quilting/diamond concept in 2 & 4, but I like the color scheme of the white (#5) better. Not sure if the diamond is worth all of the extra effort, but it's kinda' high end feelin'.

Yes, I was not sure how well a pre-made diamond quilt fabric will hold up under UV exposure. Of the high-end fabric brands that I have researched, I have not come across a quilted version.
 

southkogs

Moderator
Staff member
Joined
Jul 7, 2010
Messages
14,795
Sea Ray is using it (or something close) on a few of their newer models. I don't know the current line up that well, but I noticed it on a project I did for them last year. Maybe a skip through their stuff ... or a stop at the local dealer ... will give you a few ideas.

Might be cool for just an accent strip here or there.
 

tpenfield

Moderator
Staff member
Joined
Jul 18, 2011
Messages
17,706
Quick update . . .

I brought a few of the seat pieces home to begin working on them.

The plywood bases are really wet, but still quite solid. So, I'm going to dry them out, treat them for mold and them apply some wood sealer to them. . . maybe just some resin or something similar.

This base I had previously fixed when I got the boat, as it was split in the middle (must have been a heavy weight sitting there :D

Click image for larger version  Name:	IMG_3217.JPG Views:	1 Size:	287.3 KB ID:	10806737

The foam is actually 2 separate pieces, glued to the base, and the 'tab' goes in between the pieces where they meet.
 

Attachments

  • IMG_3218.JPG
    IMG_3218.JPG
    226.3 KB · Views: 2
  • IMG_3217.JPG
    IMG_3217.JPG
    287.3 KB · Views: 2

tpenfield

Moderator
Staff member
Joined
Jul 18, 2011
Messages
17,706
I took apart one of the seat backs this evening . . .

The base board had a bit of rot going on in the top right corner. So, I'll want to make a new board.

IMG_3221.JPG

Hoping that I can do as well as the factory folks. :)
 

Attachments

  • IMG_3222.JPG
    IMG_3222.JPG
    185.8 KB · Views: 2

tpenfield

Moderator
Staff member
Joined
Jul 18, 2011
Messages
17,706
After sorting through a bunch of sample colors, I think I have come up with a decent color scheme that will be close to the original. . .

IMG_3438.JPG
Pink = Nautolex Capitano 'Party Pink'

Purple = Morbern Seabrook 'Purple'

Teal = Morbern Sanibel 'Teal'

White is going to be Morbern Seabrook 'White'

The Teal is the least matching color, but the best one of the samples I ordered.

Next steps will be to order the material and supplies and get a sewing machine that will be up to the task.
 

tpenfield

Moderator
Staff member
Joined
Jul 18, 2011
Messages
17,706
I finished seat dis-assembly today. It is a good thing that I am doing this now, because I am finding more rot in the seat structure. These pictures are from the forward section of the 'U' shaped seat.

IMG_3452.JPG
.
I filled the back of the Explorer with seat components. I'm going to need to re-fab some of the bases. Other may just need some drying out, bleaching, more drying out, and then water sealer.

The only seat that had any sort of resin coating on the base structure (plywood) was the helm seat. Not sure why they did the helm and not others :noidea:
 

Attachments

  • IMG_3449.JPG
    IMG_3449.JPG
    177.4 KB · Views: 2
  • IMG_3447.JPG
    IMG_3447.JPG
    227 KB · Views: 2

tpenfield

Moderator
Staff member
Joined
Jul 18, 2011
Messages
17,706
Going to have a brand new boat by the time ya sell it

I know :D . . . Kind of a odd circumstance . . . if I don't keep up with things, it may not be worth selling in a few years.

I will say, that I am finding the boat's 'design life' . . . as per Scott Danforth 's past commentaries on boat design . . . seems to be about 20 years.
 

Scott Danforth

Grumpy Vintage Moderator still playing with boats
Staff member
Joined
Jul 23, 2011
Messages
47,538
With the Restoration DIY forum, we can extend the service life....
 

tpenfield

Moderator
Staff member
Joined
Jul 18, 2011
Messages
17,706
Quick Update:

As per my other thread on sewing machines, I picked up a Consew 206RB-4 yesterday and have been getting used to it and trying out some stitching on some spare vinyl.

Here is a mock-up of the backrest panel with the channeled panel. I have been working on being able to make very straight seems for the color stripes that will be on the lower portion of the panels.

Here are a couple pieces of my work so far. . .

Click image for larger version  Name:	IMG_3459.JPG Views:	1 Size:	110.4 KB ID:	10810372
.

I am liking the walking foot/needle feed, but the machine is in need of a servo motor. It currently has the clutch motor, and I did a 'gear reduction' thing swapping out the pulleys. The setup as I got the machine actually had a 16% overdrive. I reduced the ratio down to 3 turns of the motor to 1 of the machine. It slowed things down quite a bit, but there is still a lack of control that I would get with a servo motor.
 

tpenfield

Moderator
Staff member
Joined
Jul 18, 2011
Messages
17,706
Thanks, guys. I ordered a servo motor, so I should be good to go in a week or 2. I still have to order the fabric and thread. I have been learning about threads. There are certain threads that are referred to as 'lifetime' threads in that they will outlast the material. A couple of brand names are 'Profilen' and 'Tenara' they seem to be PTFE-based threads.

IIRC, on my Formula 242 seat re-upholster, I used nylon thread, which is OK, but not great for UV exposure and durability.
 

tpenfield

Moderator
Staff member
Joined
Jul 18, 2011
Messages
17,706
Question and possibly 'polling' the audience for input.

Last time I did a re-upholster on a boat (my Formula 242 back 10 years ago :eek: ) I took apart all of the old seat coverings and used the pieces as templates for the new material. That method was OK, but not great, as it seemed that some of the pieces had shrunk or distorted their shape, so the resulting covers were not as 'perfect' as I wanted.

I have been thinking on this re-upholstering, should I not dis-assemble the pieces, but instead use template paper to make templates for the pieces??? Since I am changing up the design a bit with the channeling fabric sections in the backrests, not all of the existing vinyl pieces would be usable as templates anyway. My need for templates would be more in the areas of the top and bottoms of the coverings, where they make the corners and various rounded shapes.

So thoughts on . . .

(1) disassemble the existing pieces to use as templates for the new pieces. . .

OR

(2) Make templates as needed from the existing coverings by tracing over template paper.

:noidea:

Thanks in advance for any thoughts or experiences on this.
 
Top