Thought I'd show off my new build

Efini Motorsport

Petty Officer 2nd Class
Joined
Feb 21, 2018
Messages
108
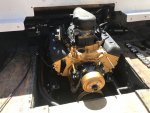
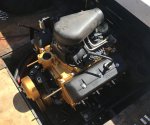
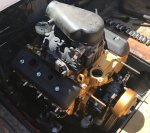
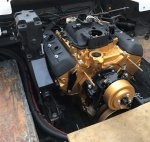
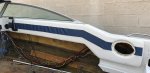
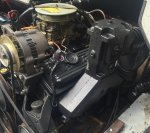
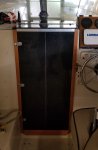
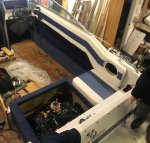
Last weekend I finally dropped the engine into my new boat. It's a 90 Four Winns Freedom 195. I picked it up a few months ago off a buddy for $450 on the trailer with an extra engine, 2 outdrives and a bunch of spare parts. The motor was a carbed OMC but needed a rebuild and the extra one was already torn down to rebuild. Going with a rebuild with the upgrades I wanted would have cost about $2000 (vortec heads, new cam, new pistons, machine work, etc). Instead I decided to just drop in a vortec 4.3, fuel injection and all. And for those of you who say I can't do that for whatever reason I don't need to hear it. I changed the starter to a marine one and things like the head gasket and freeze plug are no different (I checked). This is a MPFI not a TB setup and all the connectors are sealed so no I'm not building a bomb. I went a little (OK probably a lot) overboard with the engine by detailing and painting it and I still need to paint the throttle body and a few other pieces. The pictures are a little washed out from the sun but the engine is gold metallic and the valve covers, front cover and upper intake manifold are wrinkle black. The rest of the part will be black or gold.
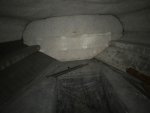
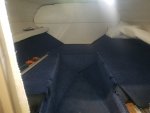
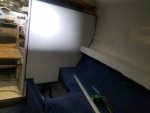
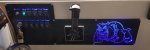
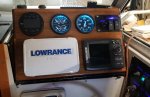
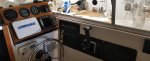
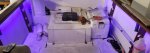
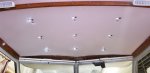
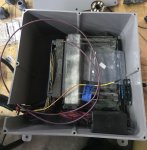
I started on the wiring today and have the PCM side pretty much done. I just need to integrate the gauge output wiring and the lift pump solenoids. In addition to the motor the boat is getting a whole new interior (pics to come), including reworked seating and all new foam and vinyl. I will also be doing new gauges, LED lighting and a 9" android touch screen for audio navigation. I'm making progress daily but am horrible about documenting it. If you have any constructive comments or questions just ask.
 

Attachments

  • photo289010.jpg
    photo289010.jpg
    2.2 MB · Views: 1

Efini Motorsport

Petty Officer 2nd Class
Joined
Feb 21, 2018
Messages
108
Temporarily installed the exhaust to start mocking up the shifter and throttle brackets. All I have to do is weld the two plates together and tweak the holes slightly and they should fit the vortec manifold perfectly. I also got the first panel recovered and the throttle control in. The blue in the panel has a carbon fiber pattern to it and is top stitched in gold to match the engine (and the Polk speakers I'm putting in). The seats are going to have a carbon fiber blue strip running all the way through them fore to aft and up over the transom. The engine cover and center of the transom cushions will have a wider stripe. I should have some of that done this weekend along with the new carpet installed. I was going to do a custom seadek floor but even at my cost it would still be almost what I have into the boat so far.
 

Attachments

  • photo289566.jpg
    photo289566.jpg
    1.2 MB · Views: 0
  • photo289567.jpg
    photo289567.jpg
    1.6 MB · Views: 0

Efini Motorsport

Petty Officer 2nd Class
Joined
Feb 21, 2018
Messages
108
The spark plug wires and exhaust coupler hoses will be blue silicone and I'm trying to find blue silicone that will work for the rest of the hoses
 

Lou C

Supreme Mariner
Joined
Nov 10, 2002
Messages
11,842
looks good, in order to mate that center riser exhaust (late OMC/Volvo style) to the OMC Y pipe you can get Volvo hoses and the 90* elbow exhaust adaptor that adapts from the 4" riser hose to the 3.5" OMC Y pipe. If you use Volvo parts they are pretty expensive (like $200 each). I used them when I did my exhaust conversion last summer. There is a GLM copy out there, that is much cheaper I'm sure but I used Volvo parts because I'm in salt water and want it to last....
 

Attachments

  • photo284492.jpg
    photo284492.jpg
    141.6 KB · Views: 0

Efini Motorsport

Petty Officer 2nd Class
Joined
Feb 21, 2018
Messages
108
I got a set of Volvo elbows from a buddy of mine for $20 a pair, brand new. It's good to know people. I am using the stock Chevy serpentine belt setup instead of the OMC v belts. I did have to move the alternator to the port side top of the engine to keep them out of the way of the water hoses. I got lucky that the accessory bracket off the V8 engines mounts the alternator above the power steering pump. It's not a perfect fit but I can make it work and keep the serpentine belt. Time to break out the TIG. I'll be getting a whole lot done on it this weekend and should have a lot more pics.
 

trailking82

Petty Officer 3rd Class
Joined
Dec 31, 2010
Messages
84
Motor looks good, as does the interior.

However my suggestion is too hold on any more work. I notice the boat has, what looks like a plywood deckover, meaning someone laid plywood over the original deck. This is a strong indicator the original deck is rotten, also indicating the stringers and transom Have also rotten out. The boat will not be safe to use and very well could result in a disaster leaving the boat and all your hard work at the bottom.

head over to the restore section of the forum, there you will find out how to do core samples of the stringers and transom. Also you will get an idea of the work involved in rebuilding the main structure of the boat.... if you want to.
 

Efini Motorsport

Petty Officer 2nd Class
Joined
Feb 21, 2018
Messages
108
The only rot was in the the panel over the fuel tank and the two pieces over the bow ladder. I cut new ones already and they'll get recovered. I've poked around a ton trying to find soft spots but haven't found any. The floors are in good shape. I think what you might have seen is some of the grey bilge paint. I'll check out the core ideas though and see if maybe I come up with something. If they did do new floors the did a good job glassing them in.Thanks for looking out.
 

Efini Motorsport

Petty Officer 2nd Class
Joined
Feb 21, 2018
Messages
108
I'll have another round in the next day or so. I got most of the cabin recovered this weekend. White monkey fur headliner and walls and blue patterned carpet for the lowers and floors. I had hoped to get the cockpit recovered but ran short on material. The cabin took almost half a roll of carpet. By luck I got 2 rolls for free from another shop we trade work with. I did figure out battery mounting and wiring, mounted the pump for the trim tabs (take off from a boat my brother scrapped) and found out that My lift pump work and with much simpler wiring than I expected. It turns out I only need to use about 4 wires from the original boat/engine harness to feed the gauges and tie into the new engine computer. I can also get rid of all three solenoids on the shift bracket as my lift pump is the newer style with the control box at the pump. I'll be using a starter relay mounted in the waterproof box with the computer, engine fuse block and OBD2 plug. I'm going to be working on engine wiring this week and hopefully get the trim tabs mounted and plumbed. I've got to go to Maine this weekend to finish putting my dad's boat back together. We had to pull the engine and gas tank out of his bayliner because of massive leaks. I alslo redid his interior, updating the gauges and a few other things. I'll try to get some pics of that too.
 

Efini Motorsport

Petty Officer 2nd Class
Joined
Feb 21, 2018
Messages
108
I'm waiting on the second roll of carpet so I can finish the cockpit. I never thought a boat this small would use so much carpet. Here's some pics of the cabin before and after. Right now I'm working on a bunch of small stuff. I think my next big problem is going to be figuring out the ESA.
 

Attachments

  • photo290020.jpg
    photo290020.jpg
    741.8 KB · Views: 1
  • photo290021.jpg
    photo290021.jpg
    735 KB · Views: 1
  • photo290022.jpg
    photo290022.jpg
    721.3 KB · Views: 1

Efini Motorsport

Petty Officer 2nd Class
Joined
Feb 21, 2018
Messages
108
I was in Maine last weekend putting my Dad's 29' Bayliner back together. Had to seal a leaky 125 gallon gas tank, fix a few leaks on the engine, recovered the interior, updated the gauges and a few other things. Glad that's finally done. I've also finished up my Boss's boat, an 83 (I think) Bayliner Trophy. It started out as just cleaning up the wiring from when it was repowered but we ran into a little mission creep. New electronics, new lighting, new helm, gauges, cabin door, head, etc, etc, etc. Here's a few pics.
 

Attachments

  • photo290495.jpg
    photo290495.jpg
    779.8 KB · Views: 0
  • photo290496.jpg
    photo290496.jpg
    979.3 KB · Views: 0
  • photo290497.jpg
    photo290497.jpg
    994.4 KB · Views: 0
  • photo290498.jpg
    photo290498.jpg
    858.7 KB · Views: 0
  • photo290499.jpg
    photo290499.jpg
    934.4 KB · Views: 0
  • photo290500.jpg
    photo290500.jpg
    1.9 MB · Views: 0
  • photo290501.jpg
    photo290501.jpg
    1.8 MB · Views: 0
  • photo290502.jpg
    photo290502.jpg
    1.9 MB · Views: 0

Lou C

Supreme Mariner
Joined
Nov 10, 2002
Messages
11,842
I'm waiting on the second roll of carpet so I can finish the cockpit. I never thought a boat this small would use so much carpet. Here's some pics of the cabin before and after. Right now I'm working on a bunch of small stuff. I think my next big problem is going to be figuring out the ESA.

Project is coming along nicely. Might want to give the tech guys at CDI Electronics a call about the ESA, they are the ones who would be most likely to know what you need to do.
 

Efini Motorsport

Petty Officer 2nd Class
Joined
Feb 21, 2018
Messages
108
I called CDI and they said just wire it with a NC microswitch on the ground for the ignition amp so that when I shift it breaks the ground and stumbles. I'm not sure if it's going to work though. A marine mechanic friend of mine said that the dog gears in an OMC don't like to "unlock" if the ignition just gets cut like the Merc's do. I'm going to give it a shot and see what happens. If need be I'll wire in the ESA.
This should be a productive weekend. The new fuel pump will be in tomorrow or Friday and the computer is wired and ready to go. I laid out the panel for the new gauges and will cut it tomorrow. If things go well I may even be able to test fire the boat. I don't have the whole exhaust yet though so it's going to be pretty damn loud. I'm hoping to figure out the alternator mount this weekend too. Next weekend I'll have the new flooring so I can lay that down and start putting the new interior back in. I ended up going with a generic 6mm teak looking foam floor. It will look better than carpet and ended up being cheaper. I was going to do seadeck to get a custom fit layout with the nice border but even at my cost it would have been as much as $1000.
 

Baylinerchuck

Commander
Joined
Jul 29, 2016
Messages
2,726
That seadeck is nice stuff, but way too expensive as you saw. I was really thinking about it for my build but ended up doing gelcoat in the bow and carpet further back. I had seen some projects where the seadeck started peeling, and some reported it wears out quick.
 

Lou C

Supreme Mariner
Joined
Nov 10, 2002
Messages
11,842
When I re-did the deck in my old '88 FW H-200 I had the 'glass shop coat it in non skid gelcoat, it still looks good, 11 years later. I think this is the best and longest lived solution when your decks are wood cored because it does not hold moisture like carpet. I would NEVER EVER have carpet of any kind in an open boat again! Carpet, unsealed screw holes, and lousy 'glass work are what causes wood cored decks to rot.
 

Efini Motorsport

Petty Officer 2nd Class
Joined
Feb 21, 2018
Messages
108
I ended up ordering another type of foam flooring from ebay. It looks the same but I don't get the fancy borders and stuff like I would with seadeck. 4 90"x35" rools was $260. I couldn't even get another roll of the carpet I used in the cabin for that cheap. It should be going in next weekend.
 

Efini Motorsport

Petty Officer 2nd Class
Joined
Feb 21, 2018
Messages
108
It may be a few weeks before I put the floor in. I want to make sure everything else is done first so it doesn't get messed up. Here's the pics from this weekend. Had some family stuff I had to deal with so didn't get as much done as I'd like. I got the fuel pump mounted in the tank. I didn't want to run an external so had to "modify" the tank. Started putting in the carpet on the wall, lower engine surround and compartment wall. I need to try and get 2 more yards to cover the seat box and a few other pieces. Problem is I can't find the matching carpet. I'm also almost done with the wiring. The boat side is done except for the helm and I've got a few more wires to harness up for the engine. I was hoping to test fire it this weekend but didn't get that far.
 

Attachments

  • photo291514.jpg
    photo291514.jpg
    434.2 KB · Views: 0
  • photo291515.jpg
    photo291515.jpg
    345.5 KB · Views: 0
  • photo291516.jpg
    photo291516.jpg
    517.3 KB · Views: 0
Last edited by a moderator:
Top