Force/Mercury Frankenstein

The Force power

Commander
Joined
Feb 3, 2019
Messages
2,251
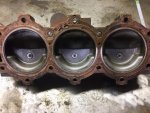
The low comp #s could be the gauge or the way it was taken?
They don't seem that bad.

Once you get it running and have time.
Do a decarb and see if the #s come up?
\
Did you replace the rings or use the old?

Once you run for a while? the #s might come up?

Thanks Nordin & Jerry,

I'm going to get ready to the point I can Run the engine and see I the numbers change/improve.

to answer Jerry's question.. the engine we're talking about now; I have not change anything yet (other then the head, because of the blown gasket)
 

The Force power

Commander
Joined
Feb 3, 2019
Messages
2,251
The Mercury vs Prestolite.
The trigger base will decide which system you use.
Most of the "parts" will swap but the ignition might give you trouble if trying to
use the newer system on the older block.

I removed the Trigger-base (Merc-style) and replaced it with presolite.
today I'll be transferring all ignition components .

I also have to change the Carburetors (the have the hose on the bowl for the "fuel enricher"
 

The Force power

Commander
Joined
Feb 3, 2019
Messages
2,251
Done so far;

Removed both ignition-systems/transferred the motor with good compression onto the work-stand
I had to swap out the swivel bracket incl. trim-pump as this was a Merc. setup & not working
Cleaned the Garage & organized so I can move around without having to move 5 items to get to one.

work to do;

Remove Carburetors to clean/inspect & change out one bowl
Remove Dog-bone inspect/clean Ports & Hoses
Stick the scope down to inspect valve-reeds
Change out linkage mechanism for control-cables (of course that had to be different Grrr)
Install All Prestolite-ignition components

Unfortunately I will not get any of this done today, because my better half is working this weekend & since I did not do any choirs yesterday.......I will be expected "been done" tonight! lol
 

The Force power

Commander
Joined
Feb 3, 2019
Messages
2,251
I need a bit of advice, on the Re-circulation hoses.
I removed them to set over some parts but forgot to label them (where they go)
I found the right year but it only shows the intake-side& not on what crank-drain they go (see attached for clarification)

Can someone tell me please, many thanks in advance
 

Attachments

  • Reed Plate and Recirculation System 91E Thru 92C.pdf
    649.3 KB · Views: 0

Redbarron%%

Chief Petty Officer
Joined
Dec 7, 2017
Messages
479
On my 90 hp Force Sport jet each goes to the cylinder below it except for the bottom which goes to the top.
Looking at the drawings can be confusing, but this is my best guess
 

The Force power

Commander
Joined
Feb 3, 2019
Messages
2,251
On my 90 hp Force Sport jet each goes to the cylinder below it except for the bottom which goes to the top.
Looking at the drawings can be confusing, but this is my best guess

Thanks Redbarron,

That's initially what I thought as well but then the hose for the bottom bearing to the intake on #1 is too short??

There are so many versions of blocks; square fuel-pump with no dog bone/ dog bone with multiple re-circulation hoses or just one.

I guess/hope as long as I hook them up to a different cylinder it works???
 

The Force power

Commander
Joined
Feb 3, 2019
Messages
2,251
GOT IT, I should of looked a little closer to the schematic,
#1 intake to #2 drain
#2 intake to #3 drain
#3 intake to #1 drain
 

The Force power

Commander
Joined
Feb 3, 2019
Messages
2,251
Set timing, hook up Fuel-line

Hooked up a sump-pump in a tub to pick-up line in the mid-section and she's running & charging:lol::dance:
A good sign that I'm heading in the right direction, although....the always run in a bucket. lol
 

Attachments

  • IMG_1983.JPG
    IMG_1983.JPG
    139.9 KB · Views: 0
Last edited:

The Force power

Commander
Joined
Feb 3, 2019
Messages
2,251
I did have however water droplets coming out from between the head-gasket & block, initially I thought the bolts needed a Re-torque but that does not seem to help (gasket is used & attached to a spare head)

Now that I'm looking through the parts listings, I notice that there are two different head/gaskets depending on the years e.g.

1990 head-gasket part# F369529-1
1991 head-gasket # F369529-3
1991-1994 # 820438

1990 head part# F63518-1
1991 # F719518
1991 # F719518

I had swapped a head(including gasket) from a "spare" motor, not knowing if the same part numbers although they did look the same.

Finally my question; what was the significant difference between the two? and could that have caused a leak?
OR is the gasket just no good?
 

The Force power

Commander
Joined
Feb 3, 2019
Messages
2,251
May the Force be with you...... those numbers for the compression are not so bad at all.
Under 10% in differrence, yes it will not perform as "new" but I think it will run decent.

As I understand you only cleaned up the cylinder walls.
Maybe you can get the compression to increase by hone the cylinders.
Is there some score in the one with lowest compression?

I have done this on a 70Hp 1970 Chrysler, was some score in number 3 cylinder and the piston/rings was bad too.
The numbers of the compression was #1 125, #2 130 #3 110.

I pull the piston out with the power head still in place (disassemble the connecting rod through the intake manifold), hone the cylinder and put a used good piston with used rings in and reassembled.

The compression rise to 120 at #3 and it is running pretty decent.
Yes I know this is a low cost restoring, but is working and I maybe will do a restoring the right way later with bore and new pistons and rings.

I have in mind that it is a 49 years old engine and a restoring the right way will cost about 5-600 dollars if bore all three change all pistons.
A lot of money !!!

Sorry Nordin that I never commented on your post, luckily I did not have to this with this particular engine, but who know?
after all I'm a sucker for punishment & will take on task such as yours was
 

The Force power

Commander
Joined
Feb 3, 2019
Messages
2,251
Lower-unit back on & time for a test run.
After a few tweaks, she seems to be running OK
 

Attachments

  • 20191027_065719_509088428591889_Moment.jpg
    20191027_065719_509088428591889_Moment.jpg
    69.1 KB · Views: 1

The Force power

Commander
Joined
Feb 3, 2019
Messages
2,251
Old parts?? use sillycone to fill in the gaps.

Good morning jerryjerry,

I have used many times sealers between gaskets, however these gaskets are slightly different in my opinion.

If I apply silicone to prevent water slipping by, do I not have to apply silicone to the metal part of the gasket that seals the piston/cylinder-section ?

in my opinion if I apply just silicone to the outer part of the gasket it will create a gap at the metal ring that seals the cylinder-section resulting in low compression/water getting sucked in.

I feel a new gasket is need, let me know if I wrong have a look at the attached pic. for clarification
 

Attachments

  • IMG_2002.JPG
    IMG_2002.JPG
    147.8 KB · Views: 0

jerryjerry05

Supreme Mariner
Joined
May 7, 2008
Messages
17,927
The metal ring shouldn't get sealer.
Don't put so much on that you raise the head and make a gap.
A thin coats all that's needed.

Now that it's running I'd get a new gasket, and double clean the head/block.
I have a BIG flat file that I use to run over the block and head to make sure they
are flat. A straight edge can help.
 

The Force power

Commander
Joined
Feb 3, 2019
Messages
2,251
The metal ring shouldn't get sealer.
Don't put so much on that you raise the head and make a gap.
A thin coats all that's needed.

Now that it's running I'd get a new gasket, and double clean the head/block.
I have a BIG flat file that I use to run over the block and head to make sure they
are flat. A straight edge can help.

okay, I'll give it a try

thanks for the fast reply

wait....so you're saying to get a new gasket?
 

The Force power

Commander
Joined
Feb 3, 2019
Messages
2,251
The metal ring shouldn't get sealer.
Don't put so much on that you raise the head and make a gap.
A thin coats all that's needed.

Now that it's running I'd get a new gasket, and double clean the head/block.
I have a BIG flat file that I use to run over the block and head to make sure they
are flat. A straight edge can help.

Well....the silicone did seal it but now the #1 & #2 spark plugs are wet (water) #1 would not even fire.
pulled it back apart & clean-up both surfaces.
A new gasket is on the order list :mmph:
 

jerryjerry05

Supreme Mariner
Joined
May 7, 2008
Messages
17,927
If it's getting water??
Then get a straight edge and see if there's a warp?/
Yes a new gasket should help.

A piece of glass or window pane has a pretty flat surface.
Hold it against the block/head and insert a feeler gauge along the edge.
 

The Force power

Commander
Joined
Feb 3, 2019
Messages
2,251
I kind of expected problems, my experiences with gaskets is that can sometime re-use them once but not over and over.
and as you know; this particular is sealing 2 compartments from each other and to the outside
 
Top