Redtruck12
Petty Officer 1st Class
- Joined
- Jan 25, 2018
- Messages
- 344
Looking really good Steve 
best of luck and a speedy recovery from your surgery.
best of luck and a speedy recovery from your surgery.


Great progress Steve! Aorta surgery sounds a bit scary, but hopefully it all goes well.
I think I mentioned this before, but dont glass the top of the deck until after you have put the holes in your floor to pour foam into. I made this mistake and burnt up my drill trying to drill holes. I ended up having to get a heavy duty cement mixer drill to finish up.
 ... should get to go home tomorrow and back to real fun... workin’ on the boat!
couple of things i would do:
if i go with 1708 over the deck, then 1/2 plywood would be enough. you adding a lot of weight and strength into the deck.
you can do one layer of csm and then flip the 1708 around so the woven is facing down and the .8 csm is facing up.
you can also do 2 layers of csm.
the 8" tabbing would apply to all of the above. no need to go up the sides but it doesn't matter. maybe somebody else has a different opinion and I'm wrong on this.
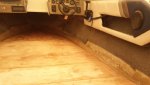
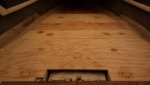
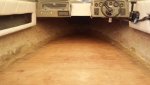
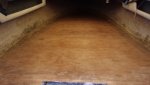
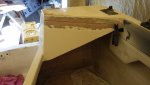
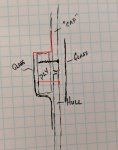
I'm looking at how much 1708 and CSM I have left and I wondered if anyone has an opinion of this combo for the deck.... If I tabbed the deck in with a piece of 8" 1708 and then cover the whole deck with 1708 and have it extend from the deck up and over the 8" tabbing, and then cover that with CSM. I've heard using cloth without covering it with CSM on a deck can result in the cloth running if it gets snagged when just covering with gelcoat. Not sure if that's a valid concern or not never having done it before but it sounded like a reasonable option.
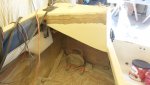
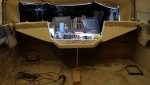
") I'm pretty happy with the way it came out. I'm now out of both CSM and 1708 so some more is on order. I was amazed at how fast I'm going through the 3rd 5 gallon pail of resin but still have a couple gallons left so we'll see if that will last the rest of the way or not. I might need to pick up another gallon or two locally to avoid having a whole pail sent from Florida. Also after being on the fence of how to finish the deck I decided to bite the bullet and remove the rest of the carpet, minus the pieces inside the side storage areas and commit to gelcoating the whole thing.
I'm pretty happy with the way it came out. I'm now out of both CSM and 1708 so some more is on order. I was amazed at how fast I'm going through the 3rd 5 gallon pail of resin but still have a couple gallons left so we'll see if that will last the rest of the way or not. I might need to pick up another gallon or two locally to avoid having a whole pail sent from Florida. Also after being on the fence of how to finish the deck I decided to bite the bullet and remove the rest of the carpet, minus the pieces inside the side storage areas and commit to gelcoating the whole thing.Looking good. you will go right past me. I'm on my sixt and last bucket. was just enough to finish. you can fair the deck to smooth things out before gelcoating
) after the motor is reinstalled, the glass won't really be supporting much.