'65 Lyn Craft Seabreeze 1500 Sport Runabout

buxmj

Petty Officer 1st Class
Joined
Jun 9, 2018
Messages
294
I did get the trailer finished and got a motor stand built. I was leaning toward the '71 Evinrude 50 hp but got some work done on the '76 Mercury 402 40 hp and the tech said it is in good shape so I am not it a bad spot, having what seems to be 2 good motors to choose from.

Buck.
 

Attachments

  • photo298153.jpg
    photo298153.jpg
    1.5 MB · Views: 3
  • photo302709.jpg
    photo302709.jpg
    687.2 KB · Views: 3
  • photo302710.jpg
    photo302710.jpg
    741.5 KB · Views: 3

sphelps

Supreme Mariner
Joined
Nov 16, 2011
Messages
11,436
Glad to see your back at it ! That boat should really move with either of those motors on it !
 

Sea18Horse

Chief Petty Officer
Joined
Jun 1, 2008
Messages
626
It's all looking great! Trailer, motor stand, outboards and the work inside the house! Well done! Yeah, I know what you mean about life getting in the way. It's been happening to me all summer.

Cheers Todd
 

buxmj

Petty Officer 1st Class
Joined
Jun 9, 2018
Messages
294
Thank you for the kind words Todd, sorry I took so long to respond, now it is nice weather to be outside and I have had a litlle time to get back to work on the boat!

Buck.
 

buxmj

Petty Officer 1st Class
Joined
Jun 9, 2018
Messages
294
I got some time to get some work done and feel like progress is happening! So glad I am doing this work this time of year. Still a litlle toasty after putting on long pants, long sleeved shirt, respirator and noise cancelling headphones but glad I can work for a few hours and not be miserable.

It looks like the factory fiberglassed plywood to the hull on the bottom. Some of it is still in good shape but so much is rotted and needs to be taken up, I so look forward to that work, lol. I can't even tell if it is 1/4 or 3/8, it definitely is not 1/2 inch. You guys know if this was common practice for boats of the mid 60s?
 

Attachments

  • photo304877.jpg
    photo304877.jpg
    1.8 MB · Views: 7
  • photo304878.jpg
    photo304878.jpg
    1.9 MB · Views: 7

sphelps

Supreme Mariner
Joined
Nov 16, 2011
Messages
11,436
Not like that very often ... I guess with not much stringer system the ply is what gave the hull strength..
 

buxmj

Petty Officer 1st Class
Joined
Jun 9, 2018
Messages
294
Hey Sam! Thanks and that is what I was thinking. There were no front to back stringers, just side to side stringers. Hope to start the grinding tomorrow!
 

mickyryan

Rear Admiral
Joined
Apr 18, 2016
Messages
4,210
One big thing I am worried about is that there was caulk all the way around the boat between the cap and the hull. I have not taken the rub rail off yet but does anyone know if that is the typical spacing between the cap and hull?

there is no typ[ical spacing it fits they caulk it and send it out the door lol , i have seen them fit tight and i have seen the top fit with a gap at stern or bow or a side, it just depends on how it cooked and if they pulled it early i guess.
 

buxmj

Petty Officer 1st Class
Joined
Jun 9, 2018
Messages
294
Thanks Micky! I do not know a lot about fiberglass fabrication, that makes a lot of sense. I hope the caulk wasnt put there to keep water from splashing in while underway. Can boats let water in at the hull/cap joint? Maybe this one was made on a Friday afternoon on payday!
 

mickyryan

Rear Admiral
Joined
Apr 18, 2016
Messages
4,210
yeah they can but only if you dunk them lol you can re caulk and it will be fine I always pull entire cap off because of transom is shot usually stringers are as well . just support boat good and take tons of measurements
 

buxmj

Petty Officer 1st Class
Joined
Jun 9, 2018
Messages
294
I can't believe it has been 6 months since my last update. Unfortunately I don't have 6 months of work on the boat to show for it... When I last posted I thought I was going to do Seacast for the transom but have changed my mind. I was frustrated trying to get the last few inches of rotted transom out and realized I needed to have a taller transom (21) to accommodate either of the motors I have. I also have found out more and more why these LynCraft were nicknamed thin crafts. The transom was only 1 inch thick and so much of the glass is thin, I think I will be adding quite a bit of structural glass. I popped the cap off and my 15 year old daughter and I lifted it off and set is aside with no problem, very light. From previous pics you can see where they glassed quarter inch plywood to the bottom of the hull. A lot of it was already rotted and the rest is now gone, need to do a little clean up but for the most part all the wood that needed to come out is gone. The pool noodle worked great for saving my stomach and ribs leaning over the side to clean out that plywood. The three cross pieces are screwed down to keep the hull from getting deformed. Since it is so easy to replace and remove the cap I can put it back on as needed to make sure the hull is not taking a new shape.
 

Attachments

  • photo313323.jpg
    photo313323.jpg
    960 KB · Views: 11
  • photo313324.jpg
    photo313324.jpg
    1.1 MB · Views: 11
  • photo313325.jpg
    photo313325.jpg
    960 KB · Views: 10
  • photo313326.jpg
    photo313326.jpg
    1.4 MB · Views: 10
  • photo313327.jpg
    photo313327.jpg
    1.1 MB · Views: 11

sphelps

Supreme Mariner
Joined
Nov 16, 2011
Messages
11,436
Welcome back ! Yeah that is a pretty thin transom... If you bring the transom up to the top of the hull will it be the correct height for your motor ? You could still do seacast if you want . Just need to make new skin for the inside and a partial one for the outside to bring to right height.. Or for the outside fasten a piece of ply for a form and pour ..
Then again a plywood transom is quick and easy and a good bit less expensive! ;)
 

buxmj

Petty Officer 1st Class
Joined
Jun 9, 2018
Messages
294
Hi Sam, thanks and it is good to be back. I won't have to go all the way to the top of the hull. The original pic shows the aluminum plate gave it a 20" height so that is where I will build the transom height. Now that I have the cap off I can cut the leftover floor glass closer to the hull so there should be less grinding, woohoo! Leaning towards plywood right now, definitely going with inch and half thick transom though, want it to be strong without having to hang a 20 pound aluminum box on the back, lol.
 

dmbarr

Recruit
Joined
Sep 9, 2019
Messages
1
Buck,

Strangely enough, I was looking for a project boat and came across this thread. I may have some information on the boat you are trying to restore. In the late 1970's to mid 80's, My brother and I had the very same model boat, with exactly the mods you are describing. The aluminum bracing was originally installed because of transom flex (likely from early rot). My brother worked at the Pro-Line boat factory in Crystal River and didn't want to get overly involved so we went with that brace (that's what teen agers did in the day - whatever keeps us skiing daily). If this is the same boat, it spent many a day and weekend on Lake Henderson in Inverness and was an amazingly maneuverable boat. Back in the day it was powered originally with 40 HP Evinrude, much like the one you have. We eventually upped to a 50 HP Johnson and it really ran then. I am pretty sure my brother has some pics of it in that era, if not, I know my parents do. When my brother went to boot camp I painted the upper hull and the two hull styling strakes a dark blue and put a fresh coat on the hull. It really looked good. I will be following this thread and will enjoy watching.
 

buxmj

Petty Officer 1st Class
Joined
Jun 9, 2018
Messages
294
I am so sorry dmbarr I did not see this post way back when, I had a super busy fall and tried to keep up reading updates from others' projects but didn't have anything to post on mine. I am very interested in any info you might have, would be great if you came across some pics! Thanks for reaching out and hopefully I won't be a stranger to my own thread!
 

buxmj

Petty Officer 1st Class
Joined
Jun 9, 2018
Messages
294
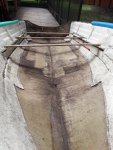
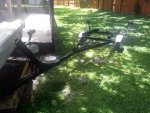
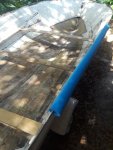
Hello everyone! So sorry I was away for a while, no time to work on my project because I had a very busy fall, which is good, I am a musician. My Christmas gigs have ended and I am not teaching many lessons for the next 2 weeks so guess what I am planning on doing? Yes, working on the boat. A few months ago I put the cap back on the boat so I could strap it all down before the hurricane that fortunately didn't come this way. I cleaned it out yesterday and will take the cap back off on Monday, will be some heavy rains tomorrow so I will be inside. I hope I can show some progress pics over the next few weeks!

I also made my first resin and supplies purchase but first things first, bought a Tyvek suit so I can grind!

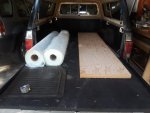
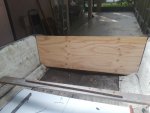
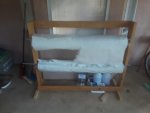
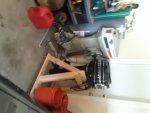
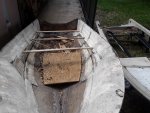
I did score some supplies off of CL a few weeks ago and I think I saved a lot of money, a partial roll of ounce and a half CSM and a partial roll of 1708, $100 total! The guy also threw in what I hope to use for the transom, he works at a local boat shop and this is a cutoff of what they use for their big transoms. This is about 18" X 80", they take 3/4 marine ply and glue and press it together, it looks real good and he gave that to me.

Buck
 

Attachments

  • photo323509.jpg
    photo323509.jpg
    1.9 MB · Views: 4

buxmj

Petty Officer 1st Class
Joined
Jun 9, 2018
Messages
294
I also wanted to share something not boat related. The truck in my profile pic is my '89 Jeep Comanche. I bought the truck new 30 years ago today. I have worked on the truck quite a bit lately because I was able to get several small projects done which put my need of big chunks of time to work on the boat. The truck is running fine and I will have some chunks of time to work on the boat now, finally!
 

buxmj

Petty Officer 1st Class
Joined
Jun 9, 2018
Messages
294
The first pic is of the transom slab test fitted after cutting and shaping a bit. That is the way I thought was best to cut it, I used the full width of the slab on the top, I have pieces cut for the space on the bottom but ran out of daylight to trim them just right. If you didn't see a previous post I was given the slab, it was a cutoff from a nearby boat factory, 3/4 marine plywood glued and pressed to make inch and a half, the pic shows the full width (top to bottom of transom) so I didn't have a choice cutting just one piece, it was free though!

The 2nd pic is where I have a question for you all. The lighter stair stepped section of the hull bottom was 1/4 ply glassed to the hull with the longest piece about 6 feet long. It took a little work to get off but was not sealed well before it was put down so it came up in chunks. Each "step" was one long narrow piece glassed with maybe 1/16th between each strip. These Lyn Craft boats were nicknamed thin craft and I can see why. Should I use plywood again or go ahead and splurge and glass 1/4 Coosa to the bottom of the hull? Or should I glass in strips of CSM and 1708 until I get the strength of glassed 1/4 ply? And if I use plywood will it still flex after I seal it properly? If I use ply or coosa I plan on just doing one strip at a time with lots of PB and weights to hold it down.

The third pic is I keep finding reasons not to do the grinding! I built this stand yesterday, I didn't have a full day yesterday to work on the boat and I knew it was going to rain today so I have been doing little 2 and 3 hour tasks until I have a full dry day to put the gear on and go to town and cover the neighborhood with dust. We Floridians have been complaining about too much rain lately, I have tried to do other things, I did put up a 8 by 8 canopy over the boat just to help keep some of the sun off when I get going.
 

Attachments

  • photo323859.jpg
    photo323859.jpg
    1.4 MB · Views: 8
  • photo323860.jpg
    photo323860.jpg
    1.8 MB · Views: 8
  • photo323861.jpg
    photo323861.jpg
    1.6 MB · Views: 8
Top