1987 Ski Centurion Tru Trac II - First Time Rebuild - Floor, Engine, Dash, etc.

Status
Not open for further replies.

ACon977

Senior Chief Petty Officer
Joined
Nov 21, 2017
Messages
759
Thanks for the response Ned, I would really like to get it running and let it settle itself out. I was trying to listen to comments on this forum and slowly coming to terms with the assumption that the engine needed major work, but I would prefer to give it the best chance to live on its own.

Since I don't have a fancy engine stand, would you recommend me building it higher and bolting it down like I had originally thought envisioned? or do you think I can just let it sit where it is?

This may seem obvious to some people, but I can't say I've run an engine out of a vehicle before, and dont know how much it will move around. My thought would be to build it up and get it as secure as possible, but, as always, open to comments and suggestions.
 
Last edited:

Ned L

Commander
Joined
Sep 17, 2008
Messages
2,266
I would definitely get it bolted to the dolley.
You don’t even need cooling water to get it started and running for a minute (just make sure you take off all the V belts so you don’t run the water pump without water (that will destroy the impeller after about 15 -30 seconds).
I’m certainly not saying the engine is good to go, but those pictures don’t look bad, and why not see how it runs before tearing it apart. Again, there is a lot of latitude between a good running engine and a fresh rebuild, and both will do just fine in a boat.
 

archbuilder

Vice Admiral
Joined
Sep 12, 2009
Messages
5,697
I've started them by mounting them to a pallet before using the motor mounts out of the boat. You just have to make sure you have it bolted down good.
 

ACon977

Senior Chief Petty Officer
Joined
Nov 21, 2017
Messages
759
Thanks for the comments! No real progress on the engine this weekend, we were out in the mountains back country skiing. We got 20+ in over the 3 days, pretty awesome.

Click image for larger version  Name:	IMG_20180408_185814_868.jpg Views:	1 Size:	96.5 KB ID:	10556095Click image for larger version  Name:	20180408_103032.1.jpg Views:	1 Size:	724.2 KB ID:	10556096Click image for larger version  Name:	20180406_190549(1).jpg Views:	1 Size:	508.7 KB ID:	10556097Click image for larger version  Name:	IMG_0329.1.jpg Views:	1 Size:	460.1 KB ID:	10556098

I got some work done on the boat frame last week and we should be able to support the hull, and start separating the cap this week. I will post pictures of my "cradle" when I get it put on the boat.

Ned L , I certainly understand the motor is not guaranteed to be perfect, but if it runs steady enough, it could be something I can work on at a later point. I purchased new valve seals, I read that they can dry out and get stiff which can also cause the valves not to operate correctly. The plan is to replace them and clean the seats to ensure that I am getting a decent seal. I'm not confident that they are seating well enough since during my leak test I felt some air coming out of the exhaust ports, this could be because the piston got pushed down a little and opened the valve a little, or it is because there is corrosion on the valves, either way, I think it would be a good non-intrusive improvement.

Ned, also good reminder with the water pump, I was planning on trying to rig a hose up to the system, but it may be just as easy to disconnect the belts and only run it for a short time.

I've started them by mounting them to a pallet before using the motor mounts out of the boat. You just have to make sure you have it bolted down good.
Great to hear that there is a budget way to do it, I think this will be my strategy.


Always appreciative of people offering their comments and experience, I'll do my best to keep this forum up to date as I work my way along.
 
Last edited:

Ned L

Commander
Joined
Sep 17, 2008
Messages
2,266
About valve seals,...... they really don’t affect the running of the engine. I’d have a hard time seeing how they can affect the operation of the valves at all, enen if they are dried out and really stiff.
They only keep the engine from “using” a little bit of oil.
Guys that I know who are into power boat racing (Jersey speed skiffs w/ SBC’s, 283’s & 305’s) don’t even bother putting valve seals in their engines. I used to have a retired racing speed skiff with a 350 that I had the engine apart a number of times, and one of the times most of the seals had disintegrated, .... the engine was running fine.

....... and you can easily change the seals without pulling the heads.
 

ACon977

Senior Chief Petty Officer
Joined
Nov 21, 2017
Messages
759
About valve seals,...... they really don’t affect the running of the engine. I’d have a hard time seeing how they can affect the operation of the valves at all, enen if they are dried out and really stiff.
They only keep the engine from “using” a little bit of oil.

Very interesting, have been watching Peter Anderson's videos on tear down and rebuild of old V8 engines to try and get a list of to-dos if I was to move forward with it. This was one thing that he had done with an old engine before even trying to turn it over. If its really not necessary then I will probably forego it until I do a full rebuild.

https://www.youtube.com/watch?v=uaX_hdQq5kU


....... and you can easily change the seals without pulling the heads.

This I knew, but I was hoping to clean out the valve seats and valves so that I knew there was a good seal between the cylinder and the heads. but again, I suppose it may make more sense to get it running, or try, first and then do this with the rebuild if needed.
 

Ned L

Commander
Joined
Sep 17, 2008
Messages
2,266
I watched his video on replacing valve seals. Yep, that’s how to do it.
I will say that the car he shows and starts in the beginning with a smokey exhaust probably has a good bit more going on with it. I don’t think valve seals alone are responsible for enough oil to be visible in the exhaust.
 

ACon977

Senior Chief Petty Officer
Joined
Nov 21, 2017
Messages
759
Ned L I appreciate your responses, very honest and direct. Since I already bought them I will probably end up replacing them if/when I do a rebuild, but for the meantime, i will forego it.
 
Last edited:

ACon977

Senior Chief Petty Officer
Joined
Nov 21, 2017
Messages
759
Update, I finished mounting the hull cradle to the trailer and am pretty happy with how it snugged up, I dont think we are going to have any problems with the Hull sagging without the cap.

I used a mixture of a circular saw and Jig saw to cut the boat profile. This year of Centurion had a modified hull design with these odd looking just outs on the side, when i looked it up people were talking about how it was to try and have wake reduction and also reduce the spray coming off the side of the boat. I suppose we shall see once we get it in the water. As of now, it just made the profile a bit more complicated. In the end, it really ended up being a lot of back and forth to the saw horses to get it right, but I'm happy with the end result.

20180410_215304.jpg

So overall I will call it a success! Nest step is pulling the rub rail bracket/guide off, and unscrewing the cap from the hull. I bought a bunch of lumber to build adjustable saw horses that I can run a 4x4 across and be able to support the cap once its lifted.

Fun fact, since I don't own a pickup truck, i do all my home depot runs in the jeep. this isnt the most amount of wood I have traveled with, but it cracks me up seeing people give me a double take with 6' of 2x4 sticking out the back window.

20180410_175719.jpg

Well that's all for now! Ill post once I get the sawhorses put together and the cap lifted. As always, excited to hear all of your thoughts and comments! Having people commenting on this forum has helped to keep me thinking and recognize when I get too excited or make an assumption that I shouldn't have.
 

Attachments

  • 20180410_215304.jpg
    20180410_215304.jpg
    1 MB · Views: 1
  • 20180410_204220.jpg
    20180410_204220.jpg
    963.9 KB · Views: 0
  • 20180410_204220.jpg
    20180410_204220.jpg
    963.9 KB · Views: 0
  • 20180410_200912.jpg
    20180410_200912.jpg
    968 KB · Views: 0
  • 20180410_200918.jpg
    20180410_200918.jpg
    1 MB · Views: 0
  • 20180410_213455.jpg
    20180410_213455.jpg
    978.1 KB · Views: 1

ACon977

Senior Chief Petty Officer
Joined
Nov 21, 2017
Messages
759
Planning a bit ahead I started to look around for a drivable fiberglass supplier, from reading forums and whatnot a lot of people were driving 2-4 hours to pick stuff up to avoid the hazard shipping fees.

Looking around my house I found one that is 3 miles away, which could be a huge win! But I havent heard of them before. Does anyone have recommendations on PlastiCare?

https://www.plasticareinc.com/Merch...=e3291f7d37785b2e2ecb1adaa39e7e58&Screen=SFNT
 

ACon977

Senior Chief Petty Officer
Joined
Nov 21, 2017
Messages
759
Still curious if anyone has heard anything on that fiberglass supplier.

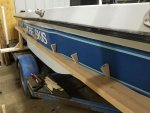
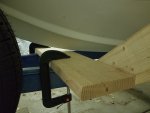
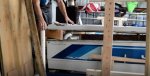
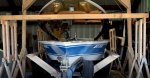
But over the weekend I got some good progress done on the boat. Finished popping the rest of the rivets out and unscrewed the cap. There was a fair bit of silicone between the hull and cap and ended up cutting most of it out with a chisel. Then separating the cap was easy enough to do by hand. Picked it up corner by corner and got some thin boards between the two until I could slide the 4x4 in there.

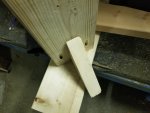
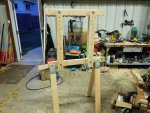
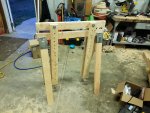
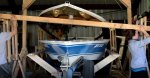
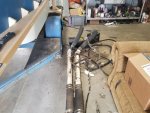
On friday I got the adjustable sawhorses built as well. Extended to their full height (6') they were more stable than I would have expected. I cranked down the bolts and they snugged up pretty well, so I think we will be alright. I set those up around the boat and then had my girlfriend help to lift the cap and 4x4s onto the sawhorses. Thank goodness she is 5'2"! Super helpful... but she was able to get it onto her head and then I got it the rest of the way lol. We make a great team.

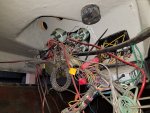
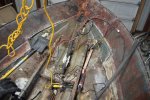
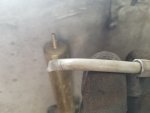
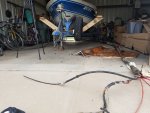
After getting the cap up on the 4x4s I started to disconnect the remaining wiring from the dash, speed sensor cables, and steering cable. There was a lot of extra wiring under there from the previous owner. And a lot of wires which went no where. We will see how much I feel like trying to rewire, or just let it be for the time being. I dont know the wiring schematic for the engine to really know where the sensors are at.

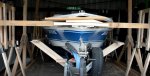
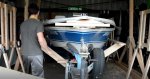
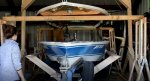
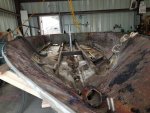
From there we pulled the hull in the cradle out from under the cap. Partly by car, partly by hand, since our alley is pretty narrow it got a bit snug trying to bring it into the other side of the garage. But SUPER happy to have the garage space to fit both the cap and hull under the roof. (Thanks Kelly for parking on the street until this project is over :) )

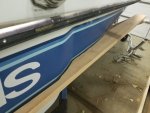
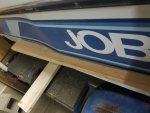
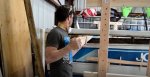
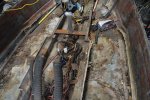
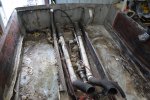
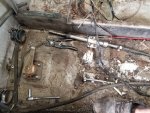
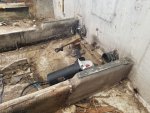
Cut out the front area which was glassed in VERY WELL, made me sad to undo work that was actually done correctly, but the stringers ran all the way up to the bow, so a mixture of my 4.5" cut off wheel and a reciprocating tool got it out of the way. Definitely keeping that wood as a template.

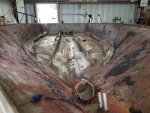
and FINALLY got all the foam out of the boat. trash can number 5, I feel like we need to bake the trash men a cake, I feel bad having heaping cans every week, but we should be done throwing stuff away for the time being.

So with that we are in the final stages before cleaning, cutting stringers, and GRINDING (definitely not excited) but I did buy a full face mask and tyvek suit. So i suppose we are as ready as I can be.

As always I appreciate thoughts, comments, or encouragement. Its still fun at this point, but it will certinally feel good to eventually be putting things INTO the boat, rather than ripping them out. Also, thoughts on how I upload pictures, before I was embedding them into my message, this one I just attached them as a slide show. Let me know which you like more, I think its helpful to have them next to the text they reference.. but maybe its easier to pull them up this way. Up to you! Cheers!
 

Attachments

  • photo288529.jpg
    photo288529.jpg
    55.7 KB · Views: 1
  • photo288530.jpg
    photo288530.jpg
    56.8 KB · Views: 1
  • photo288531.jpg
    photo288531.jpg
    48.9 KB · Views: 1
  • photo288532.jpg
    photo288532.jpg
    41.7 KB · Views: 1
  • photo288534.jpg
    photo288534.jpg
    425.1 KB · Views: 1
  • photo288535.jpg
    photo288535.jpg
    502.4 KB · Views: 1
  • photo288536.jpg
    photo288536.jpg
    61.4 KB · Views: 1
  • photo288537.jpg
    photo288537.jpg
    61 KB · Views: 1
  • photo288538.jpg
    photo288538.jpg
    60 KB · Views: 1
  • photo288539.jpg
    photo288539.jpg
    1.1 MB · Views: 1
  • photo288540.jpg
    photo288540.jpg
    282.7 KB · Views: 3
  • photo288541.jpg
    photo288541.jpg
    654.2 KB · Views: 3
  • photo288542.jpg
    photo288542.jpg
    692.3 KB · Views: 2

Ned L

Commander
Joined
Sep 17, 2008
Messages
2,266
Great progress! You are moving right along. I can't help you with glassing supplies as I am a wood boat guy (sorry).
 

archbuilder

Vice Admiral
Joined
Sep 12, 2009
Messages
5,697
Looks like you got a lot done! I like to embed my pics, that way you can put the corresponding text above or below each one. As for glass, I have to order mine, no one local. I used fiberglassite, for my supplies, some guys on here also use us composites. Whoever you get it from, just make sure it is fresh and its a "laminating resin" (unwaxed). The stuff you get at auto parts and home improvements is usually waxed. If you you waxed, you have to sand between coats, unwaxed you don't. Huge time saver!
 

ACon977

Senior Chief Petty Officer
Joined
Nov 21, 2017
Messages
759
Great progress! You are moving right along. I can't help you with glassing supplies as I am a wood boat guy (sorry).

Thanks Ned L! It was nice to make some big gains this weekend. I feel like there was a LOT more prep work to do for removing the cap than I thought, removing the rub rail, screws, rivets, screws, pop out the remaining rivets, build the sawhorses, do the wiring, gas tank, exhaust hoses, cables, silicone/sealer, and then finally lift it off. Not a complete surprise, but to people who are want to do this, just an FYI.

And I will be certainly leaning on you for help on the best way to template out new floor and bulk head then! Glad to have you following along!
 

ACon977

Senior Chief Petty Officer
Joined
Nov 21, 2017
Messages
759
Looks like you got a lot done! I like to embed my pics, that way you can put the corresponding text above or below each one. As for glass, I have to order mine, no one local. I used fiberglassite, for my supplies, some guys on here also use us composites. Whoever you get it from, just make sure it is fresh and its a "laminating resin" (unwaxed). The stuff you get at auto parts and home improvements is usually waxed. If you you waxed, you have to sand between coats, unwaxed you don't. Huge time saver!

archbuilder I personally agree with you. Ill go back to doing that in the future.

And great note about the waxed vs unwaxed fiberglass. I have heard of people talking about it, but they never really spelled out why to do one over the other. I dont know what these guys' specialty is, but I will be sure to be wary if they do primarily automotive.
 

ACon977

Senior Chief Petty Officer
Joined
Nov 21, 2017
Messages
759
As I'm preparing to cut out the stringers today or tomorrow what sort of measurements would you all recommend? i realize that there is glass coating all the stringers at this point so any dimensions would be off by 1/8-1/4". I left some of the decking top fiberglass on the sides of the hull for reference and was planning on measuring and getting my references from there. but cutting my new stringers from the old ones as templates.

Thoughts?
 

Woodonglass

Supreme Mariner
Joined
Dec 29, 2009
Messages
25,924
Your resin supplier appears to be selling the right kind of polyester resin and glass. If you can use your old stringers for patterns...GREAT! if Not use string and plumb bobs to get the specs. The middle link below should be fairly informative for you. Take measurements across the hull and top to bottom. You MUST ensure the hull specs are the same when you get the new stringers and deck installed as the were when you started your demolition. If not , the cap won't fit back on without major issues.
 
Last edited:

ACon977

Senior Chief Petty Officer
Joined
Nov 21, 2017
Messages
759
Your resin supplier appears to be selling the right kind of polyester resin and glass.
This is great news. I still need to stop into the store but am grateful to have something so close by.


If you can use your old stringers for patterns...GREAT! if Not use string and plumb bobs to get the specs. The middle link below should be fairly informative for you. Take measurements across the hull and top to bottom. You MUST ensure the hull specs are the same when you get the new stringers and deck installed as the were when you started your demolition. If not , the cap won't fit back on without major issues.

Wood I think we are going to be lucky with this project. The glass on the outside is in pretty good shape. No promises for the wood underneath, but at the very least I can put the new 2x6 in the shell and trace the shape I need.

I ended up taking measurements of the stringer placement and hull size. I did support it from the outside but definitely something to measure before glassing in the floor.

I finished removing all the wiring, cables, hoses, steering and exhaust from the hull and stern. Everything was screwed and zip tied to the inside of the stingers, seems to me like you're asking for water damage. Same goes for the gas tank brackets, ski pylon and motor mounts.
20180416_165223-1612x1209.jpg
20180416_190245-1612x1209.jpg
 

Attachments

  • 20180416_170915-1612x1209.jpg
    20180416_170915-1612x1209.jpg
    215.4 KB · Views: 2
  • 20180416_190245-1612x1209.jpg
    20180416_190245-1612x1209.jpg
    528.2 KB · Views: 1
  • 20180416_172359-1612x1209.jpg
    20180416_172359-1612x1209.jpg
    508.9 KB · Views: 0
  • 20180416_170919-1612x1209.jpg
    20180416_170919-1612x1209.jpg
    291.5 KB · Views: 0
  • 20180416_165227-1612x1209.jpg
    20180416_165227-1612x1209.jpg
    652 KB · Views: 0
  • 20180416_171858-1612x1209.jpg
    20180416_171858-1612x1209.jpg
    633 KB · Views: 0
  • 20180416_172258-1612x1209.jpg
    20180416_172258-1612x1209.jpg
    522.1 KB · Views: 0
  • 20180416_180514-1612x1209.jpg
    20180416_180514-1612x1209.jpg
    664.4 KB · Views: 1
  • 20180416_172349-1612x1209.jpg
    20180416_172349-1612x1209.jpg
    449.8 KB · Views: 2

Woodonglass

Supreme Mariner
Joined
Dec 29, 2009
Messages
25,924
The pattern for the stringers does NOT have to be Perfect. I'll explain how later. Gotta go work for my Daughter now!!!
 

ACon977

Senior Chief Petty Officer
Joined
Nov 21, 2017
Messages
759
The pattern for the stringers does NOT have to be Perfect. I'll explain how later. Gotta go work for my Daughter now!!!

It doesnt have to be perfect due to the fact that we will put foam tabs and PB underneath right? The foam is to keep it up off the hull and avoid a hard spot, which could crack when the hull flexes, or thats what I've read and heard from others. any elaboration or clarification would be great.

I got to cutting on the stringers last night. It really made me nervous, but it went pretty smoothly. I got the outside of the port stringer when the fuse blew to the garage, I couldnt get it to flip back so I may have actually bused the fuse.. not great. So ill be working on that but will probably run an extension cord from the house in the meantime lol. Cant stop progress!
 
Status
Not open for further replies.
Top