My Rotten Lady

kramerpage

Chief Petty Officer
Joined
Jul 26, 2010
Messages
447
Hello all,
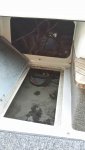
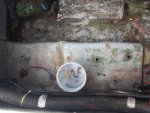
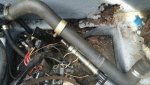
I purchased a 1989 Larson 220 Hampton 2 weeks ago knowing that It had some rot. I have found the engine mount pads and engine compartment bulkhead are bad. The transom seams to be somewhat good with one 6-8 inch area that shows high on a moisture meter 80 percent where a sonar transducer wasn't sealed properly the rest of the transom reads 18 t to 19 percent. My purpose of the boat is to walleye fish on Lake Erie as I have all my life. I have been a boat owner since 1983. My Budget does not allow me to buy what I want so I must be frugal or give up the hobby. My 6 kids are all out of the house, my father passed away 2 years ago and I now have some time to myself, I have a 1989 Larson DC-215 at the lake now that is totally rotted bow to stern but is fantastic mechanically.I would like to marry the two girls. They both have identical 4.3 l mercrusier and drive. I am a mechanical engineer by trade. Im intimidated and excited at the same time about this project. I believe I could make the repair with some guidance. My goal is to get 4 years of use out of the boat.
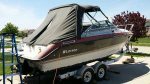
 

Attachments

  • photo220694.jpg
    photo220694.jpg
    26 KB · Views: 0
  • photo220695.jpg
    photo220695.jpg
    12.1 KB · Views: 0

Woodonglass

Supreme Mariner
Joined
Dec 29, 2009
Messages
25,924
Have you checked the stringers and bulkheads for rot? what portion of the transom is showing high moisture?
 

Mr.Stickney

Petty Officer 3rd Class
Joined
Oct 1, 2014
Messages
94
Nice pickup Kramer! I was looking at Larson Hampton in Detroit that needed similar work. Just love the look of the boat. Unfortunately I'm on the other side of Lake Erie and the US$ was not being so friendly when I purchased.

Your best friend is going to be a drill and drill bit. Drill some shallow holes in the stringers transom and bulkheads. Best case its dry and you can just fill it with Epoxy and be on your way. Worst case ... at least you know what's rotten and what's not.

The whole repair can be done frugally and done well at the same time IMHO - just need to make sure the craftsmanship and attention to detail make up for the slightly inferior materials.

Youll definitely want to check out Woodonglass's link in his signature - decks stringers and transoms is most definitely a good read.
 

kramerpage

Chief Petty Officer
Joined
Jul 26, 2010
Messages
447
Have you checked the stringers and bulkheads for rot? what portion of the transom is showing high moisture?

Thank you for your response sir,
I have checked all the stringers and bulkhead from the engine bay bulkhead that's rotted to the bow and they are in fantastic shape. I have removed the fuel cell (60 gallon) so I could conduct testing and inspections. Moisture readings are from 12 to 15 in all areas. I see no stress fractures in the glass cloth and no discoloration thru the glass stringers and bulkheads. All openings at the bottoms of the bulkheads are sealed with a thick tar/rubber type material which surprised me. I've seen them raw and unprotected. Everything is a bright yellow hue. BUT from the engine bulkhead aft is all wet or rotten. Thru poor design of this boat all deck water drains at port and starboard floor drai located at the stern which then just dumped onto a foam filled engine deck and had to make its way thru openings that were too small and higher than the deck which makes water stand and not make it to the main bilge area to then be mechanically pumped out.
The transom had a transducer mounted with 6 screws at 3 inches above the bottom and 17 inches away from the drive keyhole. This shows high moisture.
I have removed the outdrive engine manifold assembly so her stern is naked revealing her keyhole which seams to be fresh and clean with a reading of 18-19. Her exposed thee wood layers are hard as I probed my prick into the area looking for and breaches. I removed the trimtabs on each side, cleaned mating surfaces and re installed with 3m 5200 fast cure in each hole and a thin buttering of entire plate edge.. No water came out and my prick would not reveal any rot. She was vey firm in these areas.
 

kramerpage

Chief Petty Officer
Joined
Jul 26, 2010
Messages
447
Nice pickup Kramer! I was looking at Larson Hampton in Detroit that needed similar work. Just love the look of the boat. Unfortunately I'm on the other side of Lake Erie and the US$ was not being so friendly when I purchased.

Your best friend is going to be a drill and drill bit. Drill some shallow holes in the stringers transom and bulkheads. Best case its dry and you can just fill it with Epoxy and be on your way. Worst case ... at least you know what's rotten and what's not.

The whole repair can be done frugally and done well at the same time IMHO - just need to make sure the craftsmanship and attention to detail make up for the slightly inferior materials.

Youll definitely want to check out Woodonglass's link in his signature - decks stringers and transoms is most definitely a good read.


Hey Guy,
I believe this is the Hampton that you are referring too. I live in Columbus Ohio and I drove 20 miles north of Detroit. It was on Craigslist. I offered him 500 after seeing her ROT and ended at a final price of 900. He was a tuff negotiator stating he could part it out and sell trailer alone for 1800.00.

I have already drilled 20 holes in the engine mount blocks / stringer system to the transom and water wept out. Its not worm dirt but its soft and dark. I want to say replace one side at a time so I can duplicate engine mount dimensions and elevation. I have several pics to post but site says they are too large so I will work on that so you can get a better idea of what Im working with. Most sites reduce them for you.

So my budget for this repair with myself doing all the labor is to be at or under $1200.00. I don't know if that's possible since I have never done this before and have no idea of what materials I need and what the cost of the materials are. I own some tools such as pneumatic 6" DA and Velcro backing pads for 40 grit 80 grit etc..I have 25,000 rpm Makita di grinder with 3 inch cutting wheels. Straight and 90 degree 3 inch cutting tool pneumatic. Sawzall, drills, circular, jig, miter and so on. I will read the link you suggested and work on getting some pics up.Thanks for your reply sir.
 

Woodonglass

Supreme Mariner
Joined
Dec 29, 2009
Messages
25,924
You might want to read this...http://www.yachtsurvey.com/moisture_meters.htm
I don't put much stock in Moisture Meter readings.If the motor mounts are that bad I'm betting your transom is worse than you think. I'd use a drill and core sample it in various locations and check the shavings. I'd be doing the same on the stringers. If they all check out ok. fill the holes with 3M 5200 and carry on.
 

kramerpage

Chief Petty Officer
Joined
Jul 26, 2010
Messages
447
I will core the transom asap.
Is there a preferred method? Pattern? Depth Size hole? Is it more apparent at the bottom or just when the entrance point may have been. I want to be very thorough is why Im asking. Thanks so much.
Also the stringers in this boat are only 1 inch thick plywood standing about 18 inches in height. This boat has a one piece top meaning the floor, walls and bow (cuddy top) swim platform to pulpit is all one piece.
 

gm280

Supreme Mariner
Joined
Jun 26, 2011
Messages
14,593
kramerpage, basically drill in the lower sections of the transom to see if dark rotted or water shavings comes out. If it isn't totally dry clean wood shavings, it is bad. Because usually rot starts in the lower section and rots upwards. BUT, if you do find rot anyway in the transom, it all have to be replaced. You can't do partial repairs and have it work out correctly. It is all or nothing... Same with the stringers and flooring. If you are going to do the job and make it a boat worth having, do it right... JMHO!

Oh, and one other thing. follow Woodonglass's suggestions and repair methods. He knows what he is talking about and has done lots of repairs himself as well... A very good source of info for such things! :thumb:
 
Last edited:

produceguy

Lieutenant Junior Grade
Joined
Sep 30, 2010
Messages
1,243
You have I/O that means your transom is 2 inches thick. Get a drill bit and wrap tape around the end exsposeing about 3/4 of an inch of the bit. Drill as low as u can on the transom and around the plug area and the keyhole,drill up to the tape around the bit so u only drill into the transom 3/4 of an inch.
Nice boat. You got a great deal"
 

produceguy

Lieutenant Junior Grade
Joined
Sep 30, 2010
Messages
1,243
Sorry, drill from the inside of the transom. Lol, that could of been bad.
 

kramerpage

Chief Petty Officer
Joined
Jul 26, 2010
Messages
447
Thanks for the replies guys. I will try to get to the boat tonight. Its thirty miles out of town at my brothers home in the country. If the transom shows signs of rot which Im sure it will being a 1989 with several holes that were not sealed properly. How do I get to the transom? The entire upper half of the boat would have to be removed right? Since the floor walls and top are all one piece.
 

Woodonglass

Supreme Mariner
Joined
Dec 29, 2009
Messages
25,924
The entire upper half of the boat would have to be removed right? Since the floor walls and top are all one piece.

Not necessarily!!! You could cut the back portion of the cap at the gunwales. Many have done this to gain access to the transom and the "Go Back" repair is not that difficult to do. Pics of the sides and interior of the boat will help us to help you decide exactly where to make the cuts.;) Here's a boat very similar to your's ...http://forums.iboats.com/forum/boat...88-imperial-v220-low-budget/page2#post9065172
 
Last edited:

kramerpage

Chief Petty Officer
Joined
Jul 26, 2010
Messages
447
No Title

You have I/O that means your transom is 2 inches thick. Get a drill bit and wrap tape around the end exsposeing about 3/4 of an inch of the bit. Drill as low as u can on the transom and around the plug area and the keyhole,drill up to the tape around the bit so u only drill into the transom 3/4 of an inch.
Nice boat. You got a great deal"

Well I did just that. I drilled several holes in the transom 1/4 inch dia . From the inside (lol). I could find no rot or wet wood. Started on side and drilled one on top two in the middle and one at the bottom. That's ten rows forty holes. So now I got that two fill. More work. lol The moisture meter stated 83 percent moister in one place the size of a dinner plate where an old transduce im guessing was mounted so I got four extra holes in that area and its not wet. Don't understand that at all.

So I then pulled the 60 gallon gas tank out and checked the stringers drilling three holes top to bottom every 14 inches bot sides and in all lockers also and found no water or rot. Stopped counting holes. Over 50 holes Im sure of. More work...

So here we are.
Rotted engine /gas tank bulk head.
Rotted port starboard engine mount box
Rotted starboard floor compartment bottom that's 1/2 inch ply over foam. This is where all the deck water drains and I believe it couldn't get to the bilge due to the drain opening was higher that the stringer so the water just laid their.
 

Attachments

  • photo222010.jpg
    photo222010.jpg
    84.7 KB · Views: 0
  • 20150510_114501.jpg
    20150510_114501.jpg
    62.6 KB · Views: 0

Woodonglass

Supreme Mariner
Joined
Dec 29, 2009
Messages
25,924
Well I don't think I've ever Heard of anyone doing that much drilling for core samples!!!!:eek: But at least you know for sure where the rot is and isn't!!!!:facepalm: Use some 3M 4200 to fill the holes and you'll be good to gol
 

kramerpage

Chief Petty Officer
Joined
Jul 26, 2010
Messages
447
Well I don't think I've ever Heard of anyone doing that much drilling for core samples!!!!:eek: But at least you know for sure where the rot is and isn't!!!!:facepalm: Use some 3M 4200 to fill the holes and you'll be good to gol

Thanks for the reply and the 4200 idea. That seams to easy for this forum. Thought I would have to make peanut butter then coat with mayo or something like that. lol
Well I guess I just wanted to know what the hell I was getting into so I could make an informed decision on how to proceed. LL I have doing a lot of searching and reading on this subject and it seems to me different folks do things in many different ways. Say motor mount. I searched the words and went thru 30 plus post reading for a few hours and found several different methods. Poly vs epoxys, layered ply vc solid wood, greenwood vs non, cut tops off and back fill vs total removal, do one side at a time vs doo both. Its quite a lot to take in and learn. Watched the frisco boater restoration on youtube. That took two whole evenings. I don't really know how I'm going to go about the repair anymore today than I did 30 days ago but I know a lot more if that makes any sense.
 

kramerpage

Chief Petty Officer
Joined
Jul 26, 2010
Messages
447
Can you guys please recommend a poly resin for the above list of repairs? I also want to do all repairs in 1708 removing all old glass boxes and tabbing from failed components. I want to use known quality products which I don't know due to my inexperience. Also stuff to make PB as described in woodonglasses instructions. Thanks
 

Woodonglass

Supreme Mariner
Joined
Dec 29, 2009
Messages
25,924
If you haven't looked at this, I think it would be informative...Fabricating Decks, Stringers, and Transoms
A lot of the members like to get their supplies here... U S C O M P O S I T E S . C O M. Their 435 polyester resin is good stuff. Where are you geographically located. There may be a closer supplier. Shipping is NOT good on Poly products since they are rated as a hazardous material. Once you decide exactly what all needs to be done and the dimensions etc. I can and will help you come up with a more definitive supplies list.;)
 
Last edited:

kramerpage

Chief Petty Officer
Joined
Jul 26, 2010
Messages
447
2- Gallon Poly Marine Resin $30.00Ea
1- Quart White gelcoat w/wax $17.00
1- Gallon Bonding Bedding Putty $40.00
1- 3 x 1/2 glass roller $7.95
5- Yard 1708 x 50" $6.00yd.
5- Yard 1.5oz x 50" $4.75
Shipping 3- Box to your zip $56.63

Well here's my shopping list I came up with. Purchased my PPE and 36 / 80 grit paper. Should arrive for the weekend from Miami.
 

kramerpage

Chief Petty Officer
Joined
Jul 26, 2010
Messages
447
If you haven't looked at this, I think it would be informative...Fabricating Decks, Stringers, and Transoms
A lot of the members like to get their supplies here... U S C O M P O S I T E S . C O M. Their 435 polyester resin is good stuff. Where are you geographically located. There may be a closer supplier. Shipping is NOT good on Poly products since they are rated as a hazardous material. Once you decide exactly what all needs to be done and the dimensions etc. I can and will help you come up with a more definitive supplies list.;)

Woodonglass Im sorry I missed your post yesterday. I didn't get a notification of your response. so I think I got everything I need.
Im using ACX ply for the engine stringers and bulkhead.
Engine mount blocks or pillar is 7 inch wide by 13 inch long. 22ft boat powered by 4.3 mercruiser I/o


My question is
1) how do I build up the ply for the engine mount? Do I cut pieces to stack up to the proper height?
2) do I coat each piece individually if so how many coats?
3) do I place 1.5 oz matt in between each layer and then clamp in an effort to make one strong block. What is the clamping method.
4) how do I fill the bottom of the mount where it meets the hull since the hull is not flat? Do I trim the wood or fill with PB?
5) I have two quarts of total boat penetrating epoxy that Im not using. Can this be used to soak the wood then use poly over that?
6) I purchased a quart of white waxed gelcoat to finish off the bilge area and engine decks where the tril pump and batteries are which will all have one layer of 1.5 oz mat over it. There is worn grey paint there now. Is this a good idea?
 
Top