confirmation of fiberglass/resin choices for old Glasspa Stringer and Deck repair

ianmoore

Petty Officer 2nd Class
Joined
Jun 5, 2014
Messages
169
Hello,
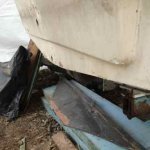
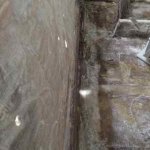
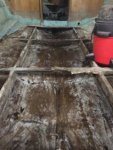
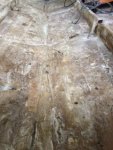
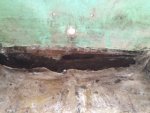
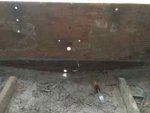
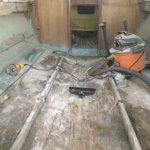
I've done quite a bit of reading here and on other sites as i prepare to fix the center stringer and replace the deck in my 1959 Glasspar Seafair sedan.
I've never done the glassing before, but feel generally ready to start. That said, i was hoping to confirm a couple of questions that I am still unsure of.

1. For the stringers, it looks like the best bet is the 1708 Biaxal. If i set them in and run tape along the seams, then the Biaxal is all i need as far as fabric?

2. For my resin i was looking to use the '700 vinyl resin', which seems to be a step up from the standard polyester, but not as prohibitively expensive as the epoxy(which would be out of my price range). overkill, underkill?

3. I am using marine ply for both the stringer and the deck. Do i need to seal the stringers with resin before glassing them in? I am reading a lot of conflicting info about this.

4. For the deck, am i ok with a couple of layers of 6oz matt on each side? What are the thought on sealing the screw holes with resin before screwing them in?

Thanks a lot!
Ian
 

JASinIL2006

Vice Admiral
Joined
Feb 10, 2012
Messages
5,549
For the screw holes, many of us predrill the holes, fill with 3M 5200 and then screw the deck down. Then fiberglass over the top.

After the screws are inserted and the 5200 cures, you can fill the dimples created by the screwheads with thickened resin, if you wish, then glass over the top.
 
Last edited:

Woodonglass

Supreme Mariner
Joined
Dec 29, 2009
Messages
25,924
You always need to precoat your wood. If you don't you run the risk of resin starving the fabric when it goes down. You don't have to use Marine Grade plywood. If you can find Aruaco plywood it's pretty good 7ply void free ext. grade stuff. You need to pay attention to the edges. That's where water will penetrate first. I'd recommend using 1.5 oz CSM on the bottom side of the deck and then again on top. You can use a layer of 6oz fabric as a finish layer if your wish. What's your final finish gunna be for your deck?

Have you seen this link?? Fabricating Decks, Stringers, and Transoms
 

ianmoore

Petty Officer 2nd Class
Joined
Jun 5, 2014
Messages
169
Thanks guys! I already have the marine grade, as we were gonna use it on the gunwhale and for some bench material.
That link is awesome. I will probably be using that '700 vinyl' though, which is a poly resin. Still think the 1708 is ok for that?
Definitely going to really pay attention to the pre-coat, especially on the edges

I'm not sure on the deck finish yet. Open to suggestions. I'd like to do something functional, utilitarian, and hopefully in the realm of a Glasspar look
 

ianmoore

Petty Officer 2nd Class
Joined
Jun 5, 2014
Messages
169
No Title

Here is the end of the day ground stringer. Still a little bit of cleanup and grinding. I think i'm going to take down some of the blisters and add another layer of glass to the keel line before i lay in the center stringer
 

Attachments

  • photo215431.jpg
    photo215431.jpg
    23.7 KB · Views: 0

bonz_d

Vice Admiral
Joined
Apr 22, 2008
Messages
5,274
ianmoore, please stay up with this thread here as I love those old SeaFair Sedans and would love to watch what you do with this one. Please do post lots of pictures too! If I could find nice specimen to start with I'd be right along side of you but all the ones I've looked at are really to far gone for my liking, skill level and cost to completion.
 

ianmoore

Petty Officer 2nd Class
Joined
Jun 5, 2014
Messages
169
Bonz,

As with many things, this boat came to me in a roundabout way. It was gifted to me under the auspice that it ran and was functional. When i got it I had no idea about the history of the boat. It came with 2 1959 Evi's. I learned to work on motors by basically disassembling the 50hp and fixing it piece by piece. I finally threw in the towel on the motor when the shift coupler broke(after rebuilding gear box/lower unit, carbs, fuel pump, and generator!) I am restoring the 10 hp, and that motor is actually coming along nicely. I found an old fuel pump, and was able to convert it from a pressurized tank.

Along the way, i fell in love with the boat itself. We live on Vashon island, in the puget sound .It is a perfect boat for the inside passage type waters we have. The hull is in pretty good shape. Outside of the stringers/deck, it could use some reinforcement on the keel. (Too many beachings in its life). The transom must have been recently rebuilt. It is in pretty good shape. Funds are a bit limited so its gonna be a slow go, but i plan on getting the floor system together in the next few weeks. After that I plan on doing some cleanup on the hull/keel and splashwell, and then eventually sanding and paint.

Some people do amazing renovations with these old ladies, and i have done a lot of studying of those top to bottom refurbs. I want to have a functional boat that is sturdy, good looking, and in good enough condition to do some island hopping. I have a late 80's inline 6 Merc on my other boat(ski boat) and really like that motor. I am starting to gently look for one of those, and starting to look into different steering systems.

I will try to post more pics as i make progress. Looks like some more grinding today. I want to clean up the inside keel line and lay another layer of glass along that before i put in that center stringer.

Ian
 

ianmoore

Petty Officer 2nd Class
Joined
Jun 5, 2014
Messages
169
No Title

Woodonglass thanks for the link. Really good info on a lot of the stuff i am looking into!
Here is day 3 grinding. Pretty much ground as far as i can get it.
I also made a discovery of some rotten wood in the lower transom. My father-in-law thinks we can dry and fill it as the rest of the transom is solid.

The bow keel line seems a bit thin and i am thinking a couple of layers of matt before i lay the stringer in. Thoughts?
 

Attachments

  • photo215451.jpg
    photo215451.jpg
    24.1 KB · Views: 0
  • photo215452.jpg
    photo215452.jpg
    20.8 KB · Views: 0

ianmoore

Petty Officer 2nd Class
Joined
Jun 5, 2014
Messages
169
We are drying it out right now with fans and a heater. He suggested drying, chiseling out any more rot and filling with Epoxy resin. It is just in the area shown in the pic.
 

ianmoore

Petty Officer 2nd Class
Joined
Jun 5, 2014
Messages
169
Woodonglass. Any advice on strengthening the inside of the keel with some additional glass on these old boats? The keel line on the outside is definitely through the gelcoat where it has been beached a bunch. I will be doing the gelcoat/cabosil thing to repair the outside next, but am trying to make sure that I am thoroughly looking through these steps as well before i bed that center stringer.
The FIL is a woodworker who has done a good deal of fiberglass work as well. He is more cavalier about these things then I am, but he also has decades of experience, so I tend to defer to him in these areas where i am a bit green.
 

Woodonglass

Supreme Mariner
Joined
Dec 29, 2009
Messages
25,924
I'd highly recommend drilling core samples in the transom in other areas to ensure it's soundness. If you feel that in fact the lower section is the only affected portion then I would Cut it out above the rot line far enuf to ensure there would be no chance for the rot to continue to proliferate thru the wood. You could then fabricate a piece to fit in the void and use PB and glass to secure it. Since it's at the bottom and only about 6-8" tall it'll be strong and won't effect the structural integrity of the boat at all. I'm sorry but I can't see anything clearly in the pic of the center keel. You need to clean it up a bit more for me to see what you are referencing.
 

ianmoore

Petty Officer 2nd Class
Joined
Jun 5, 2014
Messages
169
I will do and report back. Out of town for a couple of days.
Also will take a closer pic of the front section of the inside keel
 

ianmoore

Petty Officer 2nd Class
Joined
Jun 5, 2014
Messages
169
Couple of things:
I decided over the weekend, that i will replace the transom. The one i am replacing was 1 3/4", but i am seeing most people replace similar sections with 1 1/2" of wood; 2 3/4" pieces.
I couldn't get a good pic of the inside keel line, but there is a deep line towards the bow where the center stringer went. I can't really grind in there, so either i bed the stringer down in the 'V' or i build it up to more of a flat line with PB. Probably the former.

I have also seen a couple of people that built bilge areas with a rear bulkhead. Mine did not have one, nor a bilge pump. It just had a gabard drain in the back that would theoretically drain any water under the floor. does anyone know if these old Seafair's originally had a bilge area, or should they? I have the floor off and figure this is the time to amend anything that needs to be addressed.
 

ianmoore

Petty Officer 2nd Class
Joined
Jun 5, 2014
Messages
169
No Title

This morning i chiseled and ground off the plywood for the transom. The wood was mostly good, but wet. I decided to rebuild it.
the original transom seemed to be leaking(rotten wood) from the center area of the inside hull. I think the glass was not done well enough and some water was allowed to seep in. I had to cut the 2 side stringers back so that i can properly glass the transom in this time.

It looks like i will have to build the transom in 2 parts. First i need to glue in the bottom piece of 3/4", and then mount another 3/4" piece that is the whole transom shape.
-Does anyone have any thoughts about wrapping the CSM on the individual pieces before glassing in the whole thing?
-I would love to salvage the 2 side stringers. Both are in good shape(wood), and i was hoping to grind down some of the delaminated glass and put another layer of 1708 over them. I had to cut each back about 10" in the aft for the transom, so i would need to join a small piece if i go that route. Thoughts on this?
Slow going, but progress!
 

Attachments

  • photo215687.jpg
    photo215687.jpg
    15.3 KB · Views: 0
  • photo215688.jpg
    photo215688.jpg
    10.9 KB · Views: 0
  • photo215689.jpg
    photo215689.jpg
    15.5 KB · Views: 0

Mikeopsycho

Senior Chief Petty Officer
Joined
Feb 6, 2014
Messages
738
Just out of curiosity, what size is your boat, I didn't see that in the thread anywhere? Do you have any pics showing the whole boat? Looks like you're making good progress. :)
 

ianmoore

Petty Officer 2nd Class
Joined
Jun 5, 2014
Messages
169
No Title

It's about 17 1/2. I need to dig up some pics from before I started the rebuild. the shell of the boat is in decent shape.
Woodonglass . Here are 2 pics of the transom. Maybe my verbiage is off, and the lower part is something else.
The lower part is pretty much vertical, and the bigger section of the transom has a slight relief going out, so it seems that the only way to get the plywood to sit and properly bond and clamp would be by first laying the upper section to the lip, letting that set, and then doing the top 3/4" layer in 2 pieces(upper and lower), which is how it was. I don't know how i could get the top layer to flex enough to set it in one piece
 

Attachments

  • photo215768.jpg
    photo215768.jpg
    14 KB · Views: 0
  • photo215769.jpg
    photo215769.jpg
    14.3 KB · Views: 0

Woodonglass

Supreme Mariner
Joined
Dec 29, 2009
Messages
25,924
That's an interesting Transom configuration you've got there. I'd like to see a pic of the entire stern of the boat from the inside before I make any suggestions.
 

ianmoore

Petty Officer 2nd Class
Joined
Jun 5, 2014
Messages
169
I'll have to get back to you on the inside transom shot. We were trying(somewhat of a test) to see if we could do a small fiber repair and looks like its not going to set. Seattle weather, soft shelter, and a small heater couldn't quite pull it off. Need to clean it up and I will take a pic.
We found a thread of a similar restore where the guy rebuilds the transom in 2 pieces. His is similar to ours..
https://www.youtube.com/user/boatrepairman1/videos
 
Top