confirmation of fiberglass/resin choices for old Glasspa Stringer and Deck repair

Mikeopsycho

Senior Chief Petty Officer
Joined
Feb 6, 2014
Messages
738
I rolled on gelcoat with crushed walnut shells for non-skid. Just throwing it out there as an idea.
 

ianmoore

Petty Officer 2nd Class
Joined
Jun 5, 2014
Messages
169
No Title

Thanks Mike. I went with Interlux brightside 'kingston grey' with some Silica sand.
I actually finished the CSM deck wrap today. Man was that a job. I was gonna try to do the glass multi/layer one area at a time, but I had a tough time pulling it off. I ended up doing a layer of CSM, letting it cure, then coming in and lightly grinding some high spots/bubbles, etc. I did the second layer and will go back, doing another light grinding and probably a few patches. Once that is cleaned up i will do a final layer of 6oz. As I said above, i will be painting the main deck with the interlux brightside.
Here is a pic of the end of day work. The seam towards the back is a piece of 1708. I ran out of big pieces of CSM. I will still cover everything with the 6oz, and this back part will be under the splashwell and the rear seat.
 

Attachments

  • photo218199.jpg
    photo218199.jpg
    163.3 KB · Views: 0

ianmoore

Petty Officer 2nd Class
Joined
Jun 5, 2014
Messages
169
No Title

And finally the cloth! Deck is wrapped and next up will be deck paint!
 

Attachments

  • photo218315.jpg
    photo218315.jpg
    45 KB · Views: 0

ianmoore

Petty Officer 2nd Class
Joined
Jun 5, 2014
Messages
169
No Title

First coat of primer on deck, plus primered splashwell. I will be painting up the inside of the hull as well, but i am doing it in steps. The deck itself will have some silica sand
 

Attachments

  • photo218353.jpg
    photo218353.jpg
    45.7 KB · Views: 0
  • photo218354.jpg
    photo218354.jpg
    31.2 KB · Views: 0

ianmoore

Petty Officer 2nd Class
Joined
Jun 5, 2014
Messages
169
No Title

I did a second coat of primer on the deck, did some fairing on the splashwell and transom, and did a bunch of sanding on the hull. Somebody had splashed some paint on it to cover up some fiberglass showing through the gelcoat, and this was taken off as well. I have a friend who used to Gelcoat for a living. He has offered to help me re-gelcoat the hull. I will do it to the chine.
More sanding and priming for now.
 

Attachments

  • photo218457.jpg
    photo218457.jpg
    45.2 KB · Views: 0
  • photo218458.jpg
    photo218458.jpg
    33.7 KB · Views: 0
  • photo218459.jpg
    photo218459.jpg
    36.7 KB · Views: 0

ianmoore

Petty Officer 2nd Class
Joined
Jun 5, 2014
Messages
169
No Title

Transom is almost faired. Probably one more pass. I'm also working on the splashwell..Its almost done. I put another coat of primer on today. Looking to start painting it in the next couple of days. I also started working on the fiberglass piece that goes in the cuddy. I'm going to repaint it as well. I patched a couple of fiberglass tears and will do some fairing on it, and then paint.
Also started cleaning the seats. If i had the money i would reupholster, but for now I'm just cleaning them up, cutting some new plywood and re-installing.
 

Attachments

  • photo218495.jpg
    photo218495.jpg
    130.4 KB · Views: 0

ianmoore

Petty Officer 2nd Class
Joined
Jun 5, 2014
Messages
169
No Title

I painted the deck, 2 coats, and inside hull(one coat) today. Here is after the first coat. Interlux brightside 'kingston grey' with some silica sand non skid.
A little more fairing/fixing on some of the fiberglass inside parts. I'm using a light blue Marshall's cove paint for the dash/cuddy parts, as well as the splashwell
 

Attachments

  • photo218541.jpg
    photo218541.jpg
    98.6 KB · Views: 0

ianmoore

Petty Officer 2nd Class
Joined
Jun 5, 2014
Messages
169
No Title

Fairing, fixing, sanding, priming, repeat
fairing, fixing, sanding, priming, repeat......
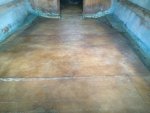
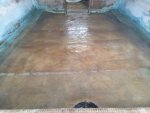
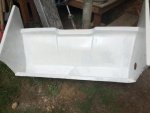
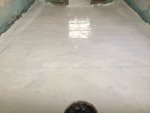
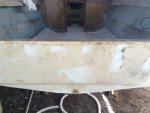
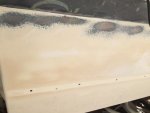
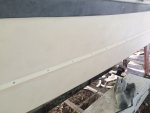
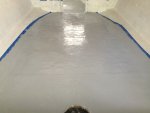
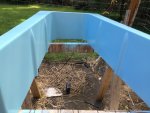
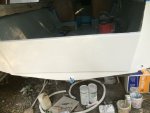
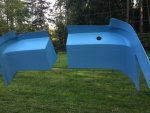
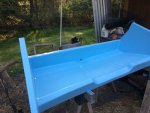
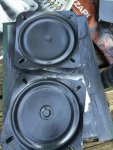
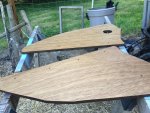
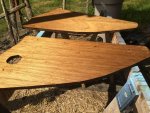
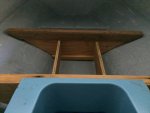
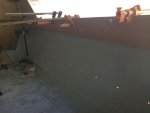
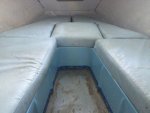
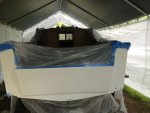
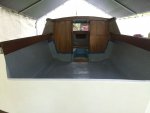
I've been doing a bunch of cosmetic work on the interior pieces(splashwell, dash, cuddy inset). This boat originally had the steering on the port side, so switched that. The splashwell below is one i found at my friends boat yard, and required a good deal of renovation. I think i'm finally saying its done and ready for final sanding and painting. I painted the cuddy insert first to see how the paint and application would hold up. I'm pretty happy with it! I'm using the Marshall's Cove paint, which is an enamel based single stage. It came highly recommended. I was originally going to roll it on, but with all of the curves and indentions in these pieces, i decided to use a Prevast sprayer. After a couple of passes i got the hang of it. I did really light coatings with repeats every 15-20 minutes until i got to what would be a solid "first" coat. This is what it looks like. I am going to spray the splashwell today, as well as the two dash pieces.
If i have time, I'm going to take a stab at rolling some gelcoat on the transom. this will be my first try and I've been reading up on the process. I figure if i screw up its a small enough area that it won't kill me to start over. My buddy comes over next week and we will gelcoat the hull.
In all of the fairing, i went through a couple of products. I really like the 3M Marine premium filler. It is easy to use, sets up quickly, and has made my fairing/sanding go a lot smoother<g
 

Attachments

  • photo218807.jpg
    photo218807.jpg
    86.8 KB · Views: 0
  • photo218808.jpg
    photo218808.jpg
    106.9 KB · Views: 0

ianmoore

Petty Officer 2nd Class
Joined
Jun 5, 2014
Messages
169
No Title

I have all of my insets finished and painted. I glassed in the cuddy inset and cut a new bulkhead for it. The floor dimensions changed with the new floor, so it took a little bit of maneuvering to make it work. As i said earlier, the steering was on the port side, so i will be switching it to the starboard side.

I consider my first attempt at gelcoating to be a success. I put on 3 layers, sprayed some PVA, had to sand an acetone as i needed more thickness, and added 2 more. I'm now wet sanding, and it's coming out pretty nice. I applied the gelcoat with a roller and it went on OK. I think when i do the hull i will try a slightly different roller and also tip as well to minimize the orange peel as much as possible. I did a bit of research on sanding procedure for new gelcoat, and will probably try using an orbital on the hull to get to a good wet sanding starting place.

I ground down as much rust as i could on the seat brackets and repainted my rust inhibitor. This is somewhat of a funds inspired temp solution, but should hold up for a couple of years. The vinyl on the seats is nearing the end of it's life, but will make it through the season.

Now that i have the splashwell done, I can fit in the ply side pieces and test fit it into the hull. this type of splashwell had vertical mahogany pieces that connected it to the hull via a glassed in horizontal piece. I'm going to test fit and plan that piece out here in the next few days.

Getting closer!
 

Attachments

  • photo218986.jpg
    photo218986.jpg
    139.8 KB · Views: 0
  • photo218987.jpg
    photo218987.jpg
    152.2 KB · Views: 0
  • photo218988.jpg
    photo218988.jpg
    184.8 KB · Views: 0
  • photo218989.jpg
    photo218989.jpg
    136.1 KB · Views: 0

ianmoore

Petty Officer 2nd Class
Joined
Jun 5, 2014
Messages
169
No Title

I used WOG's recipe for wood preservation before installing. Ground down the metal corner pieces. Nice and shiny!
I will install the gunnel wood in the next day or so and then i can install the Splashwell. This design has 3 vertical strips that mount to the deck. I have seen some designs on the old Glasspars where there is a glassed in board that they mount to. I'm trying to find something where i don't have to screw into the deck
 

Attachments

  • photo219090.jpg
    photo219090.jpg
    180.2 KB · Views: 0
  • photo219091.jpg
    photo219091.jpg
    131 KB · Views: 0

Woodonglass

Supreme Mariner
Joined
Dec 29, 2009
Messages
25,924
Did you REALLY do the edges well? That's the most important part of plywood and then the full strength coats of Marine Varnish on the outside flat layers and edges too!!!
 

ianmoore

Petty Officer 2nd Class
Joined
Jun 5, 2014
Messages
169
No Title

Woodonglass, I have studied sir! I applied the protectant thoroughly, focusing on the edges, let sit 72 hrs, and am now coating with varnish
 

Attachments

  • photo219145.jpg
    photo219145.jpg
    125.9 KB · Views: 0

ianmoore

Petty Officer 2nd Class
Joined
Jun 5, 2014
Messages
169
No Title

Some more pics
 

Attachments

  • photo219144.jpg
    photo219144.jpg
    176.1 KB · Views: 0
  • photo219146.jpg
    photo219146.jpg
    95 KB · Views: 0
  • photo219147.jpg
    photo219147.jpg
    163.4 KB · Views: 0

ianmoore

Petty Officer 2nd Class
Joined
Jun 5, 2014
Messages
169
It's fun to learn all of this new stuff, and in the process get a really cool restored boat. I have made more mistakes then i can count, and can see how it gets addicting.
you start to figure it out and think, "next time if i only"....
 

Willyclay

Captain
Joined
Sep 8, 2006
Messages
3,240
Multiple Boat Syndrome can strike anyone, anytime, anywhere! I peaked at three but am down to one which is probably my last. You are doing great work.
 

ianmoore

Petty Officer 2nd Class
Joined
Jun 5, 2014
Messages
169
No Title

Latest update:
I bought one of the cheap Harbor Freight HVLP guns and did the mod to clean out all the silicon and reseal the threads. I had already trying rolling the transom, and figured i would give the gun a try as well. Full disclosure-I have never used a paint gun, much less sprayed gelcoat. I did watch a few videos, and spent a good deal of time prepping.
I tried the gun first with water just to get it's basic functionality down. Seemed ok. Mixed the gelcoat, adding about 6% styrene. First coat went on pretty well. Not sure what to expect as i haven't done it before, but thicker then when i rolled it. I was almost done with the second side of the hull when the compressor blew a breaker! Crazy running around, changed plugs/circuits and started spraying again. Timer went off(15 minutes) and dumped about 1/3 out for fear of it kicking. Cleaned the gun, mixed up another batch, this time at 10% styrene. Set timer. this batch kicked super quick and i had to dissasemble the gun and spend about 30 minutes cleaning it. I did get the whole hull sprayed before that happened. 3rd coat kicked slower and i was able to get a nice coverage. It started kicking, and i was able to pour off the remaining gelcoat and do some small cleaning. I was trying 16oz at a time. I'm going to do 2 more today with both being 12oz. Second one will have some wax in it. I'm going a little bit more heavy so i can not worry as much when i run the orbital with 220 to take off the orange peel.
Mostly looks good. A couple of bugs wanted to be part of it, but I would consider my first attempt a moderate success.
​It's messy!
 

Attachments

  • photo220022.jpg
    photo220022.jpg
    126.6 KB · Views: 0
  • photo220023.jpg
    photo220023.jpg
    114.5 KB · Views: 0

ianmoore

Petty Officer 2nd Class
Joined
Jun 5, 2014
Messages
169
No Title

Here is where we are at today. Inside deck is painted, and all of the wood is stained. I am still working on getting the orange peel down, so more sanding!!
I'm going to test fit the splash-well and install the dash pieces. Once the outside transom is sanded and buffed will put the motor on.
I'm going to order some gelcoat from Fiberglast with color to patch up some dings and so forth. I've been trying to find the best match
getting closer
 

Attachments

  • photo220428.jpg
    photo220428.jpg
    113.5 KB · Views: 0
Top