confirmation of fiberglass/resin choices for old Glasspa Stringer and Deck repair

ondarvr

Supreme Mariner
Joined
Apr 6, 2005
Messages
11,527
Anytime you all the gel coat on the boat and it gets hard you did a good job.
 

ianmoore

Petty Officer 2nd Class
Joined
Jun 5, 2014
Messages
169
No Title

Painted, and starting reassembly. Need to do a bit more sanding on the gelcoat before i can install the splashwell, but getting closer!
 

Attachments

  • photo221041.jpg
    photo221041.jpg
    113.4 KB · Views: 2

ianmoore

Petty Officer 2nd Class
Joined
Jun 5, 2014
Messages
169
No Title

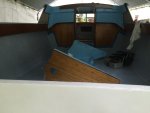
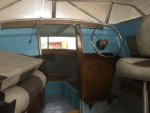
Been having to do some "real" work, but getting things put back together. Did some painting, and fairing, and started reassembling the boat.
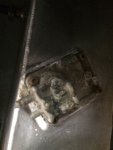
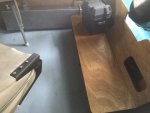
I had to cut down the transom about a half inch, re-fiberglass it, and do some creative work to make my original aluminum trim pieces fit. There is still a bit of a gap, which i will show next time i have a camera, but it's as close as I'm going to get it.
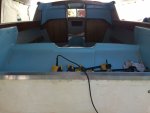
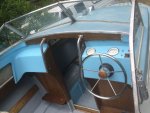
Here is a pic from last week after getting the spashwell in
 

Attachments

  • photo222048.jpg
    photo222048.jpg
    99 KB · Views: 0

ianmoore

Petty Officer 2nd Class
Joined
Jun 5, 2014
Messages
169
No Title

Tons of progress made. We have launched the boat twice, first with an aux tank and yesterday using our full fuel system. We have dual 15 gallon reclaimed aluminum tanks that have on/off spigots going to a T and the fuel/water seperator. I am looking for an elegant way to run the kicker motor. The port tank has a ancillary fuel connector(picture below). I was looking to replace this piece with a newer Mercury fitting. Does anyone know where to get these?
We put in a NFB steering system that is working nicely. FIL made new kicker boards and a rear seat. Looking into different mounting ideas for the seat so that it can be removed if we need to get under the splashwell.
I will be doing some electrical work today and tomorrow, wiring the main power to my fuse box and connecting switches to the lights, horns, etc. I have a tach and speedometer ordered. I also got some color matched gelcoat to start patching and filling in chips.
Waiting on gasket material from Wefco to reinstall cuddy front windows
 

Attachments

  • photo226126.jpg
    photo226126.jpg
    128.2 KB · Views: 0
  • photo226127.jpg
    photo226127.jpg
    148.7 KB · Views: 0
  • photo226128.jpg
    photo226128.jpg
    147.2 KB · Views: 0

ianmoore

Petty Officer 2nd Class
Joined
Jun 5, 2014
Messages
169
No Title

I got the Tach and Speedometer in, as well as all the wiring! I am looking into some type of dash plate as the switches and gauges could look cleaner on a stainless top
 

Attachments

  • photo226341.jpg
    photo226341.jpg
    54.2 KB · Views: 0

ianmoore

Petty Officer 2nd Class
Joined
Jun 5, 2014
Messages
169
The boat has been functional and have had a good summer getting it out on the water. The boat is a bit stern heavy with the 115 TOP merc and kicker motor. Side tanks are sitting middle rear, and battery underneath rear seat. It planes pretty easy, but when trailered you can easily pick up the trailer tongue and it becomes evident how stern heavy it is. I will do some more cosmetic work in the coming months, after we're off the water for a bit.
Now on to the problem.. Woodonglass maybe you have some insight to this? When i built the transom, i was very careful to waterproof it. My garboard drain was set in a big circle of peanut butter with pvc to it. The transom was tabbed in with 2 layers of 1608 and then 2 layers of CSM. I thoroughly covered the top as well. When i mounted the engine, and any other thru hull, i was very liberal with 4200 around bolts. The exterior of the transom seems to be completely solid, and the interior does as well
Yesterday I was mounting the transducer to the lower transom exterior. I made a couple of small drill incisions, and when i did I had some water seep out. Just a couple of drops, but it came as soon as i was through the outer layer of gelcoat/fiberglass. I am completely baffled as to how it could have gotten there. Obviously this is of concern to me. I would love any suggestions with how to proceed.
Thanks
Ian
 

Willyclay

Captain
Joined
Sep 8, 2006
Messages
3,240
Yesterday I was mounting the transducer to the lower transom exterior. I made a couple of small drill incisions, and when i did I had some water seep out. Just a couple of drops, but it came as soon as i was through the outer layer of gelcoat/fiberglass. I am completely baffled as to how it could have gotten there. Obviously this is of concern to me. I would love any suggestions with how to proceed. Thanks, Ian

Was this an area where you replaced the plywood transom core?
 

Woodonglass

Supreme Mariner
Joined
Dec 29, 2009
Messages
25,924
I KNOW you built the transom right!!! Soooo.... What all has been mounted to it? How low is the transducer mounted? Got Pics? The only way water could get in is via a hole that you have drilled since the installation? Had any water INSIDE the boat? IF so then check any/all penetrations into the transom on the inside as well. SOMETHING is leaking and you need to find it sooner than later.;)
 

trailerbound

Cadet
Joined
Mar 21, 2016
Messages
29
lovely job! I just picked up a 59 seafair sedan so im going to reread this multiple times and use it as a reference! thanks for posting this rebuild.
 
Top