1989 Trophy 170 Budget Build

Woodonglass

Supreme Mariner
Joined
Dec 29, 2009
Messages
25,924
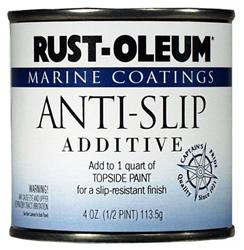
Rustoleum makes it's own anti-skid additive. You can use it with the recommended Rustoleum Acrylic Pro Enamel. There's no need to pay the extra money for the "Topside" paint.

RLL-207009_ml.jpg
 

axlr8

Petty Officer 2nd Class
Joined
Nov 12, 2013
Messages
100
Thanks woodonglass! That is news that I am happy to hear!
 

axlr8

Petty Officer 2nd Class
Joined
Nov 12, 2013
Messages
100
I spent this afternoon thinking about my options as far as transom replacement go and what kind of time frame I am going to shoot for. Being a college student has its perks sometimes. I will end up with about a months worth of free time from the second week of December and until the second week of January. And if everything goes right and I am able to get materials lined up and have no issues with the boat itself, I should have the transom and floors replaced and secured by the end of my break.

I think after hearing multiple opinions on what to do for the gunnel tops, I have come to a conclusion. I really like the idea of having a nice, non-slip surface to work with. That being said. If I use it on the gunnels, I will likely use the same paint and anti-slip mixture on the sealed plywood floors. Just to keep some consistency within the boat (and to keep the cost to a minimum). So with that in mind, I started looking at a color that I think would look nice in the boat. And I came to the conclusion that I liked the looks and hue of this: http://www.homedepot.com/p/Rust-Ole...Protective-Enamel-Case-of-2-7771402/204777452 And with that I plan to add the Rust-Oleum specific Anti-Slip material found here: http://www.homedepot.com/p/Rust-Oleum-Marine-1-hp-Anti-Slip-Additive-Case-of-6-207009/202058453

Now I do have a few questions about sealing the floor and transom again. there was a mixture mentioned above that was suggested to seal the floor and transom and do it on the cheap. My question is, is it absolutely required to add the linseed oil and mineral spirits to the Helmsman Spar urethane? And roughly how much am I going to want to have on hand so I do not need to run to the hardware store halfway through the job? Approximately how many gallons of urethane?

I will be doing the wood work and sealing inside a heated shop, but I want to minimize the need for it to sit inside there for longer than it needs to. If I can get a good run at the woodwork starting on a Friday morning, I am confident that I can have the wood installed and secured by Sunday night. If not be started with the paint prep and masking.
 

Patfromny

Lieutenant Junior Grade
Joined
Dec 2, 2012
Messages
1,197
I'm sure Wood will chime in on how much you will need but I would say you will need around a gallon min. I would shoot for a gallon and a half and you will be safe. I'm just guestimating and comparing to what I used on my boat. I used a Gallon and a half of epoxy but I replaced every piece of wood in my boat including side console supports and bow seat bottoms. I used a Gallon and a half on about 5 sheets of ply and did 4 coats on each side and 8 on the edges. I hit the edges each time I coated a side. the old timers formula might take more since you are letting it pool on the surface but if you are just doing floors and transom I would bet 1 1/2 gallons is probably enough.
I would definitely use the linseed and mineral spirits. They are what will help the mixture penetrate the wood. without the mixture the spar will just seal the top and when scuffed, the wood will not be water proof. The sealing process will take a few days if you do it right. there is nothing better than to know the wood is sealed correctly and totally. I can tell you first hand that that is one of my favorite parts about my boat. I rest easy knowing I won't ever have to do that again. As I get older I have realized that the extra time taken to prep and set up the work right is what makes the rest of the job go smoothly. seal the wood well or you will be doing all this again sooner than you would like. JMHO of course.
 

Watermann

Starmada Splash of the Year 2014
Joined
Jan 12, 2013
Messages
13,753
You should check some of the rebuild threads in the Starcraft section, they are very similarly built boats being riveted and seamed. I don't think it's been mentioned yet but just about every older tin boat will develop some degree of leaks over the years and that needs to be dealt with before you add decking. A leak test will show if you have leaky seams or loose rivets. There's nothing worse than having a leaky boat after doing a ton of work and expense.

I gave you my advice on non-skid but will add that rusto anti-skid material is pumice and although it is an option it's inferior to the poly beads. I've used similar additives and don't like the finish you end up with.
 

Pusher

Lieutenant
Joined
Sep 2, 2014
Messages
1,273
Good call on not using carpet for the floors. Every screw you have going into the floorboard would have water funneling into it from the carpet. You'd also have to un-snag hooks out. I used the gray outdoor carpet from the hardware store and it's holding up great after parking it for a year.

Just make sure you can weld an aluminum piece thats not visible or sructural first. If the material has too many impurities in the original material then you won't gets your new material to hold.

I'm sure you've seen elsewhere, but your transom boards should make contact with the aluminum hull.

The hardware store only has a limited selection of carpeting so you might make sure that carpet color will match your Rust-Oleum color since you're still in the planning stages.

I would suggest doing only the minimum stuff to get it on the water and then spend money on the extras next year were budget providing.

The $600 welder sounds cool to me also but the sticks Waterman suggested sound like they work and would be hundreds of dollars cheaper so maybe you don't need the welder at this time?
 

Woodonglass

Supreme Mariner
Joined
Dec 29, 2009
Messages
25,924
What's the approximate Sq. Footage of ALL the wood you will be sealing. I agree with WM that the Rustoleum anti Skid is NOT the same as the beads. It all depends on the style of antiskid you're looking for.
 

Pusher

Lieutenant
Joined
Sep 2, 2014
Messages
1,273
*I'm sure you've seen elsewhere, but your transom boards should NOT make contact with the aluminum hull.*

Sorry, didn't have time to proof read
 

axlr8

Petty Officer 2nd Class
Joined
Nov 12, 2013
Messages
100
Thank you guys for giving me advice, I really take it seriously when you are suggesting something. As you should know by now, this is my first boat rebuild, so I am pretty green at it...

PatfromNY, After reading and thinking about the mixture a little more, it is a no brainer for me to use the mixture, it is intended to help the plywood soak up the urethane more as well as the linseed oil. I will probably buy enough stuff to make up 2 gallons of the mix. I would rather have extra than not enough.

Watermann, What size poly beads did you use? I searched Epiphanies poly beads on google and there were a few different size choices that popped up.. I think the pumice will be a little to sharp of a antislip finish for me. I know it is really hard to judge this stuff without having a texture to feel, but Im thinking from the pictures you posted and reading a few different threads elsewhere, that the Rustoleum and poly beads are going to be what I am searching for as far as texture wise. Keep in mind this will be a fishing/leisure boat and barefoot walking will be happening on the boat. The last thing I want is to create something that feels like walking on sandpaper. I think I am going to tear it down and at minimum do the leak test and possibly gluvit the seams/rivets while I am in there. I am a firm believer in the saying "If it is worth doing, its worth doing right." And at this point, I am looking for suggestions like you made to make sure that i am not missing something that will later bite me in the rear end. Thanks for the suggestion!!

Pusher, when you mentioned hook snags, you almost gave me an instant headache... I absolutey dispise having to un snag a treble hook from a net, much less the carpet of a boat... Another good reason to not go with carpet!! At this point it is crazy for me to want to paint the floors or vinyl the floors and paint the gunnels. I am thinking that if I paint the gunnels, then I can paint the floor as well. Atleast then if I am not crazy happy with the way that the paint turns out, I can put an alternate flooring over the top of it. Rather than having to do it the other way around and remove the carpet/vinyl and start from scratch. I plan to paint the transom skin before I attach the new transom back to it. I think Watermann suggested that in the original transom replacement advice and it seems like it is a no brainer to do that when I am in there already. On the welder subject, it is absolutely not a necessity, and definitely not coming out of the boat budget. My brother and I would be splitting the investment, I learn to run the process and then I teach him. We will see where I sit with fundraising for that later on. Its a want more than it is a need. I will likely fix my holes with one of the affordable processes mentioned earlier, again, keeping the build as affordable as possible. P.S. Please follow along and add input where you see fit! I need it!

Woodonglass, I honestly have no clue on square footage at this time, but that will be something that I measure before I get too crazy buying materials and pieces for the new floor. I will probably not do a speck of work on the floor until I get the transom rebuilt and installed. One major thing at a time is what I am hoping to cover.

I will probably pick up a quart of rustoleum paint of the color that the lady and I finally decide on.... and mix in some poly beads to see what the texture turns out like. If I am not satisfied, I'll continue to search from that point on. I never got a for sure measurement on the transom thickness, but it was near the 1.5" mark where I could reach a tape measure into, so I am thinking a sheet of plywood, a bottle of glue, enough poor mans epoxy for the transom, screws, paint for transom skin and a day or two of my time, and I should have the transom replaced and have that project checked off my list. I am really getting excited about this to be completely honest!

Not as much of a worry, but I still have not been able to locate the right windshield screw cover for my boat... I have a few samples on the way and hopefully one of them works out, otherwise I will load up a few pictures and dimensions of what I am looking for and see if you guys can offer me some advice on that spectrum too!

Thanks for all the helpful suggestions! I do appreciate it and take it into serious consideration.
 

Teamster

Lieutenant Commander
Joined
Nov 8, 2010
Messages
1,923
The only way hooks grab carpet is if it is closed loop,...

Open loop doesn't grab hooks,.....

Everyone seems to hate carpet, Take care of it and it's fine,..

And it more comfortable to walk barefoot on,...
 

Patfromny

Lieutenant Junior Grade
Joined
Dec 2, 2012
Messages
1,197
Axlr8, sounds like you have been leaning in the right direction in all aspects of the build. I built mine in stages. You can buy quarts and half gallons of each chemical you need for the old timers formula. you will be mixing up small batches at a time anyway. make just enough for a coat. with the epoxy I think I made a quart at a time. I'm not sure about the old time formula but I would guess you could make a quart of it and seal up anything you haven't used in a quart container. They sell them empty at most part stores and probably at Home Depot. it is just an empty Paint quart can with the lid. I didn't have that option with the epoxy, once mixed you have to use it or it will kick and solidify.
Samples of anything you are thinking of doing is a good idea. it is nice to see something in person before doing the whole floor, for example,and not liking it. The sample will also give you some practice on mixing and mix ratios with the bubbles as well as even honing your technic for application.
The transom doesn't necessarily need to be painted but wouldn't hurt. Starcraft transoms are exposed to the elements and are actually the back wall of the splash well. if your boat is the same then I would Paint. if your boat is like mine and it is completely covered up by metal then you can still Paint it with a couple of coats for extra protection but it isn't critical as long as you have sealed it well with the old timers formula and coated with a couple of final coats of straight varnish.
The leak test is essential and if you find leaks they must be fixed and then gluvit applied. to do the leak test, you must have all the flotation foam out of the boat.
It is nice to hear that you will be tackling this project with your brother. My brother helped me out a bunch on my build and it actually helped mend some old bad feelings between us. An extra set of hands is a must at certain stages of the build and just having company or someone pushing you along is great for the motivation. keep on trucking err boating?
 

Watermann

Starmada Splash of the Year 2014
Joined
Jan 12, 2013
Messages
13,753
The Epifanies beads I bought came in the 20 gram bottles which is enough for 1 qt of paint. I don't know if your finding them in different size beads or containers? I can't show you where I bought mine, they're a competitor of iboats but they cost $10.58 per container. I also added catalyst hardener to the mix too.
 

axlr8

Petty Officer 2nd Class
Joined
Nov 12, 2013
Messages
100
I don't understand what is meant by this. ?

I think he is talking about painting the transom skin before attaching wood to it. He posted above that the bare wood SHOULD make contact, but mistyped it.
He is suggesting painting the aluminum to prevent galvanic corrosion.. I think...?
 

axlr8

Petty Officer 2nd Class
Joined
Nov 12, 2013
Messages
100
Wow, Watermann, if I would type that E word correctly, that would help! I was a few letters off and was getting results for jewlery making beads instead of the antislip ones that you suggested. My confusion is fixed! Thanks!
 

Watermann

Starmada Splash of the Year 2014
Joined
Jan 12, 2013
Messages
13,753
I still spelled it wrong with an i in the E word. :lol:

Here is a google search for the E word. :joyous:
 

axlr8

Petty Officer 2nd Class
Joined
Nov 12, 2013
Messages
100
Im glad we got that figured out! Haha, I book marked the page so I can find them easier next time!
 

axlr8

Petty Officer 2nd Class
Joined
Nov 12, 2013
Messages
100
Ok, I have got some news, and some questions as well...

I purchased enough material to make a gallon of the Old Timers sealer, is it a bad idea to mix it up and store it in a metal 1 gallon paint can? Or should it be used immediately after mixing??

My total came to just short of $40 for all the liquids and a one gallon steel can. Not bad if I say so myself, although I am sure I could find better prices if I shopped around a bit.


Today was my first day of Christmas break and i pulled the boat out of the shed, and started to go deep into the transom and see what I could find.... I have a few pictures to upload and share.. they are loading as we speak.

The boat ended up having a 2" transom which is comprised of a pair of 3/4" exterior pieces, and a 1/2" core piece. Overall, the dimensions of the transom are 23" x 74". I was hoping that i would be able to build a transom from a single sheet of 3/4", but the boat thought differently of course.

Therefore, I bring another question to the table... how much glue am I going to need for 2 laminations??? Is 2 quarts going to be enough or should I spring for a gallon and be safe?

I will definitely be asking a lot more questions as we go on here, just so I dont have to redo any part of this rebuild.

Ill post the pictures in a few minutes.
 

axlr8

Petty Officer 2nd Class
Joined
Nov 12, 2013
Messages
100
After finally tearing into the splashwell assembly, I figured how to remove it somewhat gracefully (NOT) and managed to wiggle it out of the boat and open up the rear end of of the boat. I will admit that I would LOVE to be able to just run the boat without the enormous splashwell in the back. having it out almost doubles the space in the rear of the boat... I am still contemplating attempting some type of splashwell modification, but for now, the original will do me just fine. Here is the aftermath of dissassembling the splashwell...


Removed the port side transom cap partial piece, wood looks OK, no moisture...


Cannot say the same thing for the starboard side...... there is nothing left....


So as you can see below, I am grateful to have been urged to do a complete transom replacement instead of just bolting on a motor and opening it up. I will feel so much more comfortable knowing that the boat is safe and structurally sound.

 
Top