Which gasket is better for impeller install, metal or fiber?

stormulus

Seaman Apprentice
Joined
Oct 1, 2020
Messages
45
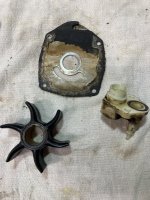
That should clean up fine. I've only replaced mine once, so I cannot comment on the 2 grooves on the shaft. The tube that looks deformed (I don't think its supposed to look like that) is a sleeve. The part that the sleeve is connected to is the water tube coupling, and it has 2 o-rings inside it. When connecting the upper and lower units together, the water tube in the upper unit goes into the sleeve and then into the coupling and is sealed by the 2 o-rings. To me it seemed the sleeve was there to help guide the water tube into the coupling before the other parts of the upper and lower units (other than the shaft) made contact.

I can't imagine why the sleeve looks like it does, however I'd replace that and also would check the condition of the water tube in the upper unit.

I believe the only other seal is the face seal, which is at the bottom of the shaft in your pictures
 

Drcoffee

Petty Officer 1st Class
Joined
Aug 26, 2021
Messages
220
The deformed sleeve guides the water pipe into the pump. It doesnt seem to much else. I used my heat gun this afternoon and reshaped it so its round again. Should be fine for what it does. The grooves in the shaft, while not ideal is probably fine with new o-rings and lube. The gear case is not pressurized so forced flow of oil out or water in should be negliable.

while Im at it and have it disassembled, I bought a new shift shaft assembly With the new design. Looks easy enough to swap out.
 

Attachments

  • 41B68076-1BD5-4C95-BE18-D2CC70B6D24C.png
    41B68076-1BD5-4C95-BE18-D2CC70B6D24C.png
    970.3 KB · Views: 3
Last edited:

Drcoffee

Petty Officer 1st Class
Joined
Aug 26, 2021
Messages
220
I installed the Quicksilver 8M0100526 kit last October. The documentation that came with it (which I still have) lists Mercury 8M0100527 number too. Under Installation Instructions, the first sentence says "for complete installation instructions, refer to the appropriate Mercury Marine service manual." Also it has a picture which shows the metal gasket installed first, then the metal faceplate, then the fiber gasket on top ( it notes the fiber gasket's silicone sealing bead should face up.)

So I referred to Service Manual #14 (Alpha One, Gen II drives), which indicates to apply Perfect Seal to the lower gasket ( I used permatex aviation on both sides) and install it, then the faceplate, then the upper (fiber) gasket (with the silicone sealing bead facing up.) I did that and it has worked fine.

The service manual also indicates to apply Perfect Seal to the threads of the 4 screws before installing them.

I must say the Mercury OEM service manuals for the engine and drive are amazing in the amount of detail shown.

Im coming from this perspective. My boat is 26 years old. While the information is mostly accurate, some parts have been updated, upgraded, or modified over the last 2 decades. The manual does not, will discuss the new pump seal which is just 3 years new. Which is why I started this thread. specifically to find out from blokes who have hands on experience to see if its a good replacement or just an aftermarket gimmick. Going back to the service manual for instruction doesnt really help. :)

but if the grizzled old sailors cant help or wont help, thats cool. There are many people here who will share their experience and wont talk down to a new member. Bottonsupscott, Lets get past this personal issue and discuss the task at hand.
 

stormulus

Seaman Apprentice
Joined
Oct 1, 2020
Messages
45
You are welcome to have whatever perspective you want. All I'm telling you is that I bought and installed the OEM kit, which came with the metal gasket
and documentation that noted in its first sentence to see the service manual for installation instructions, and then went on to describe what those instructions said.

I suppose if I had kept my response to something like "i've used the OEM kit with the metal gasket. use permatex aviation on both sides of the metal gasket, place that first, followed by the metal faceplate and then the fiber gasket with the silicone bead facing up", without any indication that I got that information straight from the service manual, it would have been a satisfactory answer.

I must say, you have a knack for inspiring others to offer you assistance.
 

Drcoffee

Petty Officer 1st Class
Joined
Aug 26, 2021
Messages
220
You are welcome to have whatever perspective you want. All I'm telling you is that I bought and installed the OEM kit, which came with the metal gasket
and documentation that noted in its first sentence to see the service manual for installation instructions, and then went on to describe what those instructions said.

I suppose if I had kept my response to something like "i've used the OEM kit with the metal gasket. use permatex aviation on both sides of the metal gasket, place that first, followed by the metal faceplate and then the fiber gasket with the silicone bead facing up", without any indication that I got that information straight from the service manual, it would have been a satisfactory answer.

I must say, you have a knack for inspiring others to offer you assistance.

I am sorry, I wasnt questioning your reply. I was trying to respond to the last 3 posts at the same time. I appreciate your input and shared experience.
whats interesting is a few posts back someone shared info from a source that it was to be i stalled dry.
 

stormulus

Seaman Apprentice
Joined
Oct 1, 2020
Messages
45
Scott06 mentioned he contacted the Merc tech line and their response was to install it dry.

did you check the water tube coming from the upper unit to see if it is also deformed? (you mentioned a temp issue in post #29)
 

Drcoffee

Petty Officer 1st Class
Joined
Aug 26, 2021
Messages
220
Scott06 mentioned he contacted the Merc tech line and their response was to install it dry.

did you check the water tube coming from the upper unit to see if it is also deformed? (you mentioned a temp issue in post #29)
Stormulus,

When I removed the pump this morning the old fiber gasket looked like hell, torn up and missing in spots. So I followed your lead, used the steel lower gasket, applied the permatex aviation to both sides of the gasket and it looks like it will last a lifetime.

whoever did this impeller swap last time didnt check the pump housing clearance to the shaft and it was rubbing, left a nice groove in the shaft. It wont impact any seals but it could un-center the shaft while running. I ended up using a dremmel to open the hole slightly on the tight side to give the shaft 1/16” of room all the way around.

The next step is to reinstall the lower unit. Thanks for everyone’s help and input. We all learn from others experiences and it considerably shortens the learning curve.
 

Grub54891

Vice Admiral
Joined
Jun 17, 2012
Messages
5,927
HHMMM.... never had a shaft rubbing the housing. A new housing sounds like you should have.
 

Drcoffee

Petty Officer 1st Class
Joined
Aug 26, 2021
Messages
220
that's odd that the housing was rubbing. maybe it was an aftermarket?
Yup, from the look of the old parts, it was aftermarket alright. The next time I do this, I will get a new housing too. I feel better knowing the key parts are all new now. You just never know what the PO did or didnt do.

You can see where water was getting past the gasket. The topside had a circular groove cut into it from the impeller core. Im thinking the metal gasket will give a tighter seal to the pump with the gasket compound on both sides.
 

Attachments

  • C7A80244-14AF-45AB-B767-8AC83EA4FD77.jpeg
    C7A80244-14AF-45AB-B767-8AC83EA4FD77.jpeg
    2.8 MB · Views: 14
Last edited:
Top